While upgrading one of my Exchange lab servers I was presented with the error, “The certificate is expired.”
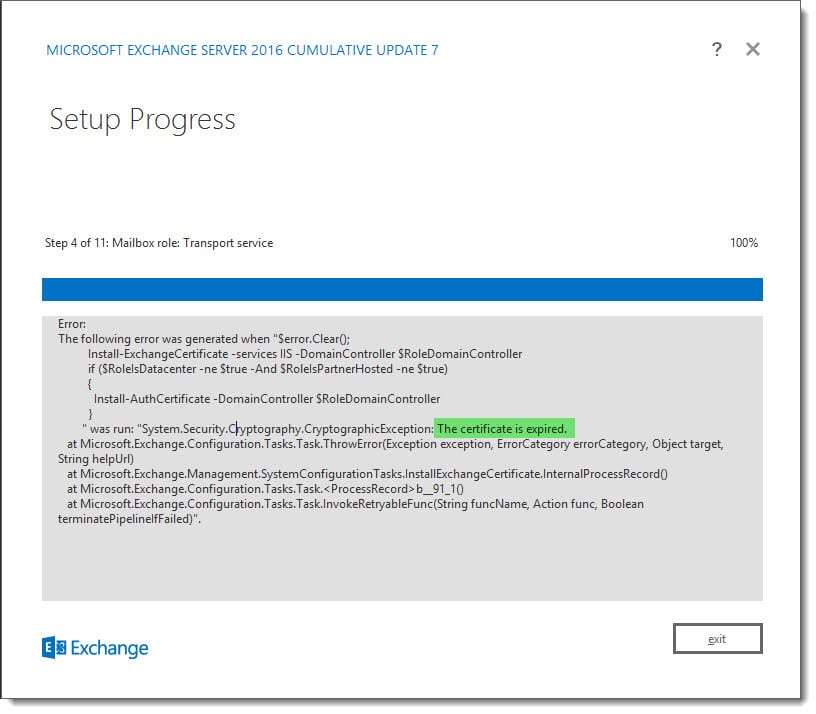
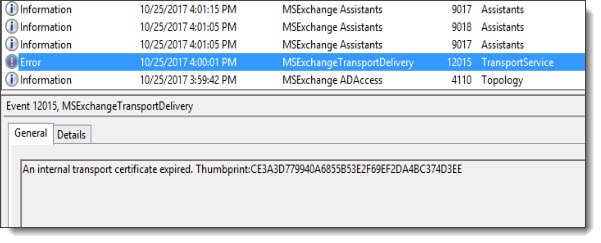
This error occurred while setup was installing the transport service and it was blocking the install from completing. Further investigation of the event logs indicated that the transport certificate had expired (Event ID 12015). This made sense why the setup was failing during that step.
The challenge here was the Exchange Admin Center would no longer load. Luckily, the Exchange Management Shell was still operational. The following are the steps to renew a certificate using the Exchange Management Shell. I have included instructions for renewing both a self-signed and third-party certificate. Once renewed setup will complete. If you have multiple Exchange servers in your lab it is also possible to do this task remotely against the problem server.
Real World: In hindsight, trying to perform a cumulative update with an expired certificate probably won’t happen to most. Expired certificates in Exchange raise errors very quickly. For me, this issue occurred in my lab environment. One of the inherent problems with home labs is the seldom receive good care and feeding. My expired cert is certainly a prime example of this problem.
Renewing a third-party certificate with PowerShell
To renew the expired certificate we first need to locate its thumbprint. We saw the thumbprint in the event logs, but it’s also possible to get this with PowerShell. To do this issue the following command.
C:\> Get-ExchangeCertificate | Where {$_.IsSelfSigned -eq $false} | FL FriendlyName,CertificateDomains,Thumbprint,NotAfter,ServicesThis will return all third-party certificates (not self-signed). In our example, we see just a single certificate returned. This certificate is named webmail.exchangeservergeek.com and has a corresponding thumbprint. The NotAfter value indicates the expiration date of our certificate. This is the certificate we will be renewing.
 C:\> Get-ExchangeCertificate | Where {$_.IsSelfSigned -eq $false} | FL FriendlyName,CertificateDomains,Thumbprint,NotAfter,Services

FriendlyName : webmail.exchangeservergeek.com
CertificateDomains : {webmail.exchangeservergeek.com, autodiscover.exchangeservergeek.com}
Thumbprint : CE3A3D779940A6855B53E2F69EF2DA4BC374D3EE
NotAfter : 9/28/2017 8:00:00 AM
Services : SMTP, IIS
Now that we have the thumbprint, let’s renew the certificate. To do this issue the following command. Be sure to use your thumbprint here.
C:\> Get-ExchangeCertificate -Thumbprint CE3A3D779940A6855B53E2F69EF2DA4BC374D3EE | New-ExchangeCertificate -GenerateRequest -RequestFile "\\ex16-02\c$\users\supertekboy\desktop\certreq.txt" -PrivateKeyExportable:$trueIn this command:
-Thumbprint identifies the certificate we plan to renew.
-GenerateRequest specifies to create a certificate request file for use with a third-party. Omitting this parameter would generate a self-signed certificate.
-RequestFile is the save location for the certificate request file. This location must be in the form of a UNC path. In our example, we specify a file called certreq.txt at the path \\ex16-02\c$\users\supertekboy\desktop\.
The certificate request data will be returned both in PowerShell and also saved to the file at the UNC path. Either copy the output from PowerShell, or, from the file located at the UNC. Be sure to include the BEGIN and END lines.
At some point, the third-party certificate authority will ask you to paste the contents of the certificate request file into their system for processing. For specific steps on how to do this check with your certificate provider. From the certificate request, the provider will identify all the subjects and alternate names you need. The validation process will then begin.
The validation process can vary between providers as well. Some providers will perform a simple domain validation where they send an email to the recipients listed on your domain registration. Others will perform more extensive checks including the validation of your business against various agencies.
Once your identity has been validated and your certificate approved, download and unpack the cert. In our case, we will save the unpacked cert to our server’s desktop.
To complete the certificate request we need to run the following command.
 C:\> Import-ExchangeCertificate -FileName "\\ex16-02\c$\users\supertekboy\desktop\webmail_exchangeservergeek_com.cer" -PrivateKeyExportable:$true

Thumbprint                                 Services   Subject
----------                                 --------   -------
95194B92F3CFFC9CE7F3C8A94B48E3973D472195   .......    CN=webmail.exch...
In this command:
-FileName specifies the UNC path to the certificate file we unpacked from the 3rd party provider.
-PrivateKeyExportable allows us to export the certificate for use elsewhere (when set to $true).
This process issues a new thumbprint. The renewed certificate is actually a duplicate. This minimizes downtime for your users because it allows you to process the certificate renewal without affecting Exchange services.
This certificate is not yet live. To make it live we must assign services to the certificate. To do this we run the following command (be sure to use the new thumbprint).
C:\> Enable-ExchangeCertificate –Thumbprint 95194B92F3CFFC9CE7F3C8A94B48E3973D472195 –Services "IIS, SMTP"Assigning the SMTP service to our certificate overwrites the expired transport certificate that was preventing us from upgrading Exchange. If you rerun the Get-ExchangeCertificate cmdlet you will notice the duplicate certificate. The one with the later “NotAfter” date is your new certificate.
 C:\> Get-ExchangeCertificate | where {$_.IsSelfSigned -eq $false} | Format-List FriendlyName,Thumbprint,NotAfter,Services

FriendlyName : webmail.exchangeservergeek.com
Thumbprint : 95194B92F3CFFC9CE7F3C8A94B48E3973D472195
NotAfter : 9/28/2018 8:00:00 AM Services : IIS, SMTP

FriendlyName : webmail.exchangeservergeek.com
Thumbprint : CE3A3D779940A6855B53E2F69EF2DA4BC374D3EE
NotAfter : 9/28/2017 8:00:00 AM Services : SMTP
The blue thumbprint identifies our new certificate. The yellow thumbprint identifies our expired certificate. Now that we have successfully assigned services to our new certificate we can safely delete the old certificate.
To delete your old certificate run the following command, specifying the old thumbprint. Hit Enter to confirm.
 C:\> Remove-ExchangeCertificate -Thumbprint CE3A3D779940A6855B53E2F69EF2DA4BC374D3EE

Confirm
Are you sure you want to perform this action?
Remove certificate with thumbprint CE3A3D779940A6855B53E2F69EF2DA4BC374D3EE from the computer's certificate store?
[Y] Yes [A] Yes to All [N] No [L] No to All [?] Help (default is "Y"):
With the certificate successfully renewed you can now resume your Exchange update.
Renewing a self-signed certificate with PowerShell
Renewing a self-signed certificate is much simpler. Like before we need to locate the thumbprint of our self-signed certificate with PowerShell.
C:\> Get-ExchangeCertificate | Where {$_.IsSelfSigned -eq $true -and $_.NotAfter -lt (Get-Date)} | FL FriendlyName,CertificateDomains,Thumbprint,NotAfter,ServicesThis will return all self-signed certificates that have an expiration date (NotAfter value) less than today’s date. If you were using the default out-of-box certificate for SMTP then look for the certificate named Microsoft Exchange. If you have multiple Microsoft Exchange certificates the cert with the most recent expiration is likely the one needing to be renewed. This is the certificate we will be renewing.
 C:\> Get-ExchangeCertificate | Where {$_.IsSelfSigned -eq $true -and $_.NotAfter -lt (Get-Date)} | FL FriendlyName,CertificateDomains,Thumbprint,NotAfter,Services

FriendlyName : Microsoft Exchange
CertificateDomains : {EX16-01, EX16-01.SKARO.LOCAL}
Thumbprint : 3C82C6FAD029B8667E162E15E938A57F5AF6F03D
NotAfter : 9/28/2017 8:00:00 AM
Services : IIS, SMTP
Now that we have the thumbprint, let’s renew the certificate. To do this issue the following command. Be sure to use your thumbprint here.
Unlike the third party certificate, the self-signed certificate will immediately prompt you to overwrite the current SMTP certificate. Hit enter to accept the default response of Yes.
 C:\> Get-ExchangeCertificate -Thumbprint 3C82C6FAD029B8667E162E15E938A57F5AF6F03D | New-ExchangeCertificate

Overwrite the existing default SMTP certificate?

Current certificate: '3C82C6FAD029B8667E162E15E938A57F5AF6F03D' (expires 9/28/2017 8:00:00 AM)
Replace it with certificate: 'D9FBC6C4E6F33178902FE2DA03B1696ACA1E291E' (expires 9/28/2021 8:00:00 AM)
[Y] Yes [A] Yes to All [N] No [L] No to All [?] Help (default is "Y"):

Thumbprint                                 Services   Subject
----------                                 --------   -------
D9FBC6C4E6F33178902FE2DA03B1696ACA1E291E   ....S..    CN=EX16-01
The output under the Services column shows a letter “S” to signify SMTP is enabled on the new certificate. Now that we have successfully renewed our new certificate we can safely delete the old certificate.
To delete your old certificate run the following command, specifying the old thumbprint. Hit Enter to confirm.
 C:\> Remove-ExchangeCertificate -Thumbprint 3C82C6FAD029B8667E162E15E938A57F5AF6F03D

Confirm
Are you sure you want to perform this action?
Remove certificate with thumbprint 3C82C6FAD029B8667E162E15E938A57F5AF6F03D from the computer's certificate store?
[Y] Yes [A] Yes to All [N] No [L] No to All [?] Help (default is "Y"):
With the certificate successfully renewed you can now resume your Exchange update.

We would love to hear from you. Have you ever run into this error? Drop a comment below or join the conversation on Twitter @SuperTekBoy.

Great write up as usual Gareth! Clear, concise and easy to follow.
Cheers,
Alternately, you can bypass purchasing a new certificate by binding the self-signed certificate to ‘https’ in the IIS Default Web Site of the Exchange server being updated.
Or, use the free SSLs at https://letsencrypt.org/ 😉