In this article, we are going to take a look at changing which objects get synced to Office 365 through organizational unit (OU) filtering. By default, Azure AD Connect is configured to sync all objects in all OUs. Filtering allows us to exclude OUs, and the objects they contain, so they are not synchronized to Office 365. An example of this may be to exclude an OU that contains service accounts for on-premises applications.
In our example, we are going to narrow our sync scope to just a few select organizational units in the domain skaro.local. We will be working with the latest version of Azure AD Connect and a single forest environment.
Let’s get started!
UPDATE 08/04/18: While these steps do still work, Microsoft recommends changing your OUs by rerunning the Azure AD Connect wizard. This can be done by double-clicking the Azure AD Connect icon. If the wizard does not work, you can use these steps as a fallback method.
Selecting which OUs to synchronize
First, log onto the server where you have Azure AD Connect installed and open the Synchronization Service program.
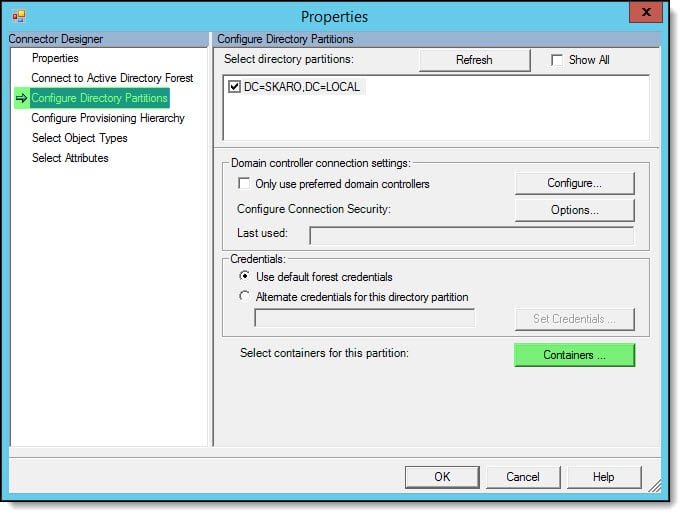
This opens the Synchronization Service Manager. From here select the Connectors tab. Under the Connectors section double-click the name of your local Active Directory. In my example, this is SKARO.LOCAL. This will bring up the Properties screen for that connector.

From the Properties screen, select Configure Directory Partitions. Then select the Containers button.
This will launch a screen requesting credentials. The credentials you enter here do not necessarily need to be admin credentials. Azure AD Connect just needs an account that can read Active Directory. Once the credentials are entered click Ok.
This will bring up the Select Containers screen where you can pick which organizational units you want to include or exclude.
- Unchecking a box will remove all objects contained within that organizational unit from the synchronization process
- Checking a box will add all objects contained within that organizational unit to the synchronization process
In our example, we are going to uncheck everything except ‘Whoniverse’ and its child OUs. This means that only objects under those checked OUs will be synchronized to Azure AD. Anything under an unchecked OU will be removed from Azure AD. Click Ok twice.

Keep in mind that if you previously synced an object to Azure AD and that object is now contained in an excluded OU that object will be deleted from Azure AD during the next synchronization. All data associated with that object, such as a mailbox or OneDrive storage will be deleted. The good news is that the data is soft deleted. You can recover this accidentally deleted object (and its data) by either including that organizational unit back into the sync, or, by moving that object into an organizational unit that is still included in the synchronization.
Note: Soft deleted data does have an expiration date and when reached that data is permanently deleted.
Applying the changes
For these changes to take effect we need to perform a full synchronization. The easiest way to accomplish this is to open PowerShell on the server with Azure AD Connect installed and run the following command. While the policy type of “Initial” does sound like it might wipe and replace everything in Azure AD be assured that it does not. Initial just means a full synchronization.
C:\> Start-ADSyncSyncCycle -PolicyType Initial
Note: A full sync will take considerably longer than a delta sync. For organizations with tens of thousands of objects, this may take several hours to complete. It is worth noting that while a full sync is taking place, delta syncs cannot occur. Any changes made to local AD during the full sync will have to wait till the full sync completes and a new sync is initiated.
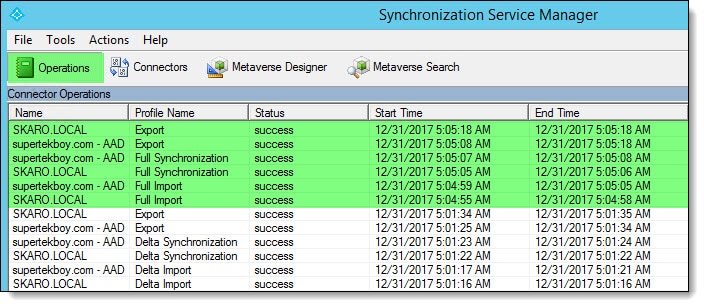
We can monitor the progress of the full sync through the Operations tab in the Synchronization Service Manager. For a single forest environment, you should see 6 rows for the full synchronization all marked with success. You can select each row to examine more detailed reports about what is being added or removed from Azure AD.
After the full sync completes only objects contained in included OUs will appear in Office 365. All other objects will be removed. With the full sync complete, delta syncs will automatically resume based on their configured schedule. If you need to make any changes to the OU selections you will need to repeat the steps above and rerun another full sync.
Note: Azure AD Connect also has a built-in feature to prevent accidental mass deletions. By default, the synchronization service will stop if it sees more than 500 deletes in one sync cycle.

What customization have you made to Azure AD Connect? Drop a comment below or come join the conversation on Twitter @SuperTekBoy.

Hello,
I accidentely set in Ad connect to syncronize all AD users. Now I set only one OU. Is it posssible now to somehow to delete from O365 user accounts that are not in that OU.
Thanks.
Hi Daniel,
It sounds like you may have hit the 500-object accidental deletion threshold. Check this article from Microsoft and see if this helps – https://learn.microsoft.com/en-us/entra/identity/hybrid/connect/how-to-connect-sync-feature-prevent-accidental-deletes?WT.mc_id=M365-MVP-5002016
Hi 🙂
Thanks for the super tutorial 🙂
You write in your tutorial that for previously synced objects, data like a mailbox or OneDrive data can be lost if you move the object to an OU that is not synced.
A mailbox or OneDrive data is bound to a user object and not to a computer object, right?
So if you only move computer objects into OUs that are not synchronized, data like mailboxes or OneDrive data will not be lost, right?
Correct. However, if you are leveraging Hybrid Azure AD Join, or, the computer accounts in your Conditional Access Policies or Intune, you will want to be careful as it could lock you or your users out of your tenant.
If the device is pushed to an OU that is not synchronized, this device will be removed from azure AD.
Then you have to add this device back to the tenant by manually logging out the company account on the device and logging it back in, right? so the device registered again in the azure ad again.
I have had this happen a few times where a user has received a message that the organization has deleted the device after it was moved to an OU that was not synced. After that I had to register it manually again.
Another question would be whether it is possible to activate the synchronization of an OU afterwards where there are already many computer objects in it. Some of them are already registered in Azure AD, some are not and some are hybrid joined devices.
Hey Alex,
I have not tested it, so I am not sure. But it’s possible if the device is still in a soft-deleted state in Azure, it might restore that object (as long as it’s within the soft-deleted window). Any device outside of that window (or was hard deleted) will require registration. Of course, I could be completely wrong on that. I can’t seem to find much out there on the web to confirm or deny my theory.
You see my last answer? 🙂
I have not experienced having the sync connector tool remove Azure containers that were unselected after having previously being selected/synced to Azure.
I initially ran a sync and selected to many OU’s. I unselected the ones I don’t want and re-ran the sync. But all of the originally selected objects remain in Azure. Even if I delete them from Azure, they return a little while later.
How can Azure be repopulated with objects that were de-selected during the sync process?
Did you do a full sync after your made the OU changes? A delta sync is not enough. Has to be an initial (aka full) sync after you do OU changes.
great!!
Thanks so much for providing this, much appreciated!
hi
my on prem AD has two ou A & B
Can i only sync OU A’s user to cloud as mail user and sync OU B’s user to cloud as contact?
thank you
Hey Peter,
You would have to set a custom attribute on those objects and then you could configure attribute-based filtering in Azure AD Connect which only syncs based on the value of that custom attribute. Check here for more details – https://docs.microsoft.com/en-us/azure/active-directory/hybrid/how-to-connect-sync-configure-filtering#attribute-based-filtering
Exactly what I am looking for but to be clear, nothing will be deleted from the on prem AD, correct?
Correct. This won’t touch anything on-prem.
This saved my ass this morning. Thank you for this.
Is there a PS script to export the list of OUs that are selected in AD Connect?
(Get-ADSyncConnector -name csb.com).Partitions.ConnectorPartitionScope.ContainerInclusionList
Similarly you can output exclusion list
(Get-ADSyncConnector -name csb.com).Partitions.ConnectorPartitionScope.ContainerExclusionList
Agree