Microsoft recently released a new feature in OneDrive Consumer called Personal Vault.
Personal Vault adds a layer of security within OneDrive. This means if anyone gains access to your OneDrive (for example, by circumventing your device’s security), they still need to authenticate to get access to the Vault.
This makes the Personal Vault great for securing those critically confidential files, such as a scan of your Passport, Driver’s license, or, Tax ID card.
Personal Vault is available anywhere OneDrive is available. In this article, we explore setting up Vault for the first time and accessing Vault from desktop, mobile, and web.
Note: Free OneDrive plans (like those through Outlook.com) are limited to 3 files in the Vault. Office 365 for Home or Personal does not have this limitation.
Setting up OneDrive Personal Vault on mobile

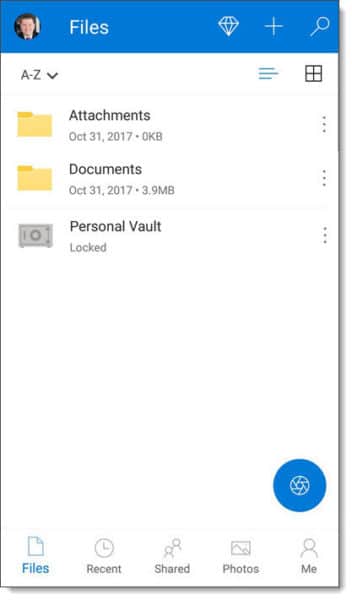
From your mobile device, open your OneDrive app and select the Files tab. You should see a new folder called Personal Vault.
The first time you open Vault, it will walk you through a setup wizard. Click Personal Vault.
The first screen will give you an overview of the Personal Vault. Click Continue. You will then be asked to verify your identity. Click Verify Identity.
Note: The identity verification process will vary based on the mobile device you own and the security you set up with your Microsoft account. For example, you may be required to enter a code from a text or authenticator app.


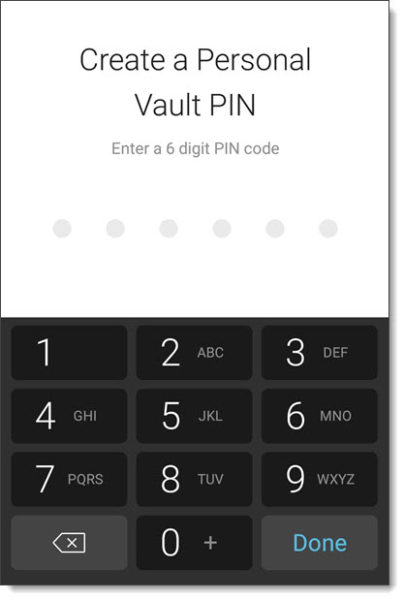
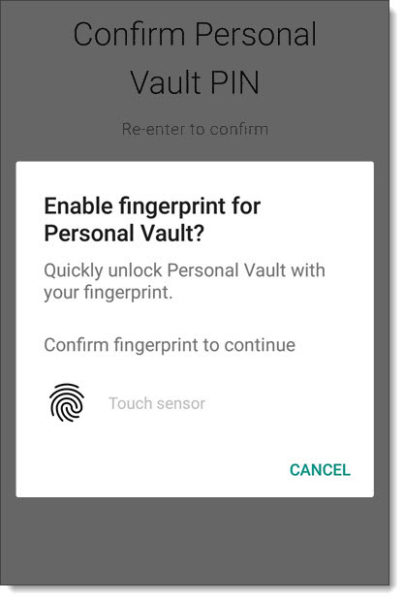
Once your identity is verified, you will be prompted to create a 6-digit PIN for your Vault. Enter a 6-digit PIN and click Done. You will be prompted to confirm that PIN. Enter your PIN a second time to confirm.
Note: The PIN is what you will use to access your Vault. However, if your mobile device supports fingerprint scanning or facial recognition, you can opt to unlock the Vault with those methods instead.
Using Vault on a mobile device
Now that we have out Vault configured let’s unlock it. To do this, tap the Personal Vault folder in your OneDrive app. Type in your PIN (or with your fingerprint or face if configured). The Vault will now be unlocked.
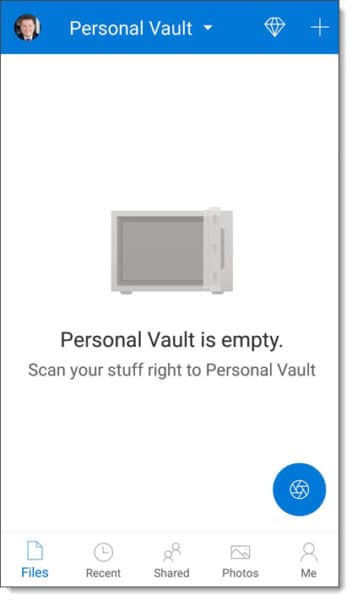
In our screenshot above, our Vault is empty. However, if you had files in the Vault, you would see them here. One method to get files into the Vault is to scan or photograph them.
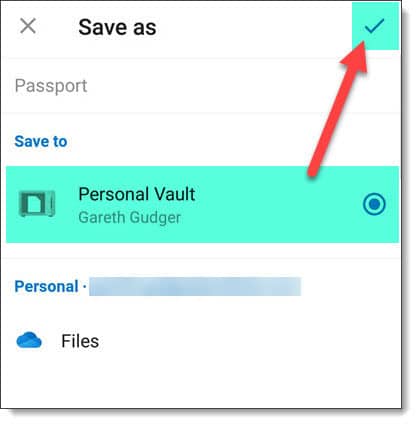
To do this, click the blue Office Lens icon in the bottom right. Using Office Lens, you will then take a photo or a scan of your document. Make any necessary edits to your document in Office Lens and then click Done. You will then be prompted for a save location. Under Save to select Personal Vault and click the checkmark. The document will upload to your Vault.
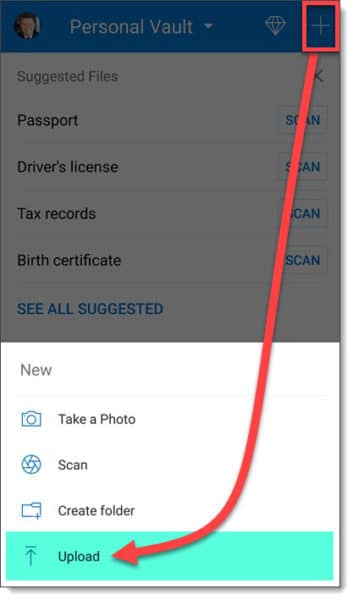
Another way to add files to the Vault is to click the Add (+) button in the top right. This will pop up a menu. Click Upload. The upload option will allow you to add any file (stored on your device or cloud storage) to your Vault.
The Vault is also a target in the Select Destination dialog within OneDrive. Click the three dots next to the file you wish to move, click Move from the menu, select Personal Vault and, click Move Here. Your file will then move from OneDrive to the Vault.

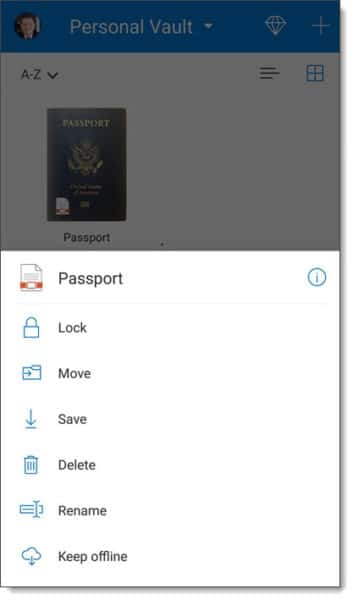
For additional file options, click on the three dots (![]() ) next to the file name. This will launch a menu where you can rename, move, or delete the file.
) next to the file name. This will launch a menu where you can rename, move, or delete the file.
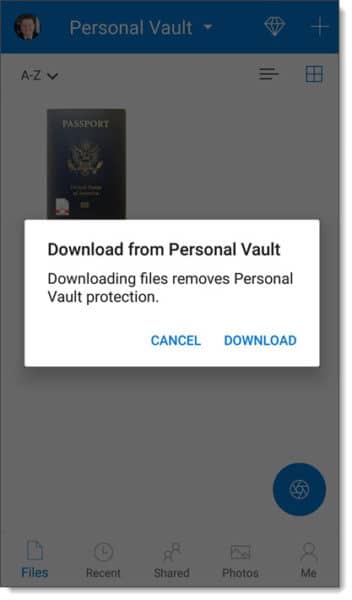
One other option is to download a file from the Vault to your device. If you select this, you will receive a warning that downloading a copy of the file will remove the protection of the Vault. You can confirm this action by clicking Download. You can leave the file under the protection of the Vault by clicking Cancel.
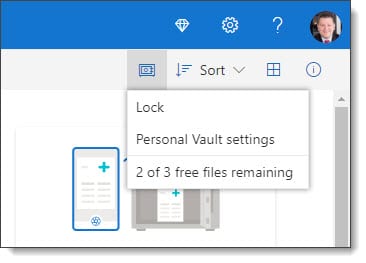
The Vault will lock itself after three minutes of inactivity. If you want to lock the Vault immediately, click Personal Vault at the top of the screen. This will bring up a menu. Click Lock. The Vault will be locked, and you will be returned to your main OneDrive folders.
To change the default inactivity timeout of three minutes, click Personal Vault at the top of the screen. This will bring up a menu. Click Personal Vault Settings. From the settings screen tap Auto-Lock. Pick a new auto-lock time. Options vary from one to ten minutes. The settings page will reflect the new timeout.

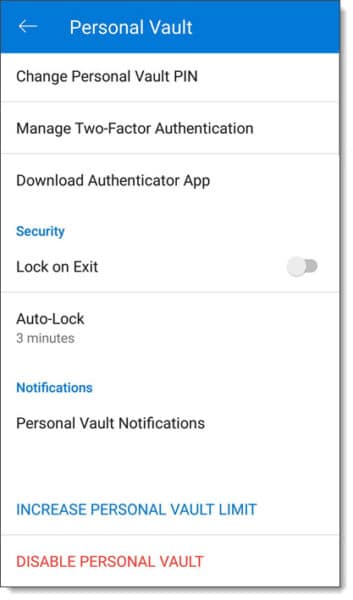
The settings page also allows you to modify your Vault PIN, manage your two-factor authentication, and manage vault notifications on your device.
Using Vault on a web browser
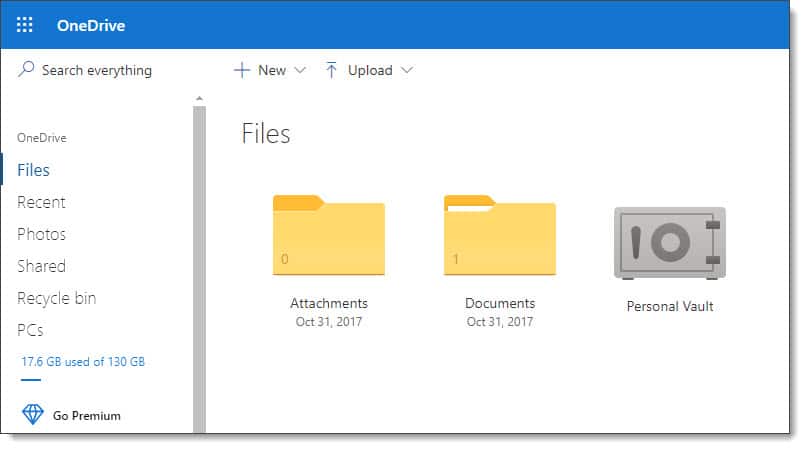
Vault is also available from a web browser. Navigate to onedrive.com and, you will see a new folder titled Personal Vault. Click Personal Vault.
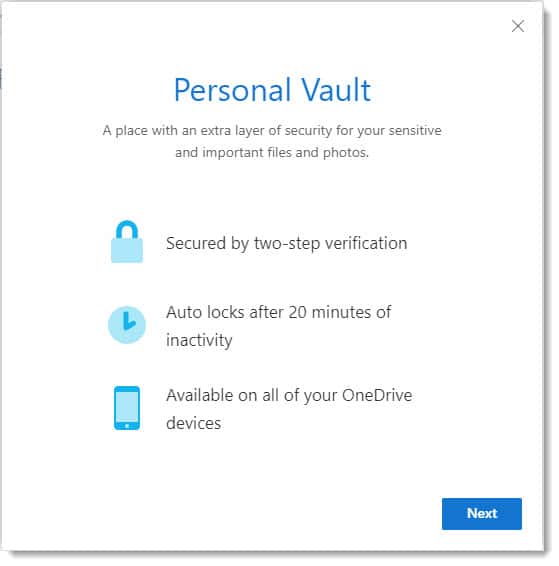
Similar to the mobile client, this will launch a wizard. The first screen will give you an overview of the Personal Vault. One difference in the overview screen is that the timeout for the web is twenty minutes versus the mobile default setting of three minutes. Click Continue.
You will then be asked to verify your identity. Click Verify.
Note: The identity verification process will vary based on the security you set up with your Microsoft account. For example, you may be required to enter a code from a text or authenticator app.
Once verified, your Vault will be unlocked, and you will have access to your Vault files.

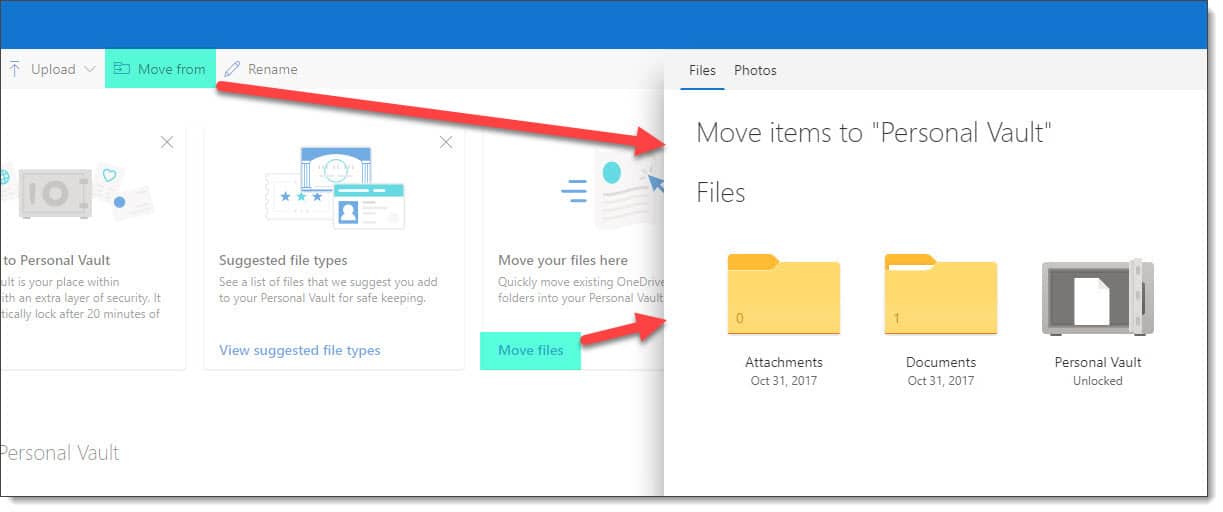
To move an item into the Vault, you can select the Move Files link in the Move your files here card. This will launch a dialog where you can select files or photos from your main OneDrive folders to move to the Vault.
Clicking the Move From button at the top of the screen also opens the same move dialog.
The Vault is also a target in the Select Destination dialog within OneDrive. Select the file you wish to move, click Move to button at the top of the screen, select Personal Vault and, click Move. Your file will then move from OneDrive to the Vault.
Like the mobile version, you can also rename, move, or delete the file. To do this, select the file and pick the appropriate action from the top of the screen.
The Vault will lock itself after twenty minutes of inactivity. If you want to lock the Vault immediately, click the Personal Vault icon at the top-right of the screen. This will bring up a menu. Click Lock. The Vault will be locked, and you will be returned to your main OneDrive folders.
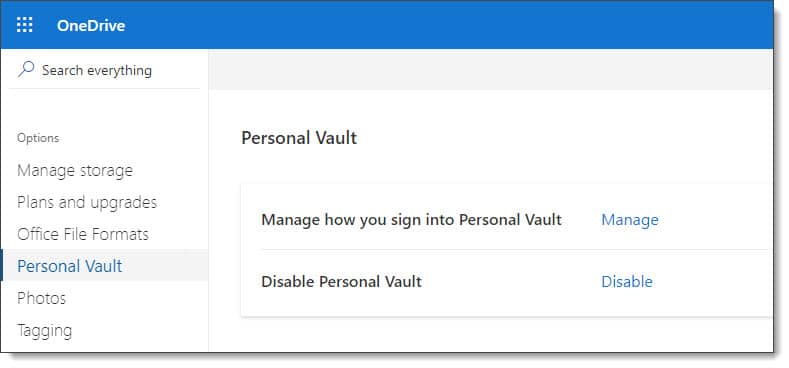
The Personal Vault Settings menu item launches settings where you can disable the Vault, and manage how you sign in.
Note: At the time of writing, there appears to be no way to change the inactivity timeout to anything other than twenty minutes for the web.
Using Vault on Windows 10
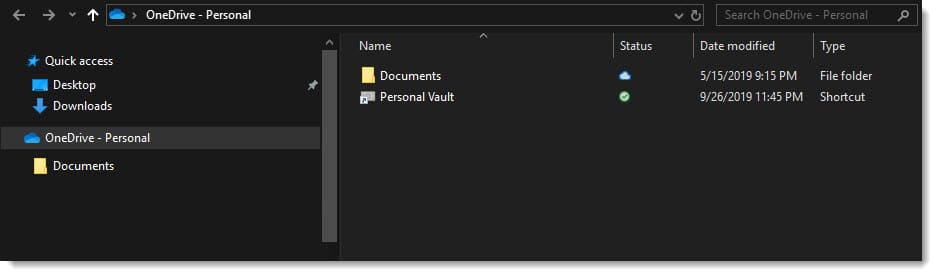
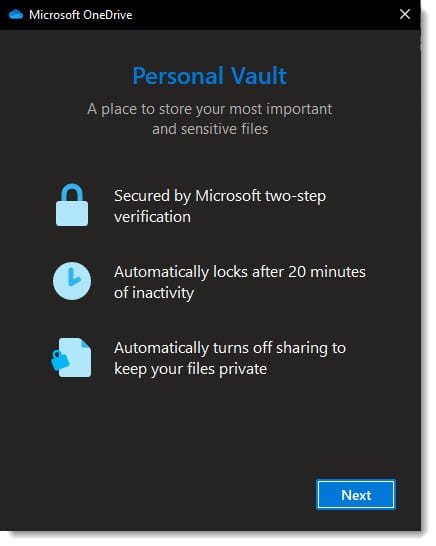
Vault is also available on Windows 10. Open Windows Explorer, expand OneDrive in the folder list and select Personal Vault.
Similar to the web and mobile clients, this will launch a wizard. The first screen will give you an overview of the Personal Vault. Like the web version, the timeout is also twenty minutes. Click Next.
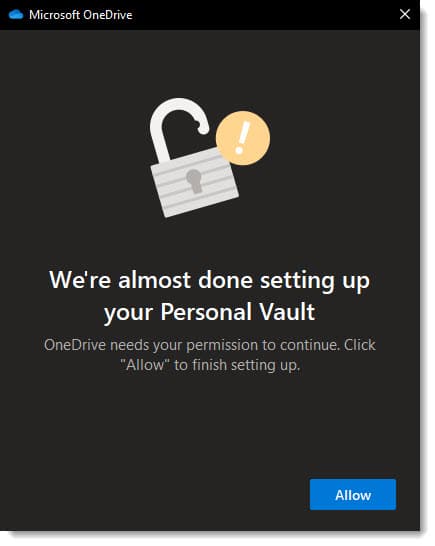
You will then be asked to verify your identity. Click Allow.
Note: The identity verification process will vary based on the security you set up with your Windows PC and Microsoft account. For example, you may be required to enter a code from a text or authenticator app.
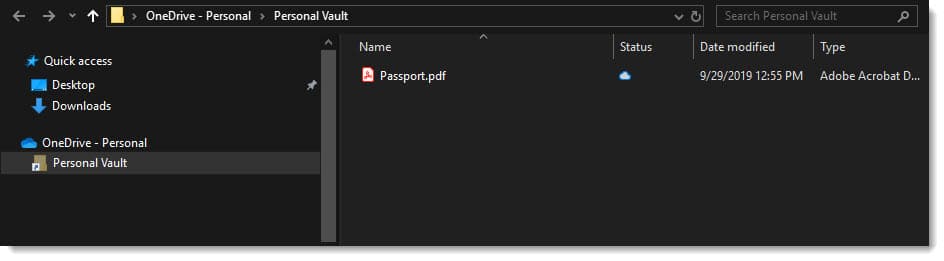
OneDrive will take a few moments as it prepares itself for first-time use. Once prepared, you will see all the documents currently in your Vault.
In our screenshot below, we can see the passport file we uploaded via our mobile client. This file can be moved, deleted, or renamed like any other file within Windows Explorer. The process to transfer files to and from the Vault is as simple as dragging and dropping a file into the Personal Vault folder.
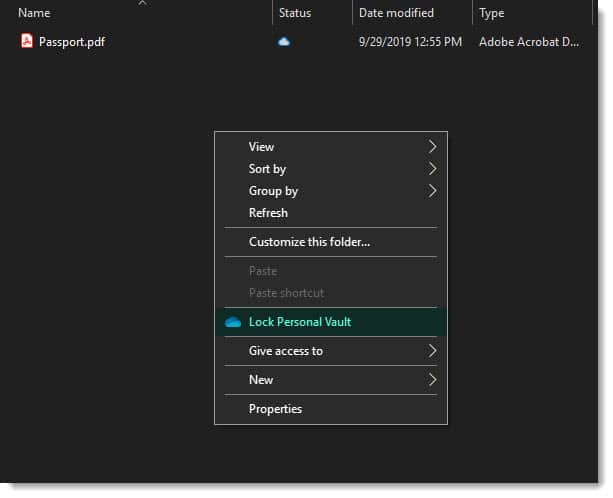
The Vault will lock itself after twenty minutes of inactivity. If you want to lock the Vault immediately, right-click the Personal Vault folder (or right-click any open space in the file view). This will bring up a menu. Click Lock Personal Vault. The Vault will be locked, and the window will close.
Note: At the time of writing, there appears to be no way to change the inactivity timeout to anything other than twenty minutes for the web.

So what do you think about OneDrive Personal Vault? What feature would you like to see added next? Drop a comment below or join the conversation on Twitter @SuperTekBoy.

Leave a Reply