UPDATED: 1/19/2023
Before you install a new version of Exchange, you will need to perform a number of tasks in Active Directory. This is true for both migrating an older version of Exchange, or, installing into a greenfield that has had no prior iteration of Exchange. This will involve the following tasks.
Setup will perform these steps during its main installation if it determines they have not been run. So, you may wonder why you would ever perform these steps manually.
One possibility is that a company operates in a split-permissions model. In large organizations, two separate teams may manage Active Directory and Exchange. If least privilege is in place, it is likely that the Exchange team cannot perform elevated Active Directory tasks such as schema extensions. Similarly, the Active Directory team may not have permission to manage Exchange. In this case, the Active Directory team will need to run the commands manually before the main setup.
Another possibility is that a company may have a large geographically dispersed network with multiple Active Directory sites. It could have its schema master in one site and its Exchange servers in a totally different site. The links between these sites could have any number of restrictions upon them, such as a long interval between replication cycles. In that case, the company will need to run the command manually in the site hosting the schema master and allow time for replication.
This article illustrates how to perform these tasks from a command line.
Tip: These same instructions work for Exchange 2010, 2013, 2016, and 2019 installations. In addition, these tasks often have to be repeated when performing cumulative updates. For more information on whether your cumulative update requires these commands, be sure to check official Microsoft documentation.
Extending the Schema
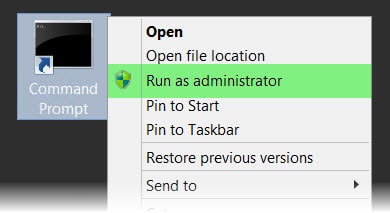
To do this, we must first open an elevated command prompt. We need to do this from a machine running a 64-bit version of Windows. The minimum version of Windows required is dictated by the Exchange Supportability Matrix. This machine must also be in the same site and domain as the schema master. The computer we execute this from does not have to be a domain controller. For smaller companies with a single-domain/single-site environment, we can simply run these commands from the intended Exchange server.
Tip: To perform this update, you must be a member of both the Enterprise and Schema admin groups.
Change to the directory containing your Exchange setup files and issue the following command. Be sure to include the license agreement switch.
Tip: Starting with Exchange 2016 CU22 and Exchange 2019 CU11, Microsoft replaced the /IAcceptExchangeServerLicenseTerms parameter with the option to send diagnostic data to Microsoft. To send the optional data, use the /IAcceptExchangeServerLicenseTerms_DiagnosticDataON parameter. If you do not wish to send any data, use /IAcceptExchangeServerLicenseTerms_DiagnosticDataOFF. Note that this can be changed post-installation using the Set-ExchangeServer cmdlet.
C:\Ex2016Setup> Setup.exe /PrepareSchema /IAcceptExchangeServerLicenseTerms_DiagnosticDataON
After several minutes the command will complete. You should see an output similar to the following.
Welcome to Microsoft Exchange Server 2016 Unattended Setup
Copying Files...
File copy complete.
Setup will now collect additional information needed for installation.

Performing Microsoft Exchange Server Prerequisite Check

    Prerequisite Analysis                                     COMPLETED

Configuring Microsoft Exchange Server

    Extending Active Directory schema                         COMPLETED

The Exchange Server setup operation completed successfully.

c:\Ex2016Setup>
Verifying the Schema
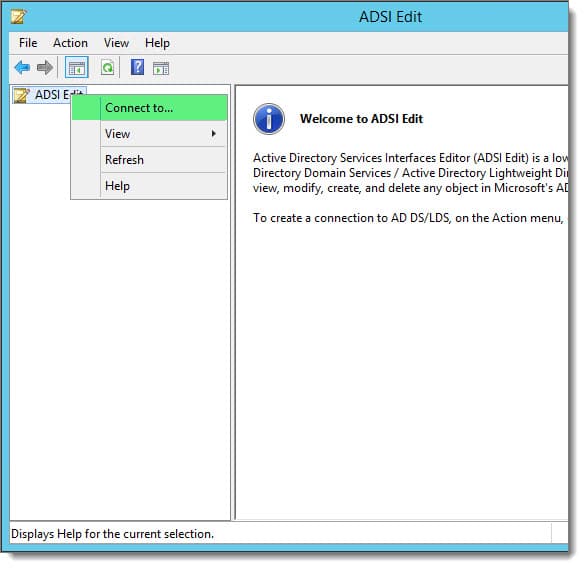
To verify that the schema was successfully extended, we can use ADSI Edit.
ADSI Edit is available from a domain controller, or, a machine running the Remote Server Administration Tools for Active Directory Directory Services (RSAT-ADDS).
Warning: ADSI Edit is a raw editor. Use extreme caution when using this tool.
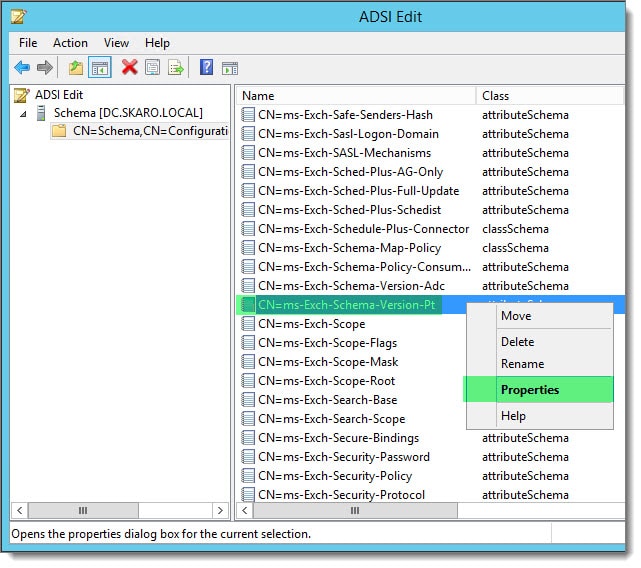
Navigate to Start >> All Apps / Programs >> Administrative Tools >> ADSI Edit.
- Right-click on the top-level node, ADSI Edit, and select Connect To… from the context menu.
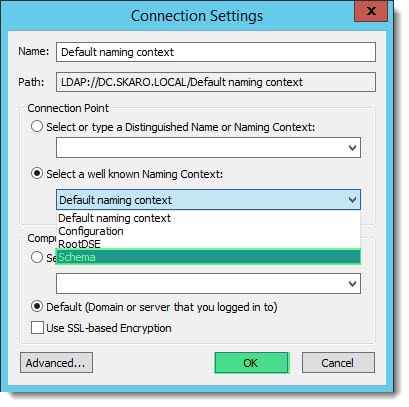
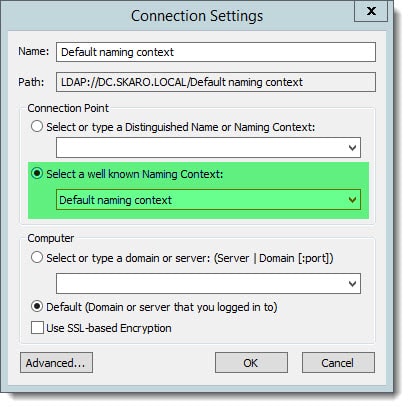
- From the Select A Well Known Naming Context drop-down, select Schema. Click Ok.
- Expand Schema [name of your server]
- Select CN=Schema,CN=Configuration
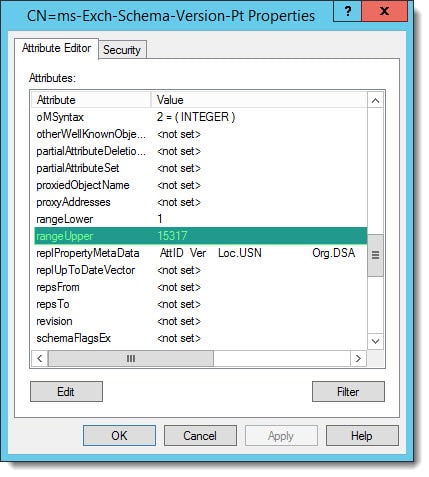
- Scroll down until you reach CN=ms-Exch-Schema-Version-Pt. Right-click and select Properties from the context menu.

- From the Attribute Editor tab, scroll down until you reach rangeUpper. For example, Exchange 2016 RTM will have a value of 15317. Exchange 2019 RTM will have a value of 17000. This number can change with each cumulative update. For a reference of each rangeUpper value, check Exchange Build and Schema Numbers
For a list of Exchange Schema versions, be sure to check out this article.
Preparing the Exchange Organization
This next command varies slightly depending on whether you are migrating from a prior version of Exchange or not. If migrating from a prior version, the command is a little simpler.
C:\Ex2016Setup> Setup.exe /PrepareAD /IAcceptExchangeServerLicenseTerms_DiagnosticDataON
If this is a greenfield installation, with no prior installations of Exchange, you will also need to specify the /OrganizationName parameter. This parameter gives our Exchange Organization a name. In this example, our Exchange organization will be named Skaro. Keep in mind this is not something your users will see. In addition, this can not be changed later on. Choose wisely. If you pick a name with spaces, you will need to enclose it in quotation marks.
C:\Ex2016Setup> Setup.exe /PrepareAD /OrganizationName:SKARO /IAcceptExchangeServerLicenseTerms_DiagnosticDataON
We should receive an output similar to before.
Welcome to Microsoft Exchange Server 2016 Unattended Setup
Copying Files...
File copy complete.
Setup will now collect additional information needed for installation.

Performing Microsoft Exchange Server Prerequisite Check

    Prerequisite Analysis                                     COMPLETED

Configuring Microsoft Exchange Server

    Organization Preparation                                  COMPLETED

The Exchange Server setup operation completed successfully.

c:\Ex2016Setup>
Verify the Exchange Organization
To verify that the organization was successfully upgraded, we can use ADSI Edit.
ADSI Edit is available from a domain controller, or, a machine running the Remote Server Administration Tools for Active Directory Directory Services (RSAT-ADDS).
Warning: ADSI Edit is a raw editor. Use extreme caution when using this tool.
Navigate to Start >> All Apps / Programs >> Administrative Tools >> ADSI Edit.
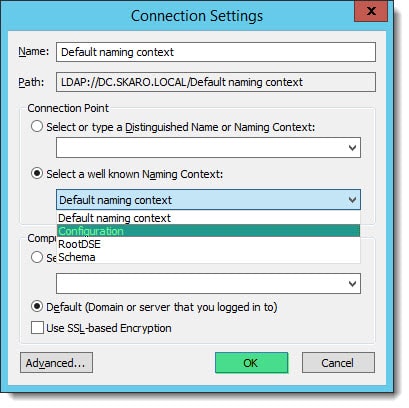
- Right-click on the top-level node, ADSI Edit, and select Connect To… from the context menu.
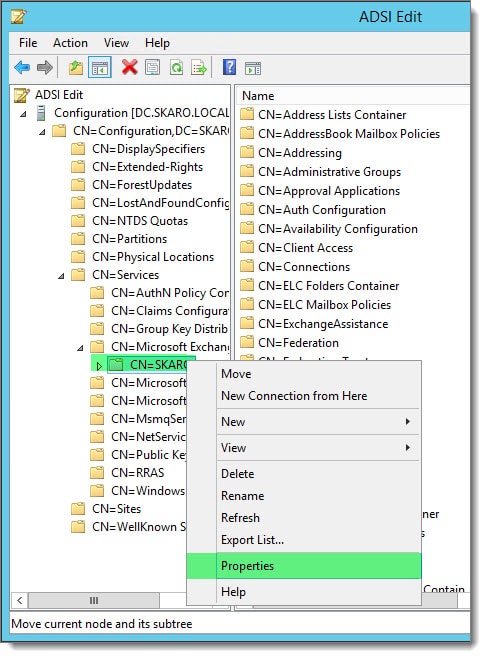
- From the Select A Well Known Naming Context drop-down, select Configuration. Click Ok.
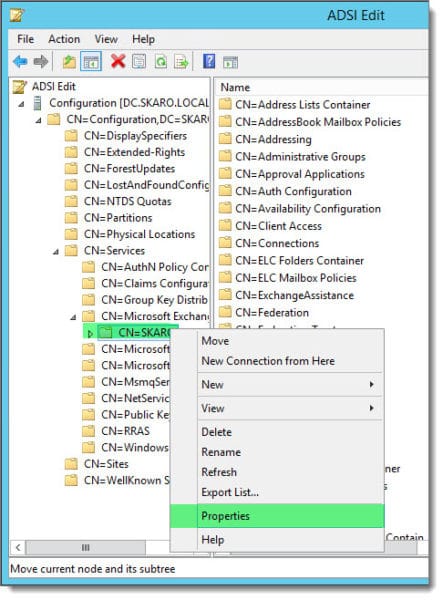
- Expand Configuration [name of your server]
- Expand CN=Configuration,DC=<domain name>,DC=<top level domain>
- Expand CN=Services
- Expand CN=Microsoft Exchange
- Select the name of your Exchange Organization (in our case, it’s SKARO). Right-click and select Properties from the context menu.
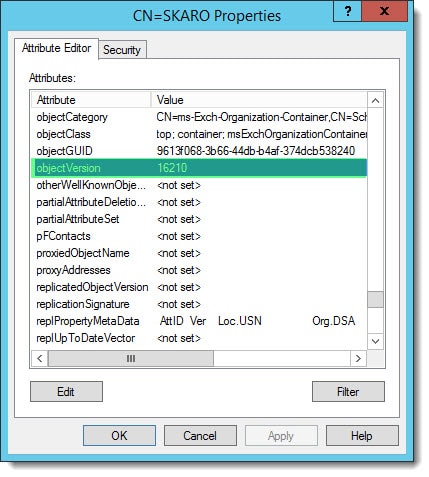
- Verify that the objectVersion property. For example, Exchange 2016 RTM will have a value of 16210. Exchange 2019 RTM will have a value of 16751. This number can change with each cumulative update. For a reference of each objectVersion value, check Exchange Build and Schema Numbers.
For a list of Exchange Organization object versions, be sure to check out this article.
Prepare the Domains
If we only have a single domain, the /PrepareAD command in the prior step has already taken care of this for us. However, if our Exchange Organization spans multiple domains, then we will need to prepare all other domains. To update all domains in your forest, you would run this command.
c:\Ex2016Setup> Setup.exe /PrepareAllDomains /IAcceptExchangeServerLicenseTerms_DiagnosticDataON
The output will be similar to the previous two.
Welcome to Microsoft Exchange Server 2016 Unattended Setup
Copying Files...
File copy complete.
Setup will now collect additional information needed for installation.

Performing Microsoft Exchange Server Prerequisite Check

    Prerequisite Analysis                                     COMPLETED

Configuring Microsoft Exchange Server

    Prepare Domain Progress                                   COMPLETED

The Exchange Server setup operation completed successfully.

c:\Ex2016Setup>
You can also selectively prepare domains with the /PrepareDomain parameter. In our example, dalekcity is a child domain of skaro. It is represented in the command by its fully qualified domain name.
c:\Ex2016Setup> Setup.exe /PrepareDomain:dalekcity.skaro.local /IAcceptExchangeServerLicenseTerms_DiagnosticDataON
Verify the Domains
To verify each domain was successfully upgraded, we can use ADSI Edit.
ADSI Edit is available from a domain controller, or, a machine running the Remote Server Administration Tools for Active Directory Directory Services (RSAT-ADDS).
Warning: ADSI Edit is a raw editor. Use extreme caution when using this tool.
Navigate to Start >> All Apps / Programs >> Administrative Tools >> ADSI Edit.
- Right-click on the top-level node, ADSI Edit, and select Connect To… from the context menu.
- From the Select A Well Known Naming Context drop-down, select Default Naming Context. If you want to check a domain other than the one you are logged in to, use the drop-down in the Computer section to select another domain. Click Ok.
- Expand Default Naming Context [name of your server]
- Expand your domain (in our case DC=SKARO,DC=LOCAL).
- Select CN=Microsoft Exchange System Objects. Right-click and select Properties from the context menu.
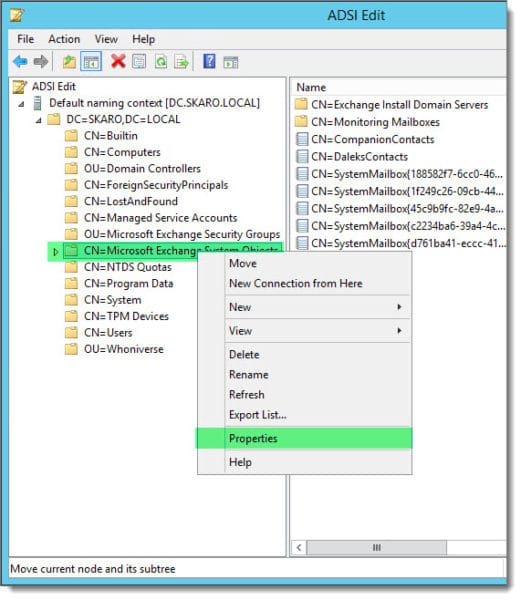
- Verify that the objectVersion property. For example, Exchange 2016 RTM will have a value of 13236. Exchange 2019 RTM will have a value of 13236. This number can change with each cumulative update. For a reference of each objectVersion value, check Exchange Build and Schema Numbers..

For a list of Exchange System object versions, be sure to check out this article.
Recommended Reading
Here are some articles I thought you might like.
- Exchange 2016: Public Folder migration made easy
- Import & Export SSL Certificates in Exchange Server 2016
- Install Exchange 2016 in your lab (7-part series)
- Configure Kemp Load Balancer for Exchange 2016
- Create an IP-less DAG
- What Ignite taught us about Exchange 2016

Join the conversation on Twitter @SuperTekBoy.

I just cant be grateful enough for this article. Thank you very much, was rly informative and simple.
Excellent information for AD verification.
Thanks,
Sheikh
Many thanks for taking the time to post this.
I’ve just run the various preps from the command line on my existing AD Forest / Domain running Exchange 2013, so I know I’m prepped and good for the Exchange 2016 installation and migration later this weekend. Appreciate your useful article – cheers!