UPDATE 8/2/23: Another way to accomplish this is to enable the built-in external tags now supported by M365 Apps (Build 2211 and greater), Outlook on the Web, and Outlook Mobile. Note that this external tag will not work in older versions of Outlook or M365 Apps (prior to build 2211), so you may still need the original solution listed in this article.
If you are on M365 Apps, you can connect to Exchange Online PowerShell and run the following command: Set-ExternalInOutlook -Enabled $true
For more information, check Microsoft’s article Native external sender callouts on email in Outlook
Adding an external sender notification to the top of an email is an important distinction for many companies. This disclaimer quickly identifies its end users when a message is sourced from an external sender. This eliminates the guesswork for internal users, helping them to identify potential phishing attacks, but also a great reminder when it comes to data loss prevention as they reply.
Companies approach this disclaimer in many different ways. Two common examples are a disclaimer prepended at the top of the email or adding a keyword in the message subject.
Thankfully, adding this is a simple process in Office 365 (and also Exchange on-premises – the instructions are identical).
For this article, our example company, Time Travel Research, wishes that all inbound email from external senders is prepended with a disclaimer stating the sender is external to the organization. Time Travel Research wants to ensure that every instance of an external email, even those in the same email chain, is prepended with this disclaimer.
Let’s get started!
Add an external sender disclaimer to all inbound email
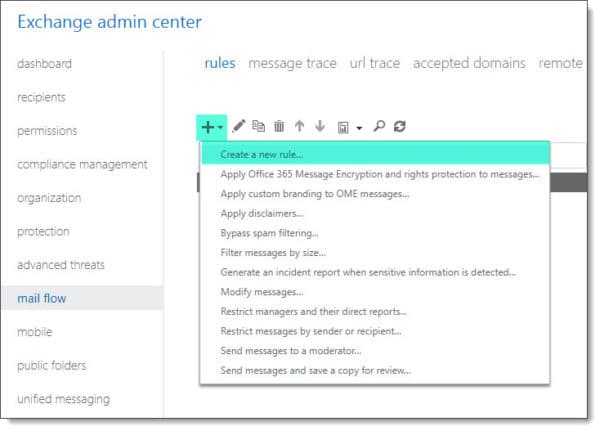
Log in to the Exchange Admin Center. Once logged in, navigate to Mail Flow >> Rules. Click the New (![]() ) button.
) button.
From the drop-down menu, you will notice several choices. These choices are predefined rule templates. We will create a rule from scratch. Select Create a new rule.

This will launch the New Rule window. Towards the bottom of the window, select More options. This will allow us to see all available rule conditions and actions. In addition, it allows us to apply multiple conditions and actions in a single rule.

Select the Apply this rule if… dropdown. This is the condition for our rule to trigger. Select the sender > is external/internal.
Click the Select One link to the right of the dropdown. A Select Sender Location dialog will appear. From the dropdown, select Outside the organization and click Ok.

Click the Add Condition button. From the second dropdown, select the recipient > is external/internal.
Click the Select One link to the right of the dropdown. From the dialog, select Inside the organization and click Ok.

Select the Do the following… dropdown. This is the action of our rule. Select Apply a disclaimer to the message > Prepend a disclaimer. Prepend applies the warning to the top of the message body. Append would apply the disclaimer to the foot of the message body. Append is useful if we were applying a legal disclaimer.

To the right of the action, click the Enter text link. This will launch the Specify disclaimer text dialog. Paste or type your disclaimer text. This text can be either plain text or formatted by using HTML tags. Click Ok.

In the example above, we are formatting our disclaimer with HTML tags. Below is an example of what we used.
<table border=0 cellspacing=0 cellpadding=0 align=left width=`"100%`">
<tr>
<td style='background:#bba555;padding:5.25pt 5.5pt 5.25pt 1.5pt'></td>
<td width=`"100%`" style='width:100.0%;background:#ffe599;padding:5.25pt
3.75pt 5.25pt 11.25pt; word-wrap:break-word' cellpadding=`"7px 5px 7px
 15px`" color=`"#212121`">
<div><p><span style='font-size:11pt;font-family:Arial,sans-serif;color:
#212121'>
<b>CAUTION:</b> This email originated from outside the organization.
Do not click links or open attachments unless you recognize the sender
and know the content is safe.
</span></p></div>
</td></tr></table>
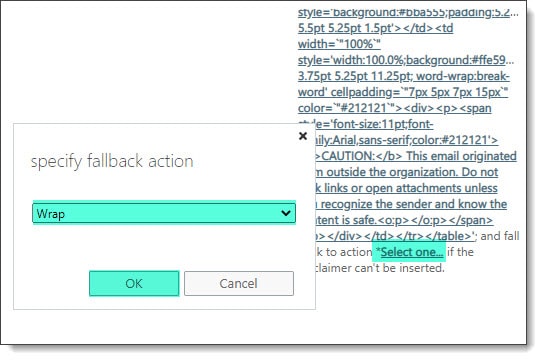
We also need to specify a fallback action. This is what Exchange will do when it can’t apply our external disclaimer. Click the Select one link.
You will notice three fallback actions Exchange can take if it can’t apply the disclaimer to the message. Here is what each does.
- Reject: Exchange rejects the message and sends a non-delivery report to the sender. The message is not delivered.
- Ignore: Exchange accepts the message and delivers it to the recipient without the disclaimer.
- Wrap: Exchange creates a new email message with the disclaimer and adds the original email message as an attachment.
For my example, I am going to choose Wrap. Click Ok.

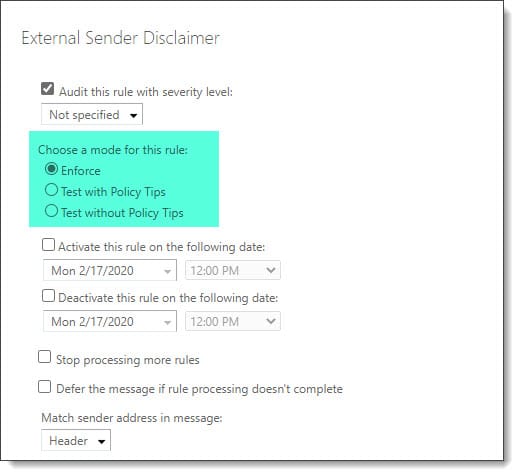
We can also specify whether the rule goes into effect right away by selecting Enforce. However, it is always recommended to test the rule first. You can do this by selecting one of the Test options. Whether you pick policy tips or not will determine if your users see any policy tips in Outlook while you are testing. For my example, I am going to leave this at Enforce, putting the rule into immediate effect.

If we scroll to the top, we can see the New Rule dialog suggests a rule name. In our example, we are going to name this rule External Sender Disclaimer, but you can name your rule whatever you like. Enter your rule name in the Name dialog.

With the rule ready, let’s click Save and begin testing.
Limiting the disclaimer in an email string
Some companies mandate that every instance of an external email, even those in the same email chain, is prepended with an external sender disclaimer. Others prefer that just the first external message in the chain receives the disclaimer, and subsequent external messages in the same string do not get this disclaimer.
To achieve the latter scenario, we can add an exception to our previous rule. This exception will check each email to see if the disclaimer text is already present. If so, it will block the rule from applying another disclaimer. Without this exception, we would get a cascade of duplicate disclaimer text. To set the exception, we need to click the Add exception button.

From the Except if drop-down, select The subject or body >> Subject or body matches these text patterns.

In the specify words or phrases dialog, paste the same disclaimer text and click the Add (![]() ) button.
) button.
Note: If your disclaimer contained any HTML markup, CSS, or, Active Directory attribute placeholders you will have to remove those from the exception. They won’t be understood.
Click Ok.

Click Save.

You are all set!
What the other buttons do…
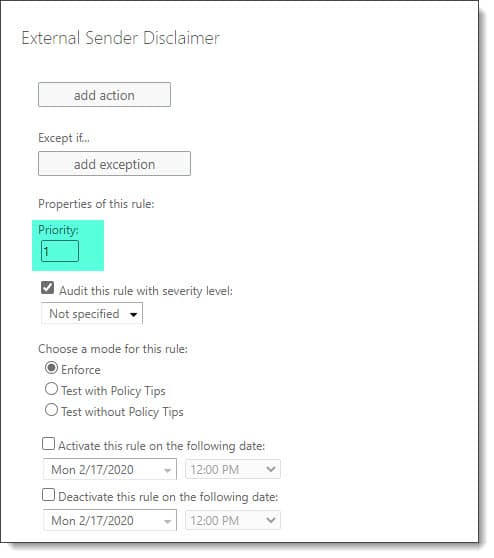
When you create a new rule, it is always added to the end of the list. This means it will be processed last by the transport engine. To change the priority or processing order of the rule, select it and click the Up or Down (![]() ) arrows. You can also edit (
) arrows. You can also edit (![]() ) the rule to change its Priority. In our example, we will make it number one and click Save. Unfortunately, the priority field is only available after the rule is created. The edit dialog allows you to change all other aspects of your rule.
) the rule to change its Priority. In our example, we will make it number one and click Save. Unfortunately, the priority field is only available after the rule is created. The edit dialog allows you to change all other aspects of your rule.

You can also disable the rule by deselecting the checkbox in the ON column. Checking the box will enable the rule again.

To delete a rule permanently, select the rule and click the Delete (![]() ) button. You will be prompted to confirm.
) button. You will be prompted to confirm.

Finally, you can also copy a rule. Select a source rule and click the Copy (![]() ) button. This will create an exact copy of your source rule which you can then modify, rename and save. This is especially useful when you need to create a lot of very similar rules and need to ensure a base rule configuration.
) button. This will create an exact copy of your source rule which you can then modify, rename and save. This is especially useful when you need to create a lot of very similar rules and need to ensure a base rule configuration.
Recommended Reading
Here are some articles I thought you might like.
- Add a legal disclaimer to all outbound email
- Exchange 2016: Public Folder migration made easy
- Import & Export SSL Certificates in Exchange Server 2016
- Install Exchange 2016 in your lab (7-part series)
- Configure Kemp Load Balancer for Exchange 2016

Join the conversation on Twitter @SuperTekBoy.

I have turned on the banner on my on-prem exchange. We are in a hybrid mode, slowly migrating mailboxes to Exchange online 365. We are doing it in batches.
But all the emails which are on cloud also getting the banners. Is there any setting to exclude those emails from getting the banner.
I can include the emails to exception but any default setting which detects that this email is from our exchange online tenancy?
Hi Tahir,
Sorry for the late reply, but maybe someone else has this problem and can benefit from the answer.
If you set an external disclaimer up in hybrid and some of the users are getting the external tag when receiving messages from internal users there is a problem with the hybrid configuration.
To confirm there is an issue with Exchange hybrid, look at an the email headers on an email where this happened. There should be an email header called “X-MS-Exchange-Organization-AuthAs” which should have the value of “Internal”. If it has the value of “Anonymous” there is an issue with hybrid configuration.
Typical causes of this are if you have a mail exchanger or mail appliance modifying mail that is sent between Exchange On-Premises to Exchange Online. It is worth noting that the only supported mail exchange that can exist between Exchange On-Premises and Exchange Online is the Edge Transport server.
For more info, check this article from Microsoft – https://techcommunity.microsoft.com/t5/exchange-team-blog/demystifying-and-troubleshooting-hybrid-mail-flow-when-is-a/ba-p/1420838?WT.mc_id=M365-MVP-5002016
Is there a way to apply an exception to the quarantine messages that come from Microsoft? I’m afraid to just allow email from the domain microsoft.com. Also don’t really want to apply it to the a key word in the email since the phishing emails probably already have the similar body in their fake messages.
Here is the answer many of us have been searching for. Add the below tags to the notification text in your Rule.
Sender: %%From%%Subject: %%Subject%%
If I attempt to use Kevin’s recommendation by adding
Sender: %%From%%Subject: %%Subject%%
I get “The disclaimer text contains an invalid macro name: ‘From’. when I click “Save”. Am I missing something with regard to where to place it?
Hi all,
Rather than using a transport rule to identify an external sender, I would use the new mail tip/safety tip instead. You can read more about it here. https://docs.microsoft.com/en-us/powershell/module/exchange/set-externalinoutlook?WT.mc_id=M365-MVP-5002016
I will be updating this article to reference this as a new and better option.
Hi , can any one help me for the , i have manage to create warning disclaimer
[EXTERNAL EMAIL] DO NOT CLICK links or attachments unless you recognize the sender & know the content is safe.If in doubt Contact: IT
but i want it as below
[EXTERNAL EMAIL] from ” xyz@domain.com “DO NOT CLICK links or attachments unless you recognize the sender & know the content is safe.If in doubt Contact: IT
below is my code , kindly help !
[EXTERNAL EMAIL] – DO NOT CLICK links or attachments unless you recognize the sender & know the content is safe.If in doubt Contact: IT
Have been searching for an answer to this too !
Hello probably someone can help me. I did manage to create a disclaimer rule but may problem is I have English and Arabic test, how can i put space in between English and arabic disclaimer. It keep showing there are in one line
Please help
You may want to test the html code and probably do a paragraph to drop the other language down. To test this, just copy the below code in a notepad and save as html file and open to see. You can equally use this in the prepend message box.
Sample like this:
ATTENTION(English): This email originated from outside Brassica Group.
Do not click hyperlinks or open attachments unless you recognize the sender
and know the content is safe. Beware of phishing emails.
ATTENTION(Arabic): Arabic Text or details here
I left out the html code with the
text here
We have applied a banner similar to this and it does work as expected, however in MS Outlook, when the message is displaying the preview line the banner takes over the entire preview line. Has anybody come across a way to have the warning banner, but not have it display in the Outlook 1 line preview?
I am in the same boat. Did you by chance figure out a way around this?
I’ve had a disclaimer How to mark external emails in a different color on email subject and display name , i saw is use for outlook client conditional access , is it enable to do on exchange mail rule to achieve
AK have any comment?
how to delete external tag form subject when replying the mail ? As after few mails sending and receiving no of external tag increase every time we receive the same mail form outside,
Hi AK,
Take a look at using an exception. It would essentially follow a similar logic to what I put in the section “Limiting the disclaimer in an email string”. What the exception does is look for instances of the EXT tags or disclaimers’ text. If it locates one, the exception will prevent the tag from stacking or applying.
There exists a tool named TagExternal that does not change the subject line and body to mark a message but assigns a special category to a message.
See https://www.ivasoft.com/tagexternal.shtml
Thank you for this nice article – it helps a lot, I `m wondering if there`s a way to add the sender`s address to the warning message
Thanks!
This is very helpful and I’m testing our rule right now.
We are running in Office365 Hybrid mode and emails originating from on-prem (flowing through our Hybrid Exchange Server) are getting tagged.
What approach would you recommend for excluding those messages from being tagged as external?
Chris
Hi Chris,
I suspect there is an issue with your hybrid mail flow, where mail is being stamped as external versus internal. If you take a look at your message headers between on-prem and Office 365 (I recommend using this one from Microsoft – https://mha.azurewebsites.net/) check what your X-MS-Exchange-Organization-AuthAs header is showing. If its Anonymous then your hybrid messages are being stamped as external. If that is the case there is likely a misconfiguration on your on-prem Exchange connectors.
Good guide, I just have a problem with the last part because the rule to deactivate the banner when I receive more than one response to the same email, remove the banner completely when an email comes from outside.
I have this issue too. No matter what I change it always comes up on the responses that follow. Great guide though and very helpful.
Fantastic article. It was very clear and provided the “html” part I was missing.
Keep up the great work
I currently use this, but would love to be able to add the senders address to the beginning of the message. “External: someone@somewhere.com.
Has anyone seen this done?
Also trying to get this working. Only way it has worked so far is if we list the sender specifically to look for instead of just the blanket outside the organization.
Has any been able to do this with native MS Rules ?
Great write-up. I’ve seen some odd issues when using this VS 3rd party software. You may experience some very strange formatting issues when the sender actually creates an Outlook signature with 3rd party software or even Microsoft Word. If you experience a similar issue, one thing to also check is that the senders email format is indeed using UTF-8. Figured most of this out by opening a support ticket with Microsoft. Just wanted to share this knowledge in case you have a similar issue and hit a road block.
Thanks for the heads up Keith.
I’ve had a disclaimer for over a year now that an MS tech assisted me with creating. It is actually an Internal disclaimer to let our employees know that the email came from an internal employee (to avoid the fake phishers too). We use a 3rd party signature program called CodeTwo (MS certified program) and all was well til a few weeks ago. Now we have chinese characters showing in place of the disclaimer in our replies. I wonder if this the “odd issue” Keith was referring to in his reponse. And, it seems to happen when the replies are from the iPhone. I’m very perplexed and all signs point to the disclaimer, but not sure why now after a year or so of using it without difficulty.
Hi Syndi,
Is this happening to every user, every time? Or a subset of users? I assume it is the same rule for everyone.
Actually it was just one user, with one client, everytime she would reply a second time from her apple device. That is until yesterday, now its two users. But the second user replied from her computer and it also happened. Yes, all have auto signatures inserted through a rule and the disclaimer appended to the top.
It goes like this: Our user sends an email (cc’s an Internal user) so disclaimer is added, recipient replies, our user replies (disclaimer is not re-added), recipient sees the chinese characters directly in front of the reply. Its so odd.
To eliminate the disclaimer being the cause, have you tried excluded those users from he disclaimer rule?
I did exclude the user, but now its a hurry up and wait sort of thing. have to wait for them to email this one recipient and see if it still happens. As soon as I hear, I will post back.
After the exclude, they still experienced the issue. So scratch that. So frustrated, but not for this thread. thanks for responding.
Thanks, Syndi. Let us know when you find the root cause. Would love to know what the issue was.