With each release of Exchange, we have seen a substantial shift in the way it required load balancers to be configured. For example, between Exchange 2010 and 2013, the requirement for session affinity was dropped. This allowed multiple requests from a single client to take different paths to its mailbox. It no longer mattered which client access servers in a site were involved in the session. This was a contrast to 2010, when a client session had to maintain a single path at all times. Ross Smith covers this in greater detail here.
Exchange 2013 also dropped support for traditional RPC connections. All client connections to Exchange 2013 were flipped to RPC over HTTP. Service Pack 1 saw another shift in client connectivity as it introduced the option of MAPI over HTTP (although disabled by default). This faster, leaner protocol allowed the Exchange Team to develop shorter failover times between servers. It introduced another virtual directory into the mix–the MAPI virtual directory–which would need to be load balanced as well.
Unlike its predecessor, Exchange 2016 did not see a shift in client connectivity. With Exchange 2016, an organization can choose between MAPI over HTTP, or, RPC over HTTP (although the former is now preferred).
Knowing the nuances between each version of Exchange can be daunting. Equally daunting is the configuration of the load balancer itself. But it doesn’t have to be.
A good vendor will give you instructions on load balancing Exchange.
A great vendor will give you a template to automate the setup.
This is lucky because this article is about a great vendor.
In this article, we configure the Kemp load balancer to provide high availability for Exchange 2016. If you don’t have a load balancer, you can download one for free from Kemp. Kemp’s free appliance is what we will use in this guide.
Don’t worry. Despite the focus being on Kemp, you can translate these principles to any vendor.
Let’s get started!
Disclaimer: I need to point out that I am not sponsored by Kemp in any way. However, this document does contain some affiliate links.
The environment
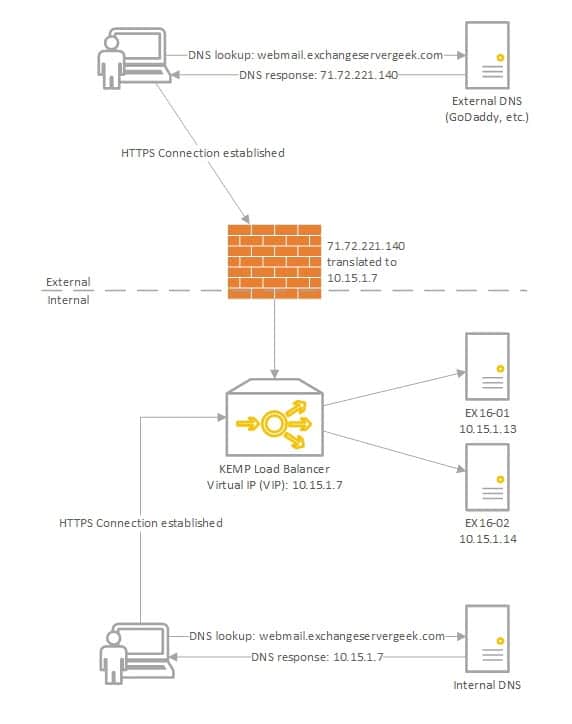
In our example below, we plan to have two Exchange 2016 servers behind a load balancer in a single site; EX16-01 and EX16-02.
The Kemp load balancer will be a virtual load balancer running on ESXi 5.5. We have already deployed the Kemp image to a virtual machine, run through the initial welcome screens, and assigned a management IP. Aside from this very basic configuration, no load balancing has been configured yet.
A third-party certificate containing all the entries in our namespace exists on EX16-01 and EX16-02; webmail.exchangeservergeek.com & autodiscover.exchangeservergeek.com.
All Exchange URLs will use routable top-level domains. This means we will use split-DNS. Our external DNS provider will resolve webmail.exchangeservergeek.com to 7172.
Note: This article will work for Exchange 2013, Exchange 2016, and Exchange 2019.
Luke, use the templates!
Kemp provides templates for the configuration of its load balancers. These templates cover many technologies, including Exchange. These templates give you a tremendous head start in configuring your load balancer. In turn, that head start will save you a tremendous amount of time. More importantly, it eliminates a lot of room for human error. It really doesn’t take much effort to get a Kemp load balancer configured for Exchange. In this article, we explore the configuration of a Kemp load balancer using its 2013 templates (these templates work for 2016).
To download the Exchange templates visit https://support.kemptechnologies.com/hc/en-us/sections/200428856-LoadMaster-Templates-.
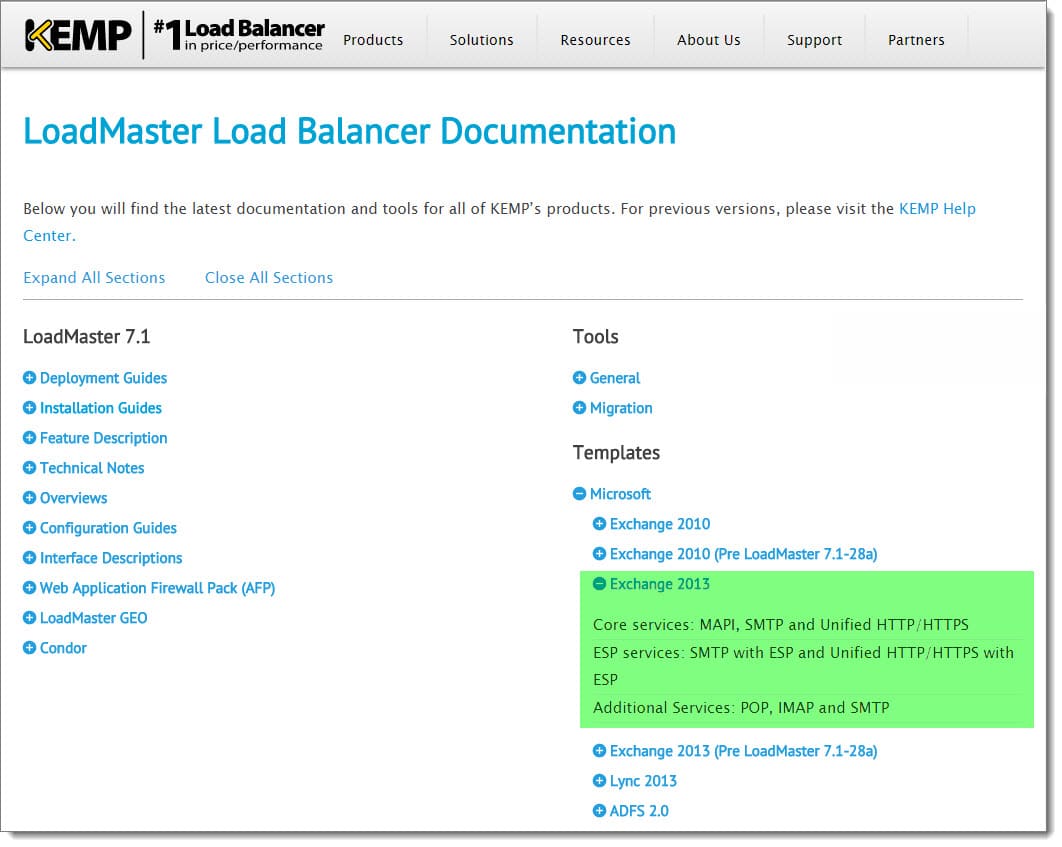
Kemp offers three distinctive templates.
- Core Services: This is the base template for all Exchange HTTPS services.
- ESP Services: The Edge Security Pack (ESP) is a template for advanced authentication needs. One such benefit of ESP is pre-auth for clients. This allows the load balancer to take the brunt of any brute force attacks, passing only legitimate requests to the Exchange Servers. A great alternative if you had previously been using Microsoft Threat Management Gateway (TMG).
- Additional Services: If you plan to offer POP or IMAP, then I recommend snagging this template as well.
For this guide, I am going to download just the Core Services template pack.
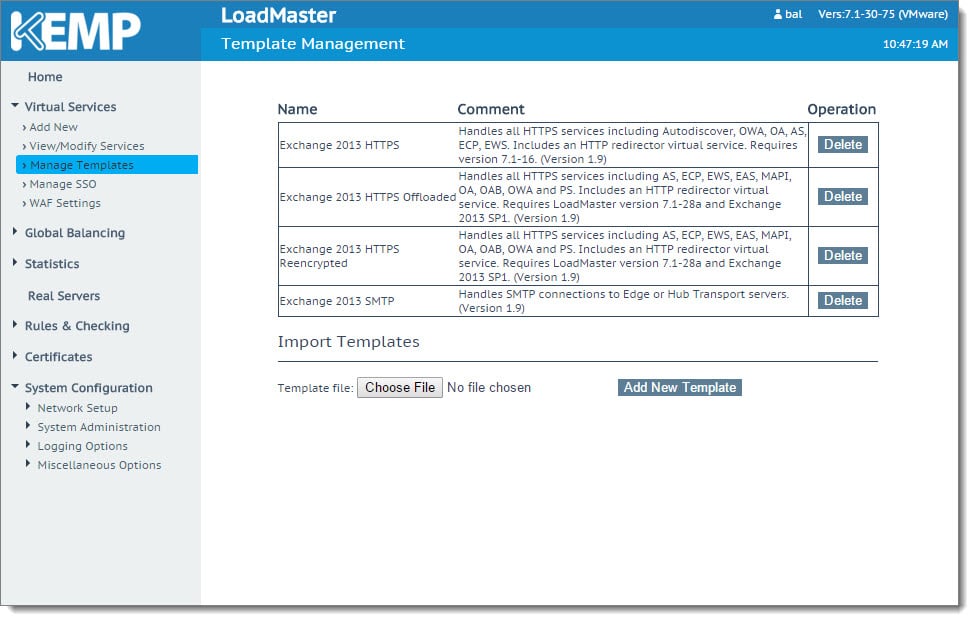
To import a template, expand Virtual Services and select Manage Templates. Click the Choose File button and locate your template. Click Add New Template.
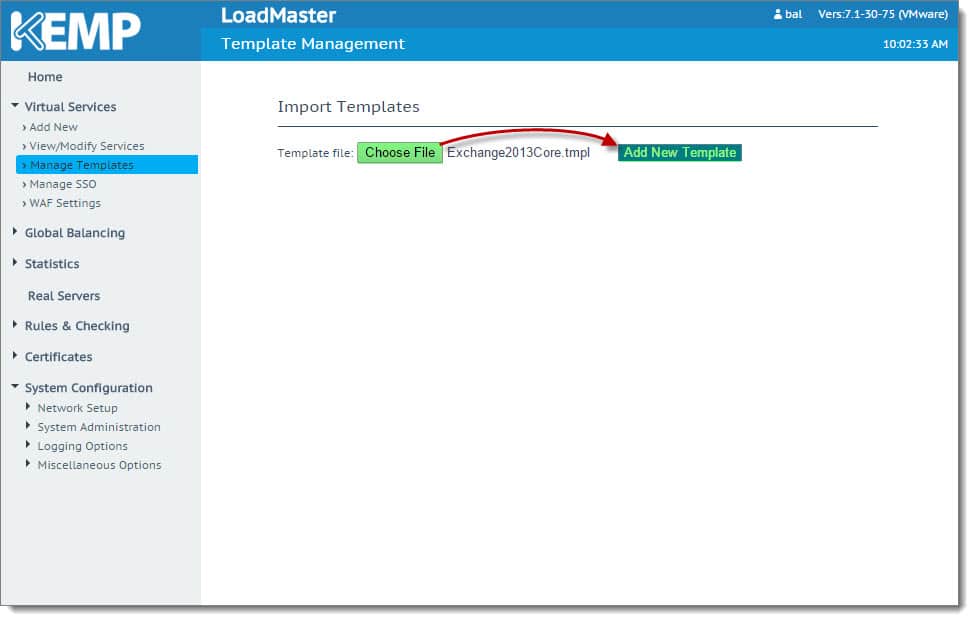
You will receive a confirmation that the templates have been installed. Click Ok. The screen will refresh, showing the newly installed templates. You can use this screen to delete templates should you wish.
Repeat this process for any additional templates you need.
Creating the Virtual IP (VIP)
With our templates installed, we can move on to creating our Virtual IP (VIP) for Exchange. The IP we choose for our VIP must not be used anywhere else in the environment. The Virtual IP will represent all client access servers in our site. Using the environment diagram above, our VIP will be 10.15.1.7.
To create a new Virtual IP, expand Virtual Services and select Add New. From the Use Template drop-down, pick the template you wish to use.
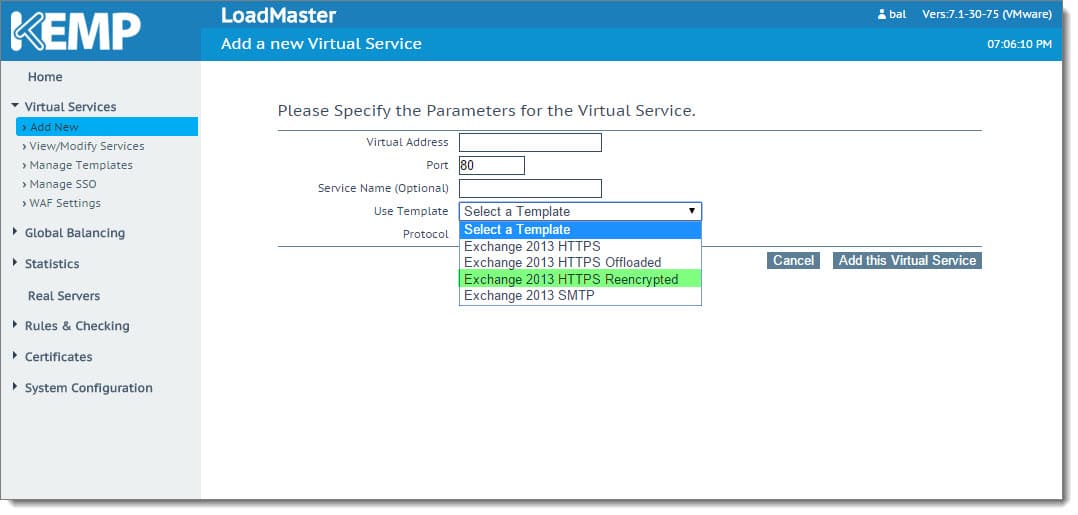
Which template you pick depends on your business needs.
- HTTPS Offloaded: The key benefit to SSL offloading is that the load balancer takes over the responsibility of decrypting all secure communications instead of the Exchange Servers. SSL decryption adds processor cycles to the Exchange servers, so shifting this workload to a virtual machine or hardware appliance is a nice option. To put the security hat on for a moment, it does mean communication between the load balancer and Exchange servers is not encrypted. This presents a potentially larger security issue if you are using one-arm load balancing where all clients, servers, and load balancer are on the same subnet. There is also an additional configuration you need to perform on the Exchange side (which you repeat after each Cumulative Update as the settings are not retained). However, these steps can be scripted.
- HTTPS Reencypted: Similar to SSL offloading, SSL bridging decrypts and examines the packets. Both technologies then use content rules to match the packet to a virtual directory and then deliver that traffic to a server where that virtual directory is marked healthy. The difference between SSL offloading and SSL bridging is that bridging re-encrypts the packet before it sends it on. This is much more secure than offloading. The other benefit is that no additional configuration changes have to be made to Exchange.
- HTTPS: This template is the simplest of all solutions, as all SSL acceleration components are disabled. This means SSL decryption is not taking place at the load balancer. Which, in turn, means there are no sub-virtual servers for each virtual directory. At this level, only a single health check can be performed. Most often, administrators pick the OWA virtual directory as a litmus for the entire server. The problem here is when using only one health probe, the load balancer has no insight into the health of the other Exchange virtual directories. Should the OWA health probe fail, the entire server will be written off, even if the other virtual directories are still functional. Similarly, should the OWA health check report look good but OAB virtual directory fails, client requests for the OAB will still be sent to that server. It is possible to get around this. But that would require separate namespaces for each virtual directory with a corresponding Virtual Server (and IP) for each. And where is the fun in that? If you want more comprehensive health checking without the complexity of multiple VIPs, I recommend either of the first two options.
For this guide, I will be using the HTTP Reencrypted template. I prefer this load-balancing method over the others. It offers considerably more insight into the health of the servers without sacrificing security. This is especially true because my lab is a single subnet, so I will be using a one-arm configuration for my load balancer. All clients, servers and the load balancer will sit on the same subnet.
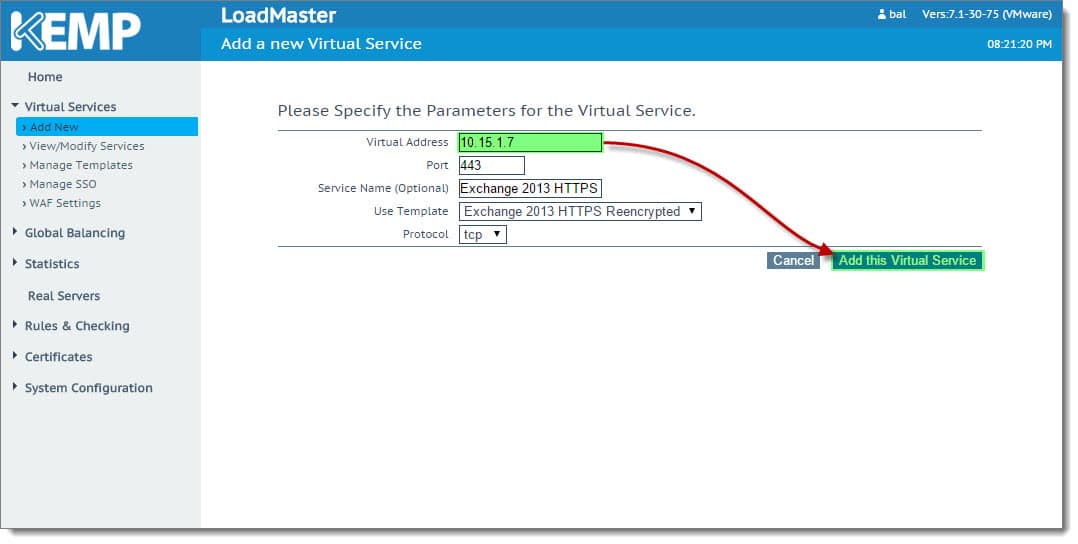
Once we select the template, it automatically populates in the Port and Protocol fields. It also suggests a Service Name. You can make the service name whatever you desire. You will still need to enter a Virtual Address manually. Based on our environment diagram, this will be 10.15.1.7. Once complete, click Add this Virtual Service.
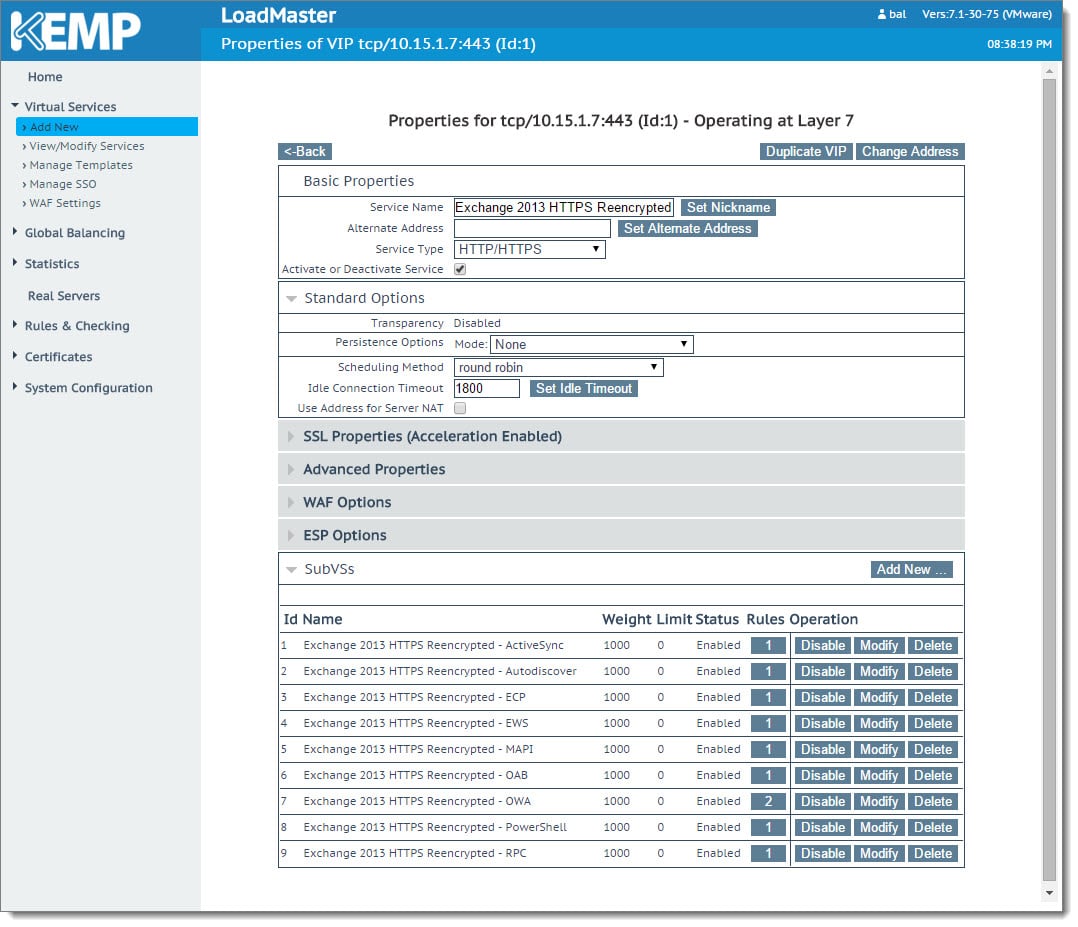
This brings us to the properties screen for the virtual service. This is where the awesome sauce of the template really kicks in. All the hard work has already been done for us, including the creation of nine sub-Virtual Services, each corresponding to an Exchange virtual directory.
In addition, this template has configured our SSL acceleration settings and a port 80 redirect. Any traffic coming into the Virtual IP on port 80 will be redirected to port 443. You can expand each section to see the options the template has configured.
Configuring SubVS
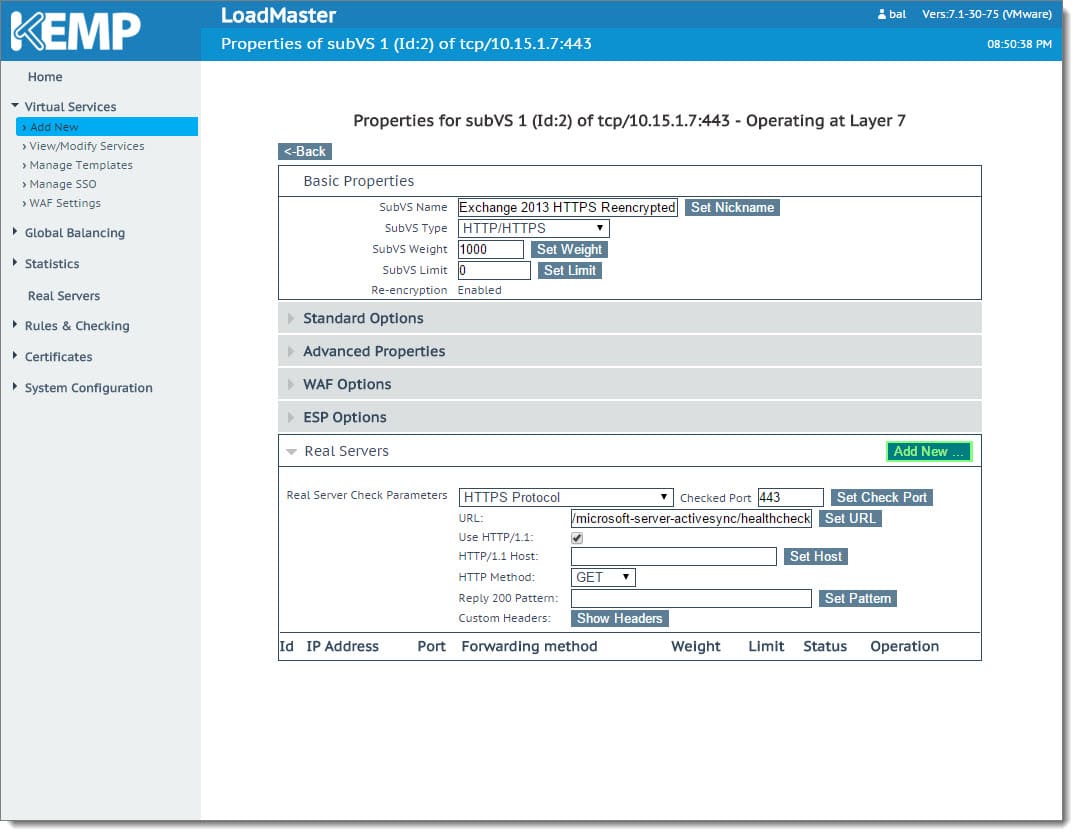
Let’s continue by modifying the first SubVS. In the first row, select Modify. In our lab, this is ‘Exchange 2013 HTTPS Reencrypted – ActiveSync’.

Similar to how the Virtual Service was configured by the template, so is the SubVS. Under the Real Servers section, you will notice that the health check URL settings for this particular virtual directory have already been configured. All we need to do on this screen is to add our Exchange servers. To do this, click the Add New… button.
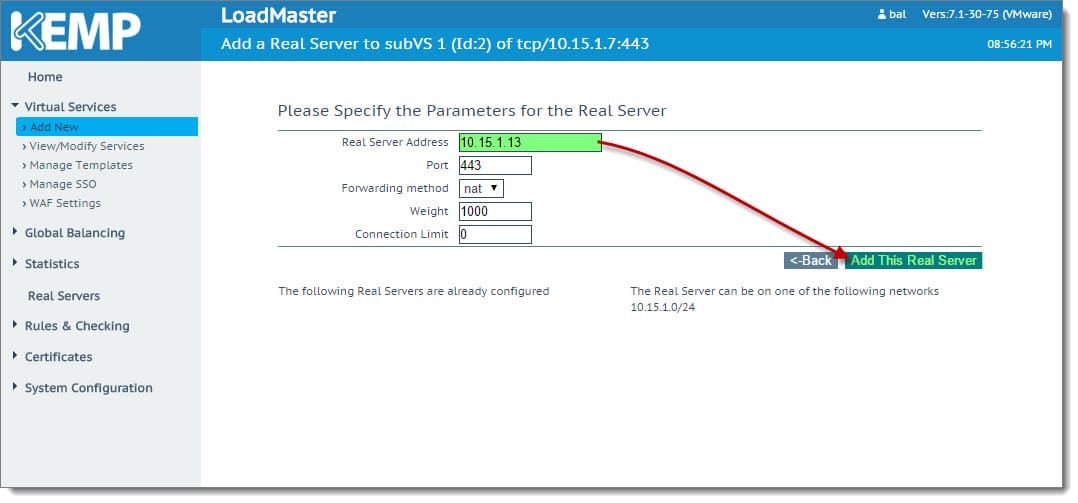
This brings up the Parameters for the Real Server screen. The template has already filled out most of these fields for us. All we need to add here is the IP address of our first Exchange server in the Real Server Address field. Then click the Add This Real Server button. In our lab, our first server is 10.15.1.13.
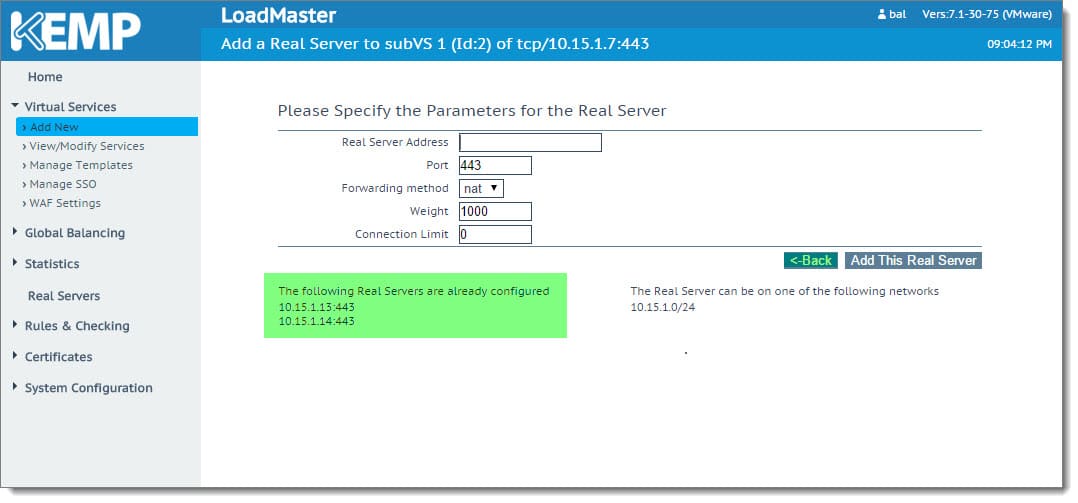
You will receive a confirmation that the server was successfully added. As each server is added, it will be displayed under ‘The Following Real Servers Are Already Configured’ section. Repeat this process for all additional Exchange servers in your site. In our lab, we just have one additional server to add; 10.15.1.14. When complete, click the Back button.
You will notice the servers are now listed at the bottom of the SubVS page. Click Modify to make corrections to a server. Click Delete to remove the server. You can also administratively disable a server from just that SubVS with the Disable button. When ready, click the Back button.

You will need to repeat these steps on the remaining eight SubVSs. Once all nine are complete, click the Back button.
Adding our Exchange Certificate
The end result should be all green. If you select the IP:Port link under the Virtual IP Address column, it will break the status down by virtual directory.

Now we need to add our Exchange certificate to the load balancer. This is necessary so the load balancer can decrypt the packets with the Exchange server’s private key. To do this, click the Add New button under the Certificate Installed column.
Tip: For instructions on exporting certificates from Exchange, check this article.
Click Import Certificate.

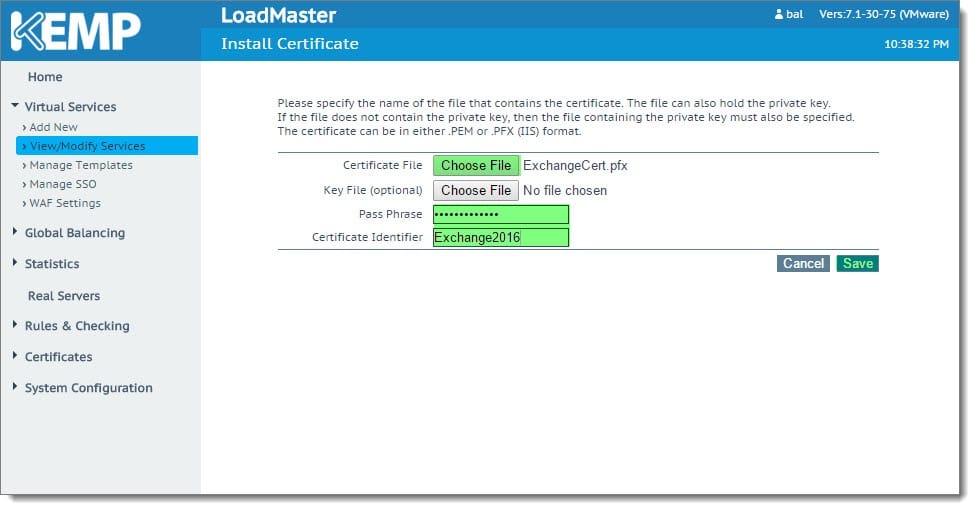
Next to Certificate File, click the Choose File button. Select your certificate file and click Open. In the Pass Phrase field, specify the password you used when you exported the certificate. Specify a Certificate ID to identify the certificate. Click Save.
On the Certificate Configuration screen, select the virtual IP in the Available VSs box and click the right arrow. This will shift the Virtual IP (VIP) to the Assigned VSs box. Click Save Changes.
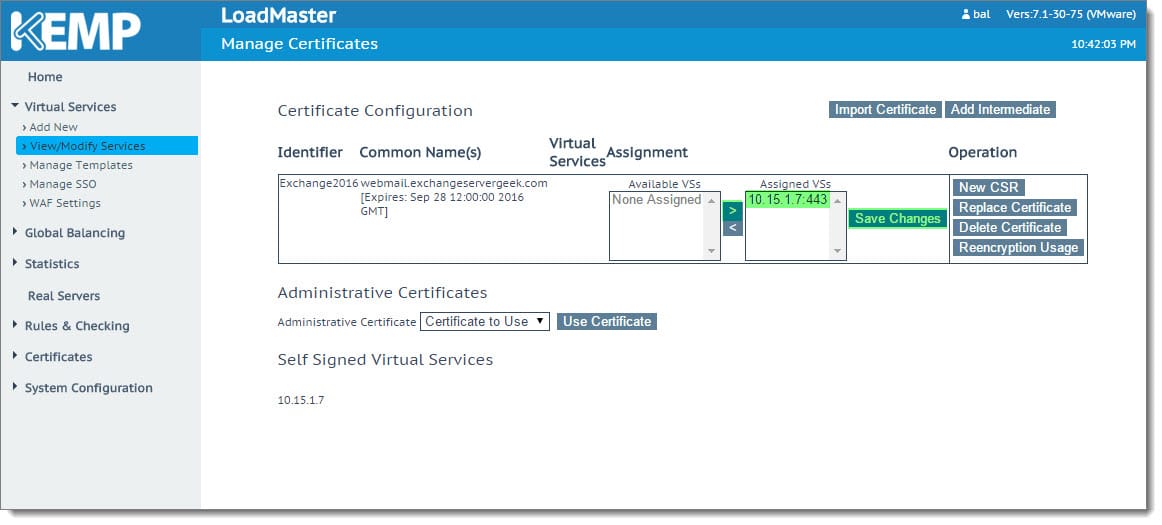
This will take us back to the View/Modify Services page. We can now see that the Exchange certificate has been applied to our virtual service (VIP).

Checking our work
Now that we have everything configured, let’s check our work. First, double-check with PING or NSLOOKUP that your namespace is resolving to the new virtual IP (VIP). If it is, great! In our case, our namespace resolves to 10.15.1.7. If not, double-check your DNS entries for your Exchange URLs. You may also need to clear your DNS cache.
Next, point your browser to your OWA namespace and log in. In our case, this is https://webmail.exchangeservergeek.com/owa. If this logs in, that is a really good sign. But let’s see what is really going on under the hood.
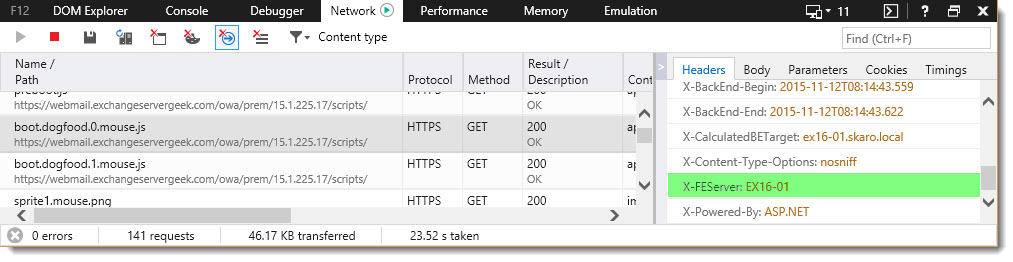
If you are using Internet Explorer, hit the F12 key to bring up the developer tools. Select the Network tab. Under this tab, you should see a list of files that have been retrieved from your email servers. If you don’t see any files, reload the page while keeping the developer tools active.
In the screenshot below, you can see our browser has fetched a number of javascript and image files from https://webmail.exchangeservergeek.com. If we select one of those files, we can examine the response header to the right. If we scroll to the bottom, we should see a parameter named X-FEServer (Front-End Server). From the screenshot, you can see that sprite1.mouse.png was delivered by EX16-02.

Let’s check another file; boot.dogfood.0.mouse.js. In this case, we can see the front-end server was EX16-01. This is also a great example of how session affinity is no longer in the mix.
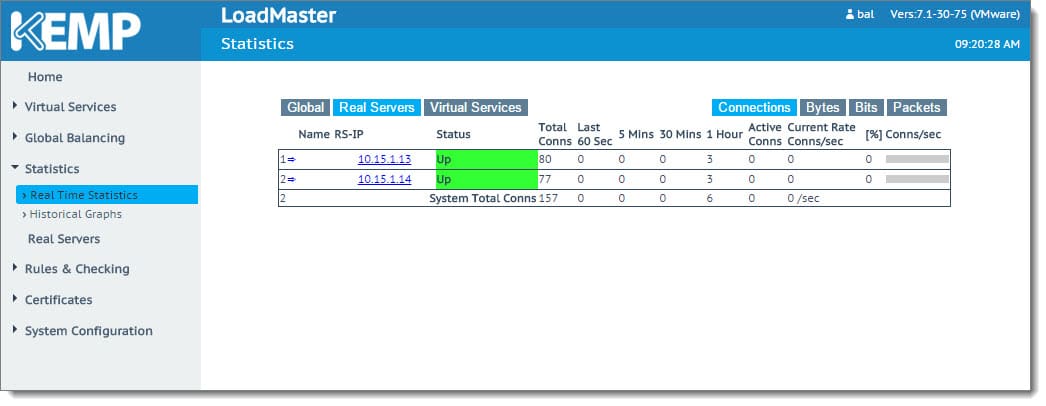
The Kemp Load Balancer also has some great real-time statistics. If you navigate to Statistics >> Real-Time Statistics and select Real Servers, you can see how connections are currently being distributed.
You are all set!
This wraps up load-balancing Exchange HTTPS services. In a future article, we’ll explore using Kemp to load balance SMTP traffic. Also, I recommend checking out our other Exchange 2016 articles below.
Free Kemp Load Balancer
In this article, we used Kemp’s free virtual load balancer. This appliance is free for perpetuity, but it does have some limitations, such as 20 Mbps throughput and no technical support. If you prefer to start with an unlimited virtual appliance with technical support, try a 30-day trial on one of their paid devices.
Note: You can easily switch from the free to the paid appliance at any time by updating your license key.
Further Reading
Here are some articles I thought you might like.
- Make inbound SMTP highly available with Kemp LoadMaster
- Import & Export SSL Certificates in Exchange Server 2016
- Configure Kemp Virtual Load Balancer on VMware ESXi
- Free Layer-7 Load Balancer from Kemp Technologies
- Install Exchange 2016 in your lab (7-part series)
- Create an IP-less DAG (No Administrative Access Point)
- What Ignite taught us about Exchange 2016
Special Thanks: I want to give a shout-out to Exchange MVP Bhargav Shukla for being my technical editor on this post.

Hi! great article! but what is the “admin” ip of the kemp lb? is it on the same network as VIP?
i tried to put the adm into the inside private network, and the vip (with the second eth1) in the dmz and it did not work at all.
what should it be if i’d like to have vip in the dmz?
Hey Sergey,
You can get the admin IP by accessing the console of the load balancer. For example, if you are using a virtual load balancer you can connect to your HyperVisor (e.g. Vmware VSphere, Hyper-V Manager) and go to the console of the virtual machine. The console will display a screen that shows the management IP, which you can then use to connect to a web browser.
For your second question, it sounds like you are trying to configure a two-arm configuration. I would recommend starting with this article: https://support.kemptechnologies.com/hc/en-us/articles/202214098-What-are-the-network-deployment-options-on-the-KEMP-LoadMaster-
Hey Gareth!
Great article – i work for KEMP, so it’s good to see a non-biased article on loadbalancing!
one thing i wanted to point out was your section about SSL Bridging – I think you mean Reencryption as Bridging would just pass the SSL traffic through without any inspection on the LM.
I teach the content to engineers, so i thought i would just clarify that 🙂
otherwise, epic article!
Hey Gareth awesome article as always,
Is it possible to go from a one-arm config (internal-only) to a two-arm?
I’m thinking we’d just add another NIC to the Kemp VM, and then set that to point to the DMZ in the WebUI, and NAT our firewall there…or is there more to it than that?
Thanks!
I figured it out! In a nutshell: Used the eth1 to set the DMZ virtual services on, changed the default gateway to the DMZ subnet (since we have no route between LAN and DMZ), and set “Subnet Originating Requests” and “Enable Non-local real Servers”. Good to go!
.
Today i have updated from 7.1.35.2 LMOS to 7.2.36.1 LMOS Release.
When the boot is complete the machine will shutdown after 10 seconds with kernel error. 🙁
My friend has the same error after the update. The 7.1.35.2 works fine for us but the update does not!
VLM2000 Test enviroment with two Exchange 2016 based on your super guide, Gareth.
Deployed on Vmware Workstation 12.5.2.
Nice. Glad you got a workaround.
Thanks for the heads up. I haven’t tried the 7.2.36.1 release yet. Looks like I am still on 7.1.35.0. What is support saying?
My workaround was to install a new VLM2000 with 7.2.36.1 LMOS Release. 😉
I have a NFR Licence for my testlab, i think there is no support.
Looks like there is an official support statement from Kemp saying not to upgrade at this time.
https://support.kemptechnologies.com/hc/en-us/articles/218199183-Critical-Notification-LoadMaster-v7-2-36-1-Release
Yes. Yesterday evening the support send a e-mail to the kemp customers. I make a new reinstall with LMOS 7.1.35.2 and wait for the new LMOS build.
After moving a mailbox from exchange 2010 to exchange 2016, the client still using RPC/HTTP and the connection failed, I did a work around on RPC Virtual Directory by redirecting the traffic to https://mail.domain.com/mapi , then editing the hosts file pointing to the exchange server 2016 not to the Kemp load balancer and it worked, so I need to create an RPC redirect rule to the mentioned mapi URL on the Kemp Load Balancer.
When you migrate users from 2010 to 2016 they will still be using RPC/HTTP by default. You need to switch your users over to MAPI/HTTP if you want them to use MAPI/HTTP instead. I would not recommend doing a redirect.
Great Article.
Is there already a article about KEMP loadbalancing SMTP traffic?
Gosh, I’m sorry. I forgot all about the follow up article. Starting on it right now. Expect it to publish Tuesday (6-21-16).
Got it completed sooner than expected. http://supertekboy.com/2016/06/17/making-exchange-smtp-highly-available/
how to setting up dns kemp and exchange? ex: mail.abc.com to vip: 192.168.10.20 but my owa doesn’t working. so how to do it?
Nice article, but is this really free appliance of Kemp or its a Free Trial..?
Keep it up..
Regards,
Yes, they have a free for life virtual load balancer (not a trial). The free version does have some restrictions; such as no technical support, a throughput cap at 20Mbps and a couple of removed advanced features. But the beauty is if you ever outgrow the free version you can drop a paid license on it and it unlocks other features. For a great comparison of their free versus paid feature set, check out the site here – http://freeloadbalancer.com/
Very nice article! One thing to mention is that when using a one-arm config, the Exchange server logs show all traffic originating from the Kemp. This is because source NAT’ing is used when Transparency is disabled in the Re-encrypt template.
The load balancer utilized SNAT to keep the communication path to Exchange the same. Otherwise, clients in the same subnet would start a conversation with the load balancer, which would then pass it on to Exchange, but then Exchange would see that the source IP of the packet was sent form a device in its local subnet. Exchange would then reply directly to the client instead of routing it back through the load balancer. The client would then, of course, reject it since it’s trying to communicate with the load balancer and not directly with the Exchange servers.
To get the actual source IP addresses to show in the Exchange logs is to implement a two-arm config. I actually just set it up this way, but noticed something interesting. When configured in a two-arm setup, all incoming traffic uses the VIP while all outgoing traffic – that is, traffic originating from the Exchange servers – uses the management address of the Kemp and not the VIP. This is how most firewalls work, so I guess it’s not too surprising. However, is there a way to make the Exchange servers use the VIP for incoming AND outgoing traffic? (Essentially switching from port-forwarding to a one-to-one NAT on the Kemp?)
Thanks for any info you can throw my way!
Hey Miles,
Great advice. Thanks for sharing. One option with 2-arm is to configure the Exchange servers default gateway with IP of the Kemp device versus the default gateway you would normally use (e.g. a router).
I have a single static IP address and use IIS ARR to enable me to host multiple HTTPS websites with a single static IP address. Is it possible to replace the IIS ARR server with the Kemp load balancer? Can the Kemp load balancer have rules on it which say send domain1.com to server1 but send domain2.com to server2?
Hey Bob,
Great question. Yes you can. They have Content Rules that can accomplish that. They have a extensive guide to that here. https://support.kemptechnologies.com/hc/en-us/articles/203125019-Content-Rules
Really nice article. Would it be possible to use exactly that setup and move it into the DMZ and just cunfigure the necessary routing on the Kemp?
Thanks,
Thomas
Contacted KEMP support, its possible, just adjust the routing.
Sorry I didn’t get to this sooner. Glad you found your answer and thanks for updating us.
Hi,
great article. Really helps with the “understanding part” 🙂
Normally I would deploy TMGs in a DMZ as a reverse proxy doing pre-auth. (In the picture above) you mapped your external IP directly to an internal IP. Something that works but is sometimes not “very welcomed” by IT-organizations. …something something external access must be DMZ… something offloaded and reversed proxied something something security…
I’m a fan of KEMP as well. Really love what they’re building. What would you do to meet the IT-organizations requirements, described above? My first attempt would be two KEMPS. One in the DMZ with ESP for pre-auth and everything TMG did. Then point this KEMP (in an reverse proxy manner) to an internal KEMP without ESP which “only” works as an Load-Balancer. What do you think? Internals still go directly through the internal KEMP of course.
Thanks!
Tim
Hey Tim,
Great comments!
I would likely deploy a Kemp HA pair in a two-arm configuration, with one arm in the DMZ and one arm in the network where the Exchange servers were deployed. Then configure the Kemp with ESP doing pre-auth.
I am planning a future article on ESP, pre-auth and a two-arm configuration. This article was more for those who wanted basic Exchange high availability and load balancing in a simple one-arm configuration.
Hi Gareth,
thanks for your reply. I see: A HA pair would make more sense since I already need to run two KEMPs. I’m absolutly new to two-arm config. Can’t wait to read your future article. In my understanding the KEMP then needs some sort of policies and firewalling function, because if someone (unlikely, but we should think about it) “hacks” the KEMP I don’t want him to “be” in my internal subnet. That’s the solely purpose of having one devivce in the DMZ. Of course, to bring securitans to the boil, we should use different devices for DMZ and internal…
last, for my clarification, my described configuration in my first comment would work, right?
Thanks!
Tim
Hello
It is necessary that my exchange server gateway is the ip of my kemp?
or not necessary?
Depends on whether you plan to use a one-arm or two-arm configuration for your load balancer.
In this guide I used one-arm which does not use require you to reconfigure the Exchange Server gateway.
Configuring the gateways comes into play in two-arm (or “inline”) load balancing. But even in two-arm you can dodge this with SNAT.
One-arm is easier to deploy.
Great article but I have a couple questions:
As I’m still learning Exchange 2016 how does having two Exchange servers behind the load balancer work if my mailbox is on server 1 and then that server goes down? Is there a second copy of my mailbox on server 2? Or is this load balancing purely for OWA and ActiveSync?
Also, I currently use IIS ARR as I have one static IP address and I use this to host many SSL websites behind it. Can the Kemp load balancer do this as well? Can it do this for any TCP port?
Love the website!
Hey Bob,
Glad you like the site and the article.
Kemp (or ARR for that matter) will only load balance the client access services. For database high availability you will need a Database Availability Group (DAG) on the back end. This is configured in Exchange itself. I have an article on configuring a DAG here. Once the DAG is created you will then need to create database copies. When a server goes down it will activate the passive copy of the database on the surviving server.
Create an IP-less DAG
http://supertekboy.com/2015/06/30/create-an-ip-less-dag-no-administrative-access-point/
Check the bottom of this page for supported workloads for the Kemp load balancers.
https://kemptechnologies.com/loadmaster-family-virtual-server-load-balancers-application-delivery-controllers
Thats very helpful, thanks Gareth!
You mentioned something about not all backup programs working with some DAG setups. Does Veeam work ok with DAGs and Exchange 2016?
Veeam 9 that is!
Hey Bob,
Its possible some backups do not support the newer IP-less DAGs (no administrative access point). If not, you can configure the older style DAG with the IP/AAP.
Looks like Veeam v9 supports Exchange 2016. Not seeing any callouts to IP-less DAGs. You may have to go with an IP DAG, or, give their support a call.
http://veeampdf.s3.amazonaws.com/new/veeam_backup_9_0_whats_new_en.pdf?AWSAccessKeyId=AKIAJI4MX44AEVG3NBLA&Expires=1453160838&Signature=VDzNMNIuCKNakQA8g79xfpxze5o%3D
Come to think of it, I *think* Veeam 9 will work with an IP-less DAG as it hooks into the Hypervisor when doing the backups and doesn’t connect to Exchange directly (ie: no agents).
I could be wrong but its just a guess!
Sounds good Bob. Let us know what you find.
Amazing one
Glad you like it!