In most situations adding a second email domain, is simply just a matter of configuring the necessary mail flow. However, in situations such as an acquisition or merger, you may need users to configure Outlook with an email domain that is different from the one configured in your autodiscover URI. This is especially true for companies that offer hosted Exchange in a multi-tenancy business model.
In this article, we take a look at a couple of case studies where an SRV record might be preferred over adding additional names to a certificate. We then explore how to configure an SRV record in a popular DNS management system. Finally, we look at two different ways to test that SRV record.
Tip: Not all ActiveSync devices support SRV records (some don’t support Autodiscover at all). In these cases you may need to manually configure each device with the server name, or, look into a different autodiscover method.
Case Study 1: Acquisitions and Divestiture
One solution is to simply add each domain to your UC / SAN certificate (also called a multi-domain certificate). This may seem like a quick and easy solution but it all depends on volume. Re-keying your certificate for a one-time acquisition or merger may seem like a minute task. But consider a company that frequently acquires or divests other companies. You may find yourself re-keying that certificate every couple of months. This may still seem trivial but consider the size of your environment. If you have a large Exchange deployment with dozens of servers and multiple load balancers then each will need the new certificate every time it is re-keyed. This pales in comparison to the single SRV record that can be easily added to the new domain. It not only saves you time but also money. Adding each domain may incur additional charges. Some certificate providers even charge a fee for re-keying a certificate.
Case Study 2: Multi-tenant hosted Exchange providers
With a hosted Exchange provider the acquisition and departure of clients are likely to be even more volatile. That said, you don’t want to be re-keying your certificate every time you onboard or off-board a client. Adding each domain to your certificate will eventually become cost-prohibitive affecting your bottom line. Like any business your bottom line is important. So choosing the SRV redirect method over a cost-prohibitive multi-domain certificate is more attractive (and also simpler to configure).
Scenario
For the purposes of this article ExchangeServerGeek has recently acquired SuperTekBoy. STB users have an email address of SuperTekBoy.com. Whereas ESG users have an email address of ExchangeServerGeek.com. Mail data from STB has already been migrated to the ESG. The company requires STB users to keep using their SuperTekBoy.com email addresses to configure their Outlook profiles. The company does not want to make any changes to its current SSL certificate as this will incur additional fees. The Exchange administrator determines the best solution is to configure an SRV record.
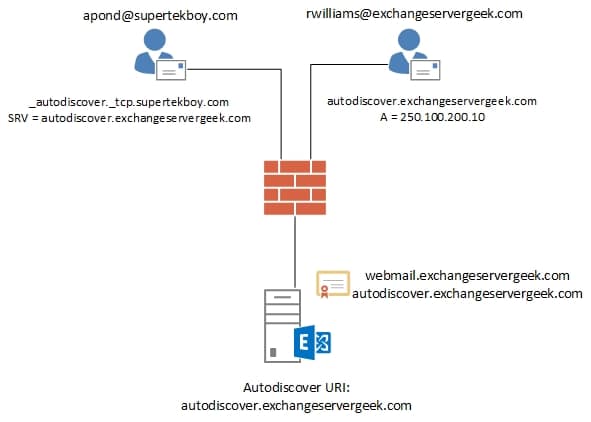
Using the above diagram no changes will be made to the current Exchange server, its certificate, or, its existing external DNS records. The only change will be the addition of an SRV record in the SuperTekBoy.com namespace. This will redirect users who enter supertekboy.com as their email domain to the servers at exchangeservergeek.com.
Configuring an Autodiscover SRV at GoDaddy
For this tutorial, we will be configuring an SRV record at GoDaddy.com. This is where both domains in our scenario are hosted. This process should be similar for most hosting providers.
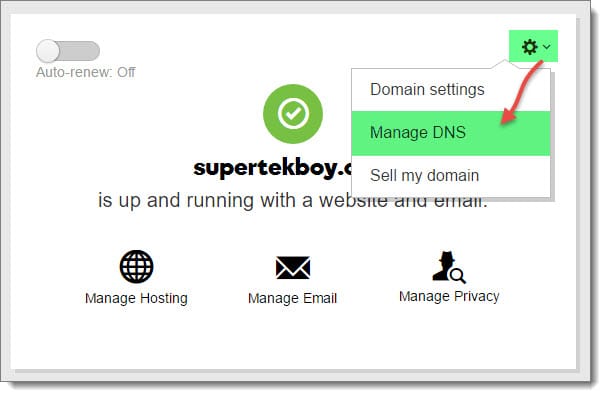
Once logged in to your GoDaddy account you will need to manage DNS.
For the appropriate domain, in this case, SuperTekBoy.com, select the cogwheel icon. Then select Manage DNS from the drop-down menu.
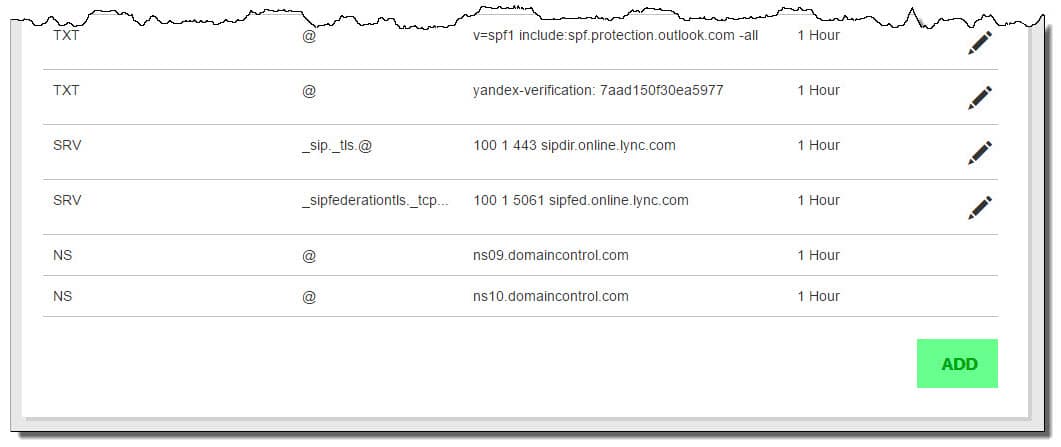
This will bring up a page that lists all your DNS records. Scroll to the bottom and select the Add button.
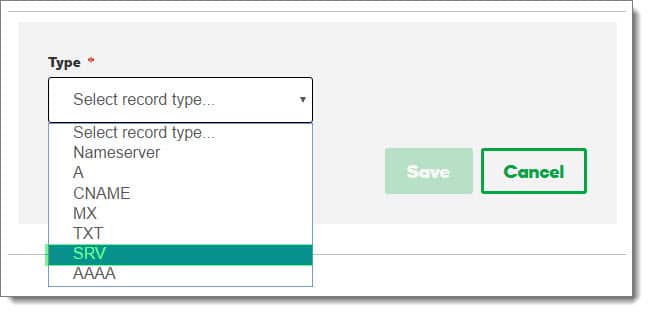
From the Type down-drop, we need to select SRV.
We then need to enter the details of our SRV record. The entries you make in your DNS management system should be very similar. Let’s visit each one.
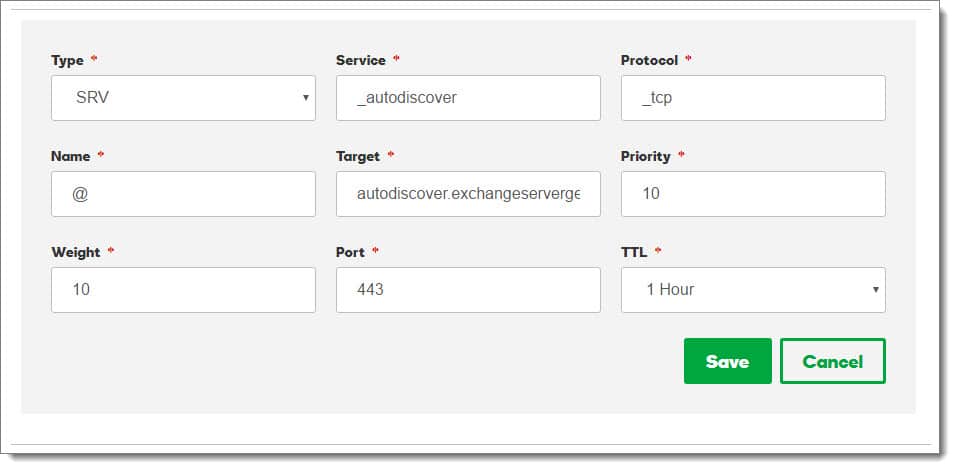
Service: Enter _autodiscover. Be sure to include a single underscore in front of it. By design, this is one of the names the Outlook client looks for.
Protocol: Enter _tcp. Be sure to include a single underscore in front of it. By design, autodiscover requests are performed over TCP connections.
Name: All you need here is the @ symbol. This will default the record to the parent domain. In our case, it will append supertekboy.com creating a complete record of _autodiscover._tcp.supertekboy.com.
Target: This is where we want our Outlook clients redirected. This has to be a name that exists on our SSL certificate. In our case autodiscover.exchangeservergeek.com.
Priority: If you only have one autodiscover SRV record then it really doesn’t matter what you enter here. This is for high availability. The lowest priority number will always be used first. If it is unavailable the next lowest number will be used and so on. In our case we only have one record, so we just went with 10. But we could just have easily made it 0 or 100.
Weight: Weight is used for load balancing multiple SRV records. Should you have two SRV records with the same priority, then the weight is factored in. A higher value in weight means it is preferred and more connections are sent to it. In our case, we only have a single SRV record so it does not matter what we enter here. We went with 10 again.
Port: All connections will be over HTTPS. This is port 443.
TTL: A TTL (Time To Live) determines how long clients should cache the record. If you are doing a migration you may want to set this to the lowest possible value. That way you can quickly roll back if you ever encounter an issue. In our case, we went for one hour.
Click Save.
Checking our work
Being that this is a brand new record you should be able to test against it relatively quickly. If you alter an existing autodiscover SRV record then you will have to wait for DNS propagation to occur. How long this takes depends greatly on your time to live (TTL) value.
Let’s open a command prompt. Type NSLOOKUP and hit enter.
C:\> nslookupI am going to point my DNS queries to an external service such as Google. You do this with the SERVER command followed by the server you wish to use.
> server 8.8.8.8
Default Server: google-public-dns-a.google.com
Address: 8.8.8.8
Next, let’s switch our query type to SRV records.
> set type=srvFinally, let’s see where our autodiscover SRV record points.
> _autodiscover._tcp.supertekboy.com
Server: google-public-dns-a.google.com
Address: 8.8.8.8

Non-authoritative answer:
_autodiscover._tcp.supertekboy.com SRV service location:
 priority = 10
 weight = 10
 port = 443
 svr hostname = autodiscover.exchangeservergeek.com
Looks good. When an Outlook client looks up the autodiscover record for SuperTekBoy.com it will be redirected to the autodiscover record at ExchangeServerGeek.com.
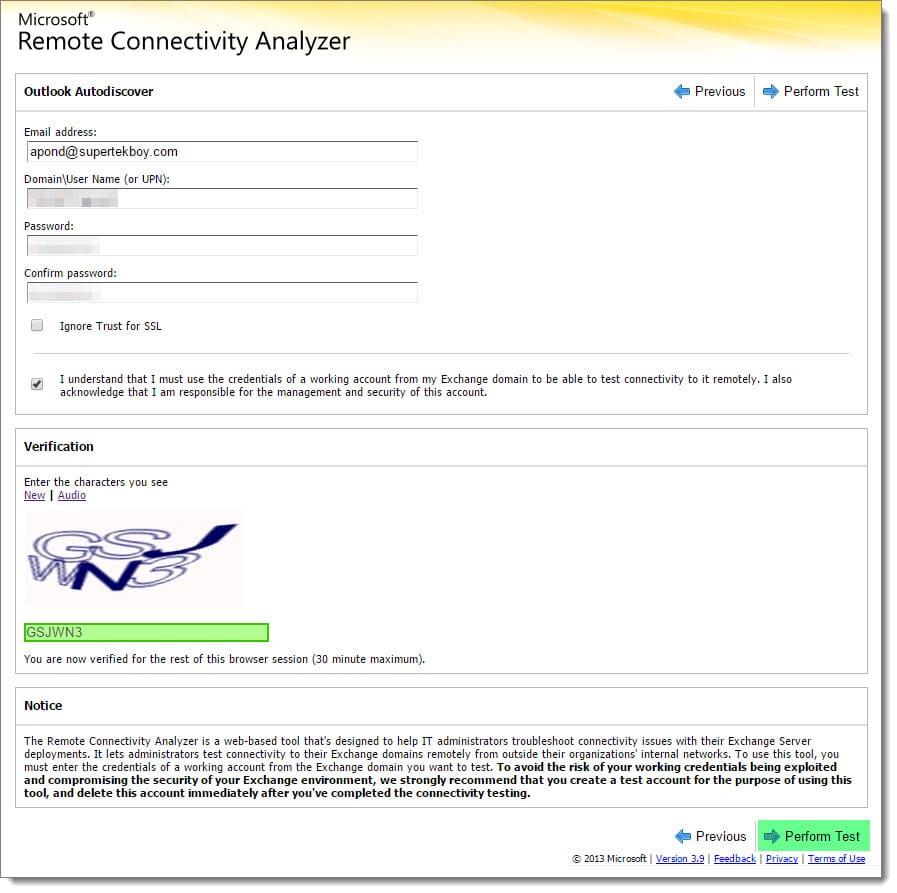
At this point, I recommend checking with the Microsoft Remote Connectivity Analyzer as well.
Further testing
Tip: The Remote Connectivity Analyzer is a web-based utility that aides in the troubleshooting of Exchange, Skype and Office 365 connectivity issues. You can also access the same utility from the shortened URL of exrca.com.
From the Exchange Server tab, select the Outlook Autodiscover button and click Next.

On the next screen enter the details of one of your users. In our case, we will check user apond@supertekboy.com. You will also need to verify a captcha. Click Perform Test.
Tip: I recommend not using an administrative account as this can cause some unpredictable results.
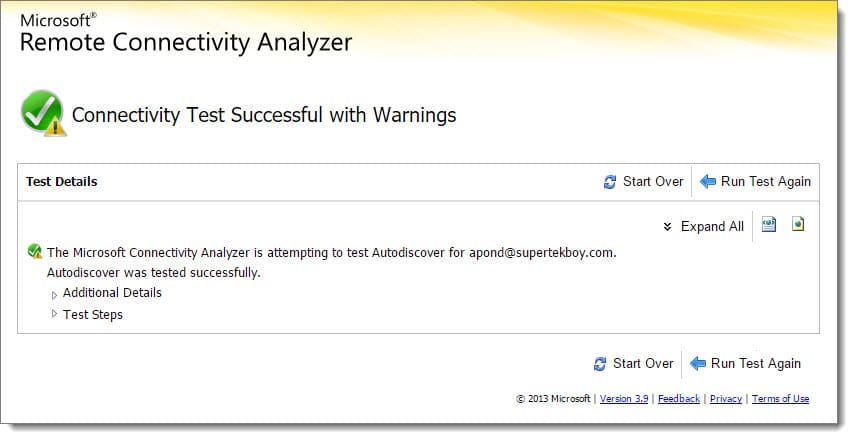
The test can take a minute or two. If successful you should see a green checkmark. You can expand each section to see the specifics of the test.
Outlook clients use four different methods to lookup autodiscover. To make sure the SRV method is working we should expand that section of the test to see how it did. It will be listed as the DNS SRV Redirect Method. In our case, everything checks out.
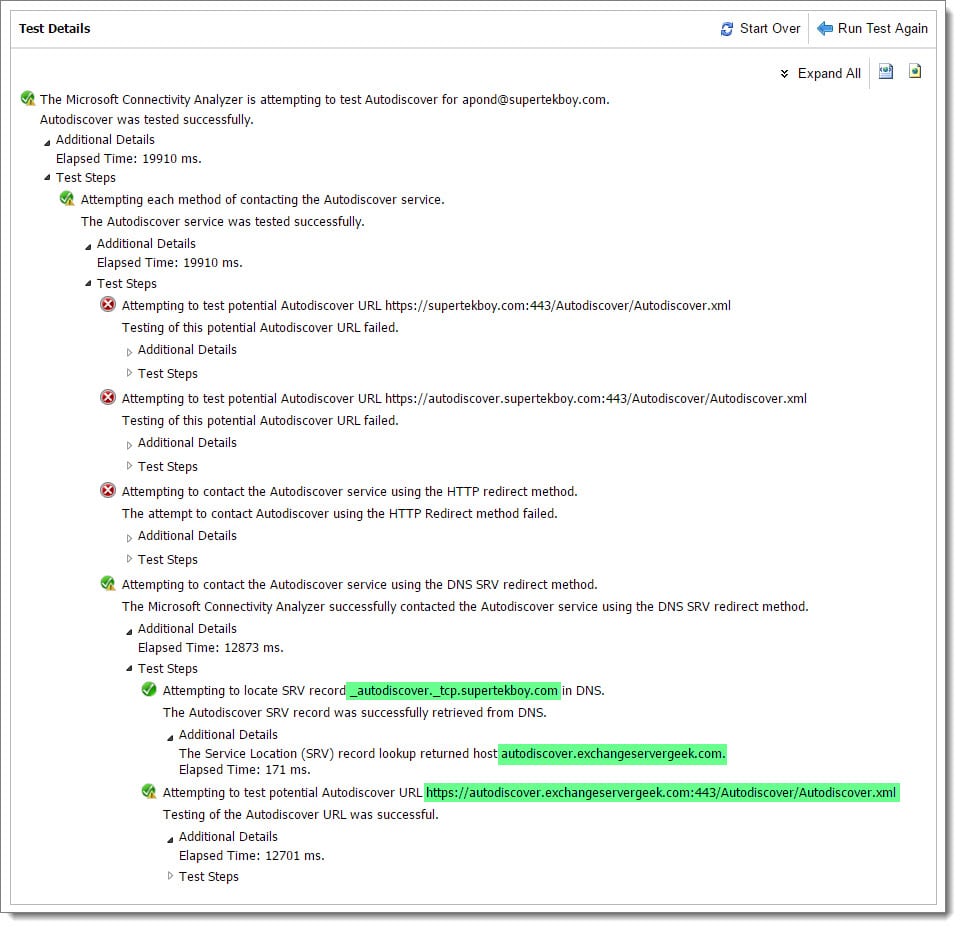
You can see where _autodiscover._tcp.supertekboy.com is discovered with the redirect of autodiscover.exchangeservergeek.com. It then tests the autodiscover URL for exchangeservergeek.com. Everything works. All without touching our SSL certificate.
Recommended Reading
Here are some articles I thought you might like.
- Exchange 2016: Public Folder migration made easy
- Import & Export SSL Certificates in Exchange Server 2016
- Install Exchange 2016 in your lab (7-part series)
- Configure Kemp Load Balancer for Exchange 2016
- Create an IP-less DAG
- What Ignite taught us about Exchange 2016

Join the conversation on Twitter @SuperTekBoy.

I think you should also mention a few words about the “redirectservers” in the registry to avoid popup windows when using this kind of configuration