In a previous article, Configure Kemp Load Balancer for Exchange 2016, we explored how to make client access services highly available for Exchange 2016. In this article, we continue that trend by making the Simple Mail Transfer Protocol (otherwise known as SMTP) highly available.
If you don’t have a load balancer, you can download one for free from Kemp. Kemp’s free appliance is what we will use in this guide.
Don’t worry. Despite the focus being on Kemp, you can translate these principles to any vendor.
Let’s get started!
Disclaimer: I need to point out that I am not sponsored by Kemp in any way. However, this document does contain some affiliate links.
The environment
In our example below, we plan to have two Exchange 2016 servers behind a load balancer in a single site; EX16-01 and EX16-02.
The Kemp load balancer will be a virtual load balancer running on ESXi 5.5. We have already deployed the Kemp image to a virtual machine and made our client access services highly available. The Kemp LoadMaster is performing no other functions at this time.
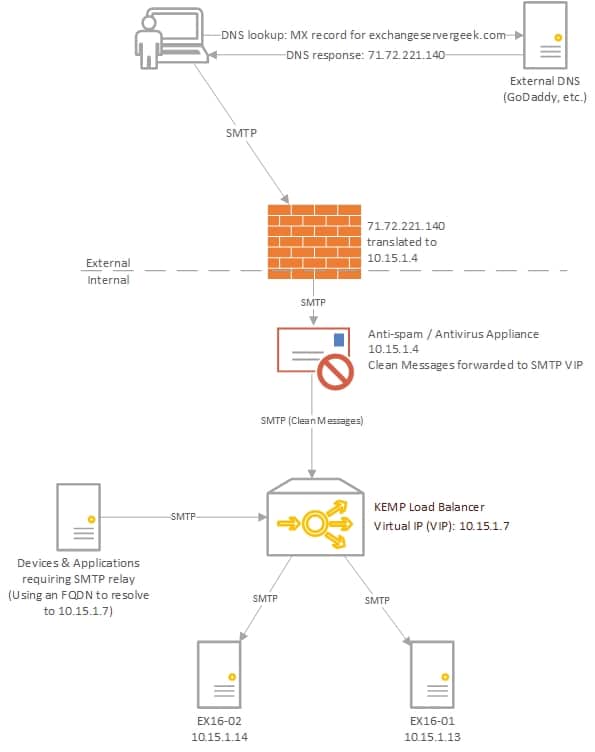
Our external DNS provider will resolve our MX record to webmail.exchangeservergeek.com. This, in turn, resolves to a public IP on our firewall
Tip: I always recommend pointing internal devices or applications to a DNS record because it is quicker to change one entry in DNS than it is to change an IP on every single device and application.
Note: This article offers a simple approach to making SMTP highly available. Keep in mind that to make any service highly available, you also need to eliminate all single points of failure. In our diagram above, this would include the need for multiple load balancers, message hygiene appliances, firewalls, and ISPs.
Luke, use the templates!
Kemp provides templates for the configuration of load balancers. These templates cover many technologies, including Exchange. These templates give you a tremendous head start in configuring your load balancer. In turn, that head start will save you a tremendous amount of time. More importantly, it eliminates a lot of room for human error. It really doesn’t take much effort to get a Kemp load balancer configured for Exchange. In this article, we explore the configuration of a Kemp load balancer using its 2016 templates.
To download the Exchange templates visit https://support.kemptechnologies.com/hc/en-us/sections/200428856-LoadMaster-Templates-.

Kemp offers three distinctive templates.
- Core Services: This is the base template for all Exchange HTTPS and SMTP services.
- ESP Services: The Edge Security Pack (ESP) is a template for advanced authentication needs. One such benefit of ESP is pre-auth for clients. This allows the load balancer to take the brunt of any brute force attacks, passing only legitimate requests to the Exchange Servers. A great alternative if you had previously been using Microsoft Threat Management Gateway (TMG).
- Additional Services: If you plan to offer POP or IMAP, then I recommend snagging this template as well.
For SMTP, we just need the Core Services template pack. You may already have this if you followed our previous article on client access. If so, you can skip to the next section.
To import a template, expand Virtual Services and select Manage Templates. Click the Choose File button and locate your template. Click Add New Template.
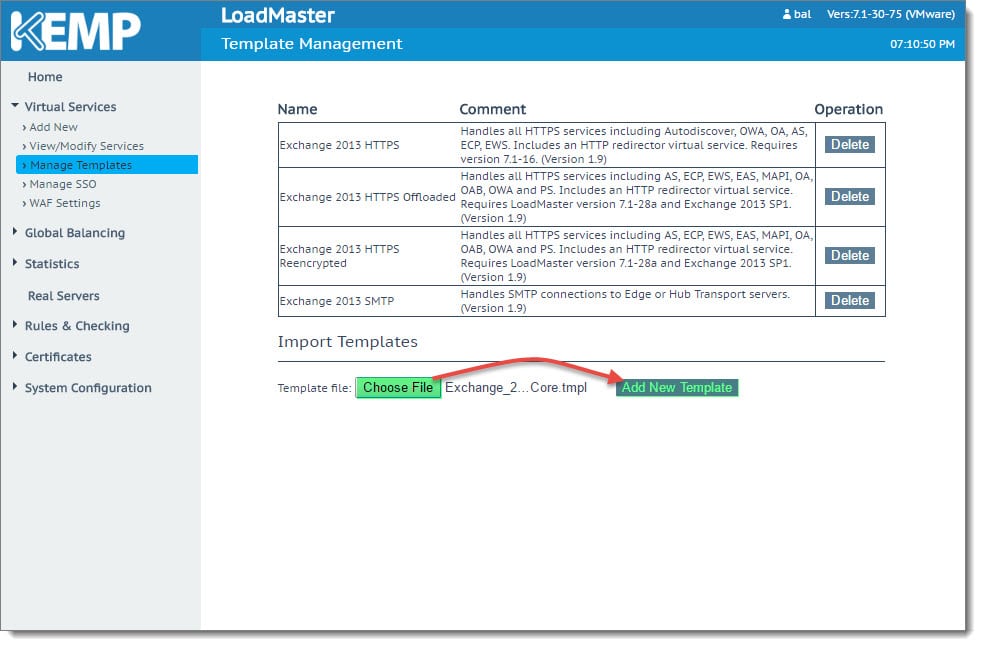
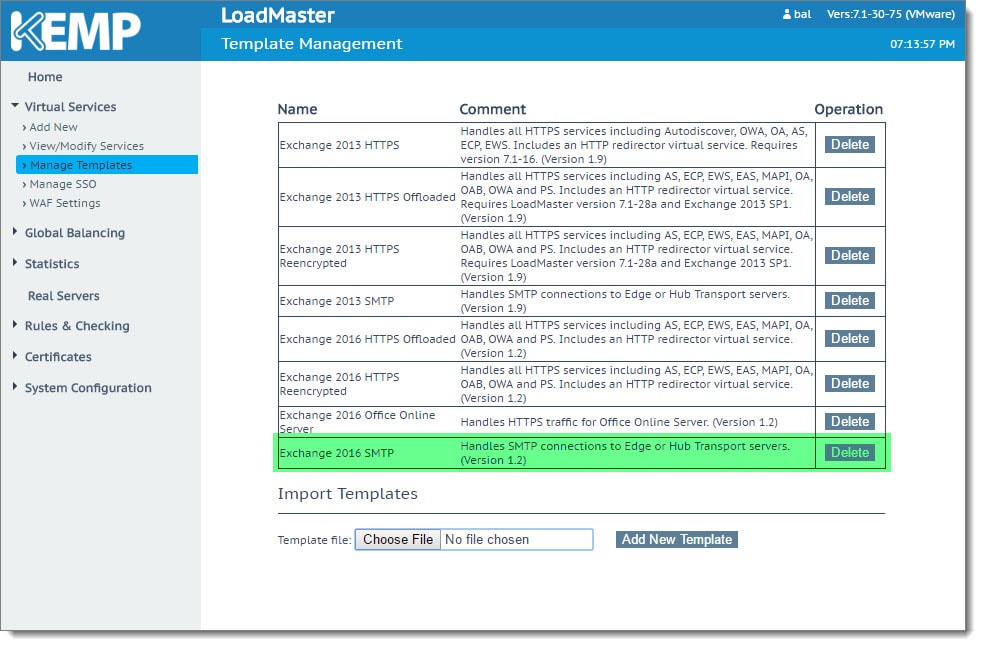
You will receive a confirmation that the templates have been installed. Click Ok. The screen will refresh, showing the newly installed templates. You can use this screen to delete templates should you wish.
Creating the SMTP Virtual IP (VIP)
With our templates installed, we can move on to creating our Virtual IP (VIP) for SMTP. The IP we choose for our VIP must not be used anywhere else in the environment. The Virtual IP will represent all Exchange servers in our site. Using the environment diagram above, our VIP will be 10.15.1.7. We can reuse the same IP as our client access services because SMTP uses a different port. You could use a brand new VIP here should you wish.
To create a new Virtual IP, expand Virtual Services and select Add New. From the Use Template drop-down, pick the Exchange 2016 SMTP template.
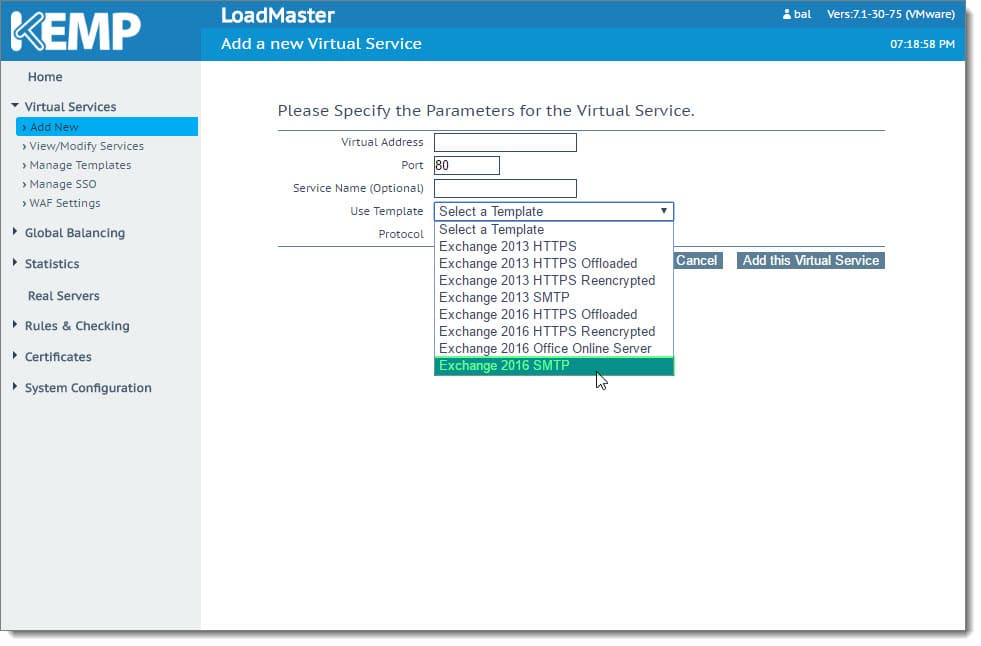
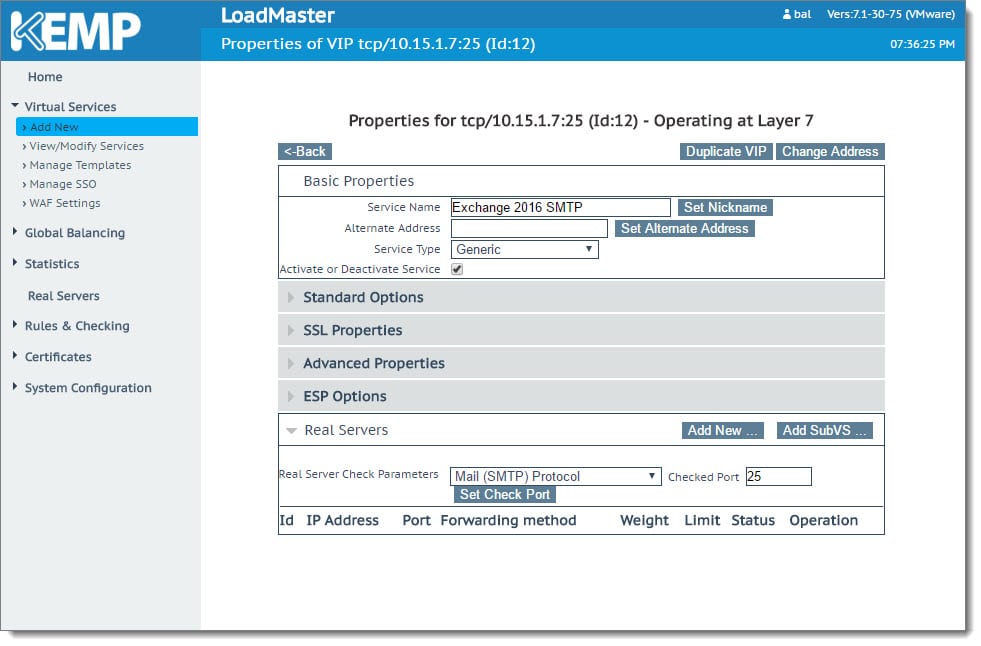
Once we select the template, it automatically populates in the Port and Protocol fields. It also suggests a Service Name. You can make the service name whatever you desire. You will still need to enter a Virtual Address manually. Based on our environment diagram, this will be 10.15.1.7. Once complete, click Add this Virtual Service.

This brings us to the properties screen for the virtual service. This is where the awesome sauce of the template really kicks in. All the hard work has already been done for us. You can expand each section to see what options the template has configured.
Configuring SMTP Servers
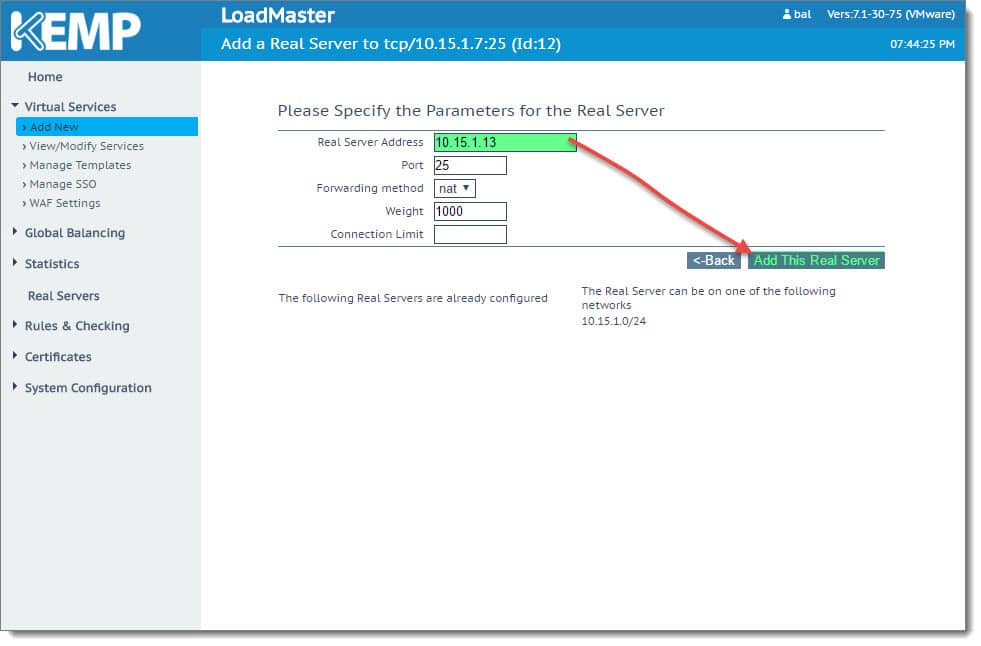
Let’s continue by adding our SMTP servers. Under the Real Servers section, click the Add New button.

This brings up the Parameters for the Real Server screen. The template has already filled out most of these fields for us. All we need to add here is the IP address of our first Exchange server in the Real Server Address field. Then click the Add This Real Server button. In our lab, our first server is 10.15.1.13.
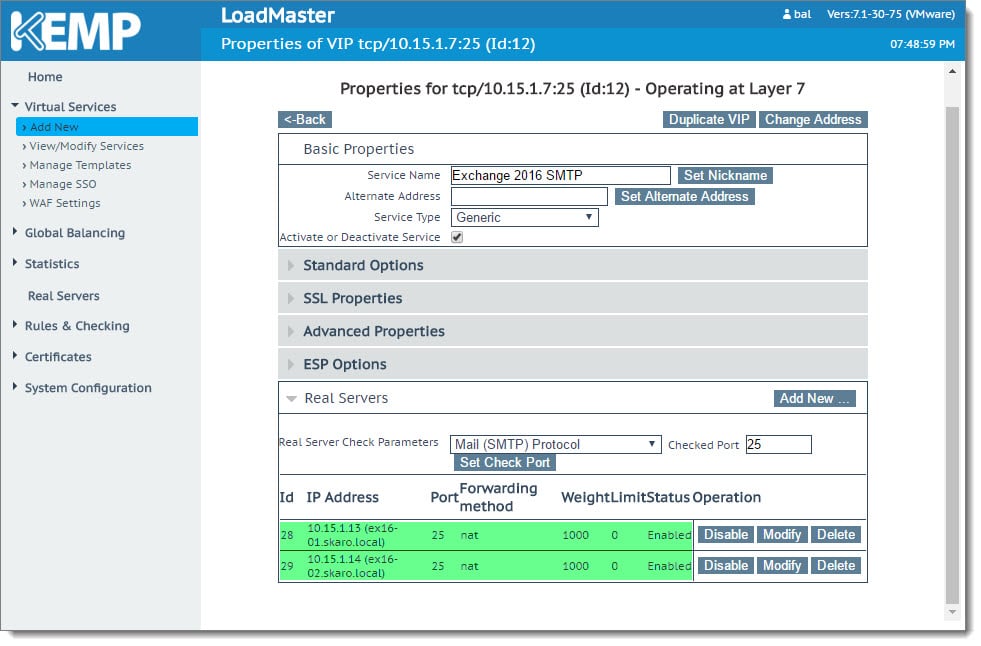
You will receive a confirmation that the server was successfully added. As each server is added, it will be displayed under ‘The Following Real Servers Are Already Configured’ section. Repeat this process for all additional Exchange servers in your site. In our lab, we just have one additional server to add; 10.15.1.14. When complete, click the Back button.

You will notice the servers are now listed at the bottom of the page. Click Modify to make corrections to a server. Click Delete to remove the server. You can also administratively disable a server with the Disable button. When ready, click the Back button.
Back on the View/Modify Services screen, we can see that SMTP services are functional. If one of the servers were to go offline, its IP under the Real Server column would turn red. If both servers were down, the Status column would indicate a status of down.

In our lab, we are now ready to reconfigure our message hygiene appliance to route SMTP messages to the new VIP (10.15.1.7). If we were leveraging a cloud-based message hygiene solution, such as Exchange Online Protection, then we reconfigure our firewall NAT rule to point to the SMTP VIP. The steps for either scenario will vary based on the vendor you use.
Checking our work
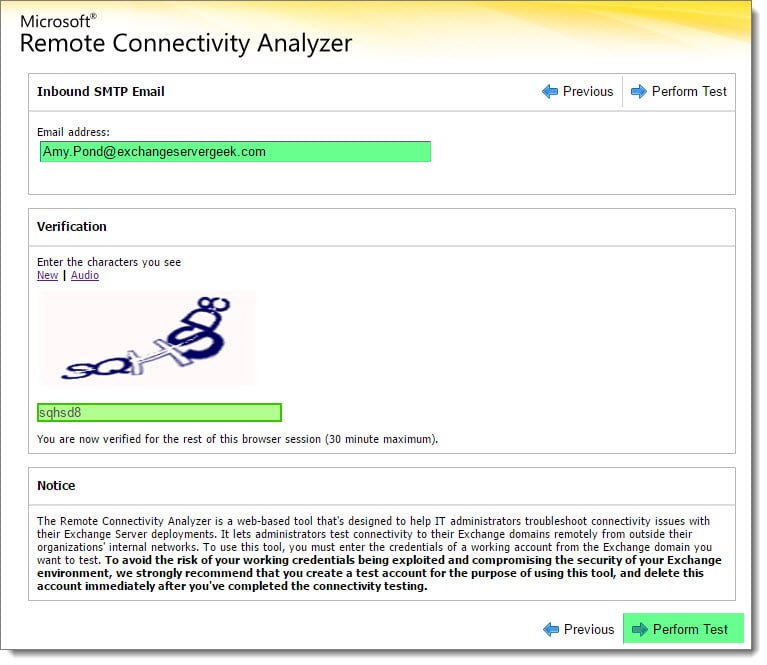
Once you have added the Kemp VIP to your transport path, let’s make sure everything works. My favorite way to test is to use https://testconnectivity.microsoft.com/. Select the Inbound SMTP Email and click Next.

Enter an email address to receive the test message. Verify the captcha. Click Perform Test.
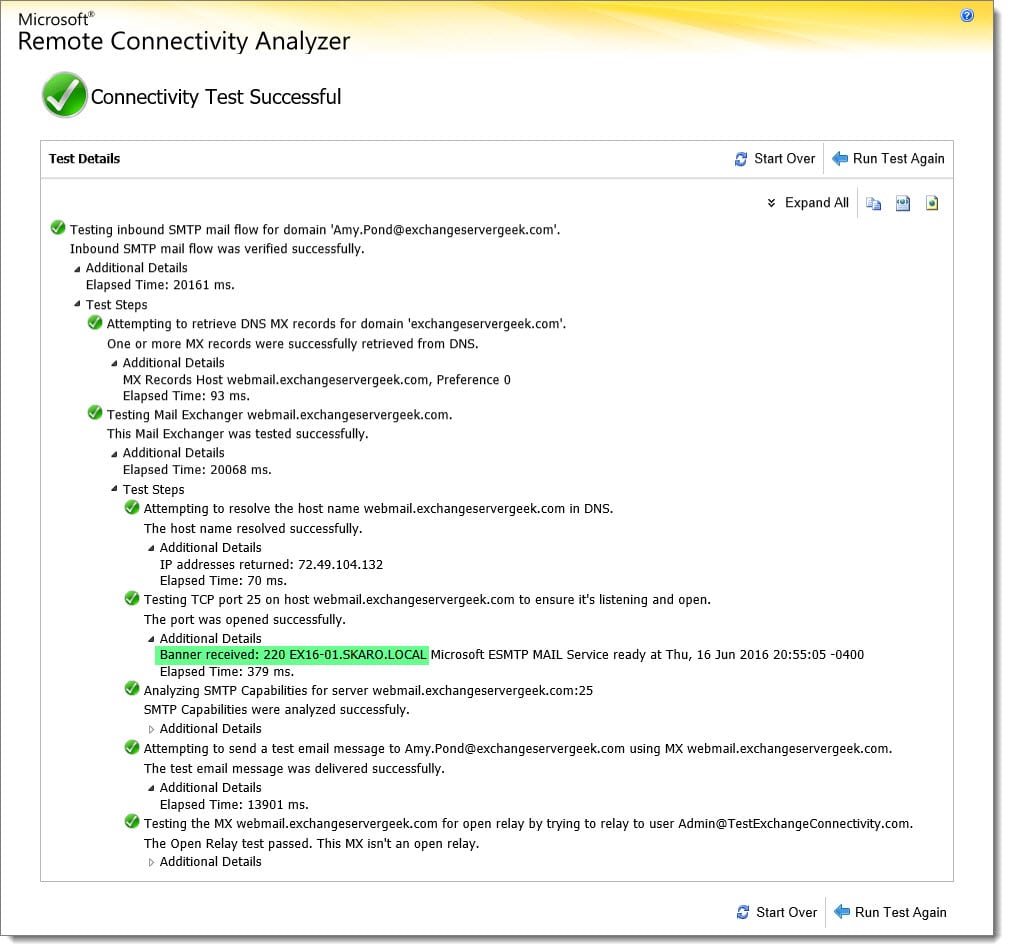
If the test passes, it will indicate which server responded.
If we run the test again, we see our other server responds.
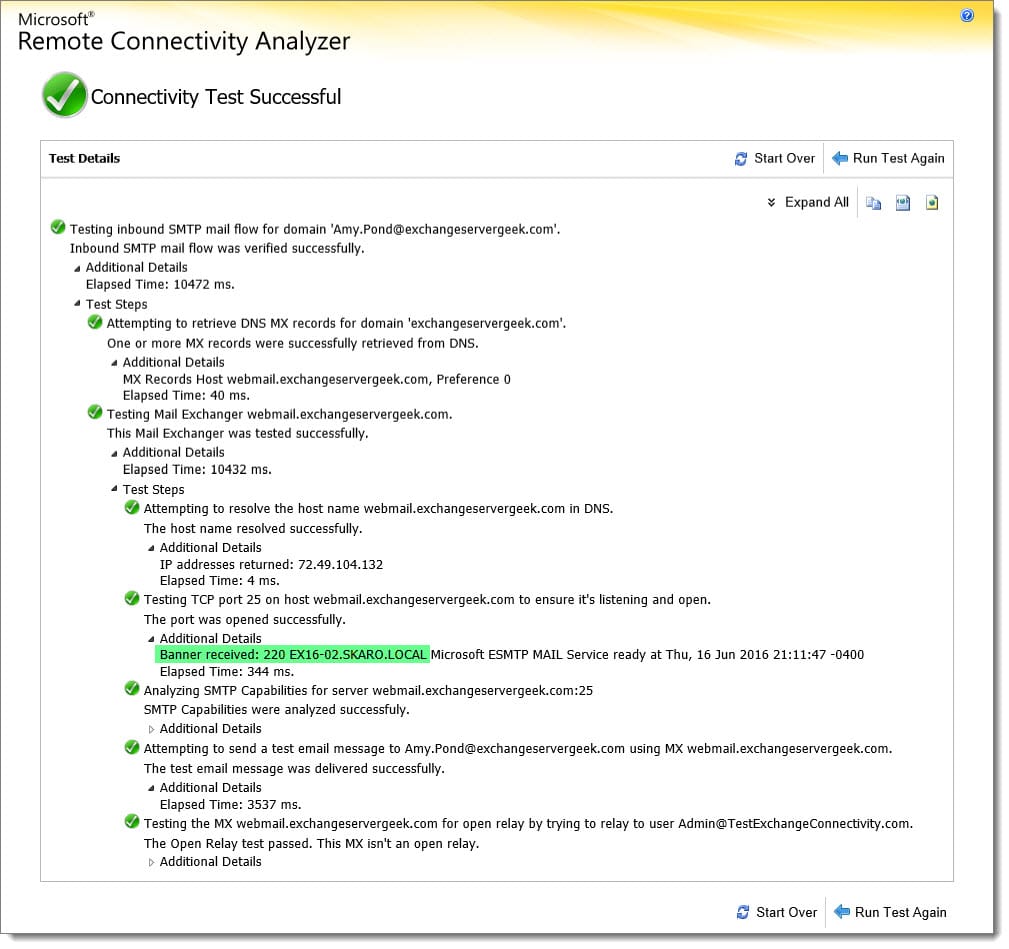
For additional confirmation, we can check the test message headers testexchangeconnectivity.com sent to our user, Amy Pond. Viewing the message headers from Outlook on the Web, we see which server responded. You can gather similar information from the Message Tracking Logs.

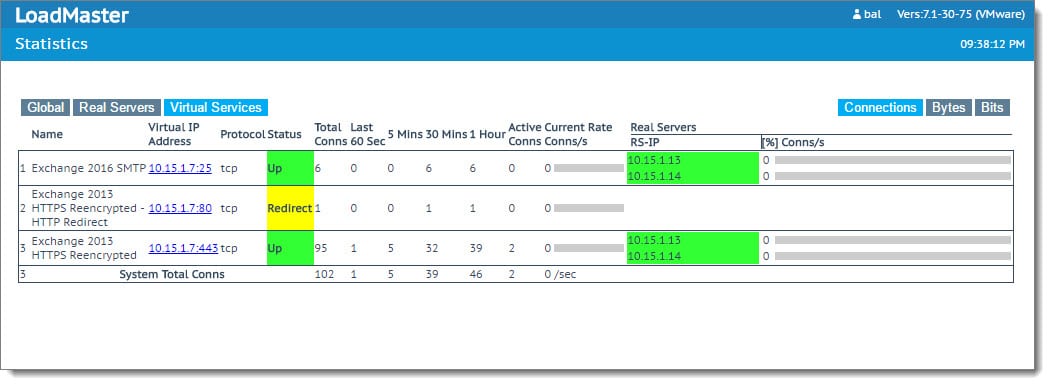
The Kemp Load Balancer also has some great real-time statistics. If you navigate to Statistics >> Real-Time Statistics and select Virtual Services, you can see how connections are currently being distributed.
You are all set!
This wraps up load-balancing Exchange SMTP services. In a future article, we’ll explore using Kemp to pre-authenticate HTTPS traffic. Until then, I recommend checking out our other Exchange 2016 articles below.
Free Kemp Load Balancer
In this article, we used Kemp’s free virtual load balancer. This appliance is free for perpetuity, but it does have some limitations, such as 20 Mbps throughput and no technical support. If you prefer to start with an unlimited virtual appliance with technical support, try a 30-day trial on one of their paid devices.
Note: You can easily switch from the free to the paid appliance at any time by updating your license key.
Further Reading
Here are some articles I thought you might like.
- Configure Kemp Load Balancer for Exchange 2016
- Configure Kemp Virtual Load Balancer on VMware ESXi
- Free Layer-7 Load Balancer from Kemp Technologies
- Install Exchange 2016 in your lab (7-part series)
- Create an IP-less DAG (No Administrative Access Point)
- What Ignite taught us about Exchange 2016

Hello Gareth,
Thank you for the article. Really helpful.
So i configured it in the same way as explained above and do not have any Anti spam server or appliance so just couple of exchange servers in two different sites. S o on the firewall should i NAT the SMTP VIP for outbound emails or configure this VIP as smart hosts instead of MX?
Please advise.
Great how-to, thanks a lot! I have one question..
Is it just incoming SMTP-traffic which gets load-balanced? I think when I have a DAG with two exchange servers and I’m using Split-DNS to connect my clients to Kemps VIP, the outbound SMTP traffic of the clients gets load-balanced, too? 50/50 to both exchange servers which forward the mails to my anti-spam smarthost.
Thanks again!
Nice post. Thanks! One question: is one of the requirements of using Kemp for smtp load balancing that the default gateway of the Exchange server has to be the Kemp? Has this changed? Thanks
Mike
You can set the Exchange default gateways to be whatever you want them to be. 🙂
Great! Thx!