In this article, we explore applying the Exchange product key. We will illustrate this process through both the Exchange Admin Center (EAC) and PowerShell. We will also look at how to license multiple servers at once and how to locate all unlicensed servers in your environment. This process is the same for both Exchange 2013 and 2016.
Apply the product key with Exchange Admin Center
To apply the product key through the Exchange Admin Center follow these steps.
Log into the Exchange Admin Center (EAC). Navigate to the Servers tab and then the Servers sub-tab at the top.
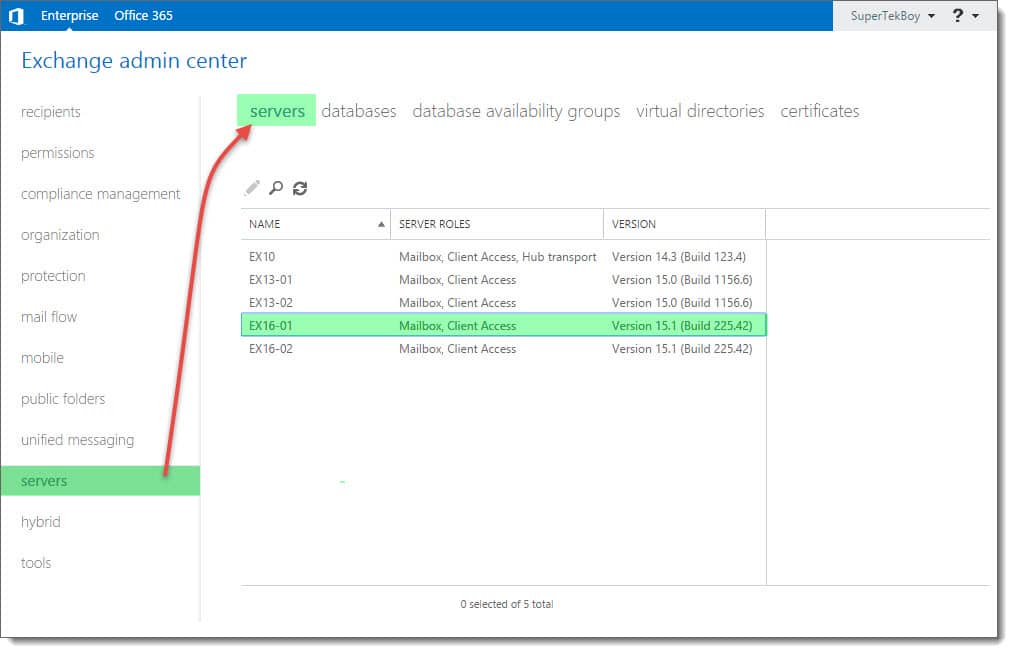
Select the server you wish to apply the key and click the Edit (![]() ) button.
) button.
From the General tab enter your 25-character product key into the 5 boxes under Enter a valid product key section.
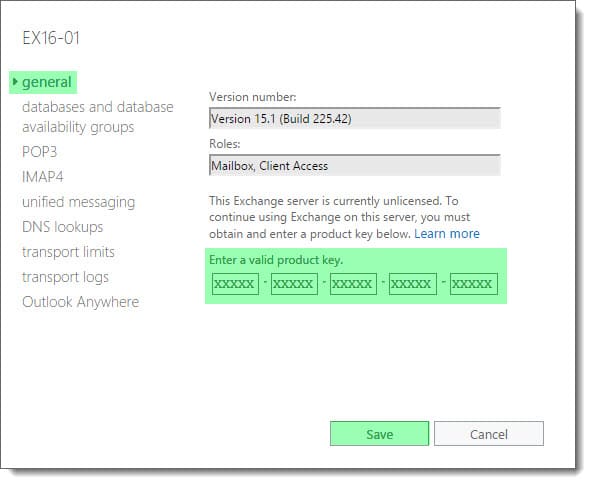
Click Save.
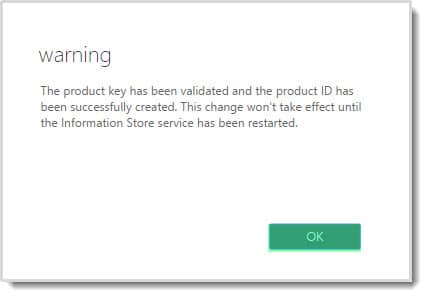
You will receive a message that the product key has been validated but will not be active until you restart the Information Store.
Click Ok.
Warning: Restarting the Information Store will dismount any active databases on that server. For environments with a Database Availability Group (DAG), it is recommended to move the active copies to another server. In a single server environment, it is recommended to perform this task during a maintenance window.
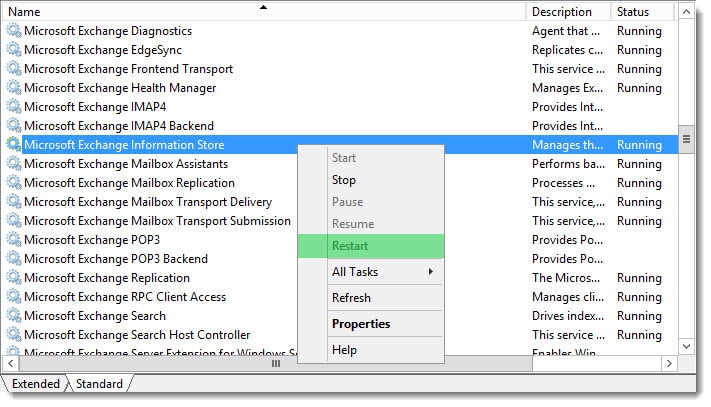
To restart the Information Store navigate to Start > Administrative Tools > Services. Right-click on the Microsoft Exchange Information Store and click Restart from the context menu.
Once restarted let’s examine the General tab again in the EAC.
This time we can see the inclusion of the Product Edition box. This box will either report Standard or Enterprise depending on the license you have. In our case it reports Enterprise. A checkbox to Change Product Key will also appear. This is especially useful if you need to swap out a Standard edition key for an Enterprise edition key. Standard Edition limits you to 5 databases whereas Enterprise Edition grants you 100 databases. Keep in mind that you can not swap an Enterprise key for a Standard key. You will also notice the product key boxes have been grayed out.

Now let’s look at how to do this with PowerShell.
Apply the product key with PowerShell
First, let’s open the Exchange Management Shell.
To apply a product key to a server named EX16-02 you would enter the following command:
C:\> Set-ExchangeServer -Identity EX16-02 -ProductKey xxxxx-xxxxx-xxxxx-xxxxx-xxxxx
In this command:
- Identity specifies the server where you want to apply the product key.
- ProductKey specifies the 25-character Standard or Enterprise product key.
We will receive a warning that the Information Store needs to be restarted. Let’s do that next. To restart the Microsoft Exchange Information Store on the local server issue the following command:
Warning: Restarting the Information Store will dismount any active databases on that server. For environments with a Database Availability Group (DAG), it is recommended to move the active copies to another server. In a single server environment, it is recommended to perform this task during a maintenance window.
 C:\>
WARNING: The product key has been validated and the product ID has been successfully created. This change won't take
effect until the Information Store service has been restarted.

 C:\> Restart-Service MSExchangeIS

WARNING: Waiting for service 'Microsoft Exchange Information Store (MSExchangeIS)' to stop...
WARNING: Waiting for service 'Microsoft Exchange Information Store (MSExchangeIS)' to stop...
WARNING: Waiting for service 'Microsoft Exchange Information Store (MSExchangeIS)' to stop...
WARNING: Waiting for service 'Microsoft Exchange Information Store (MSExchangeIS)' to start...
WARNING: Waiting for service 'Microsoft Exchange Information Store (MSExchangeIS)' to start...
WARNING: Waiting for service 'Microsoft Exchange Information Store (MSExchangeIS)' to start...
[PS] C:\>
Once the command is complete you will be returned to a prompt. You can check the status of the service by running the following command. In our example below, we can see the Information Store has returned to a running state.
 C:\> Get-Service MSExchangeIS

Status     Name             DisplayName
------     ----             -----------
Running    MSExchangeIS     Microsoft Exchange Information Store
To check that the product key has been correctly applied run the following command.
 C:\> Get-ExchangeServer EX16-02 | ft Name,Edition,ProductID,IsExchangeTrialEdition -Auto

Name      Edition      ProductID                 IsExchangeTrialEdition
----      -------      ---------                 ----------------------
EX16-02   Enterprise   XXXXX-XXX-XXXXXXX-XXXXX   False
In this output, we can see the Edition column is reporting as Enterprise. If this were a trial it would be reported as StandardEvaluation. In addition, the IsExchangeTrialEdition column reports as False.
You can also pipe the Get-ExchangeServer cmdlet into the Set-ExchangeServer cmdlet to license multiple servers at once. In this example, we look for all Exchange 2013 servers that are in trial mode and license them.
C:\> Get-ExchangeServer | Where {$_.AdminDisplayVersion -like "*15.0*" -and $_.IsExchangeTrialEdition -eq $true} | Set-ExchangeServer -ProductKey XXXXX-XXXXX-XXXXX-XXXXX-XXXXXIn addition, to look for all unlicensed servers in your environment you could run this command.
C:\> Get-ExchangeServer | Where {$_.IsExchangeTrialEdition -eq $true}
You are all set! How did your implementation go? Drop a comment below or join the conversation on Twitter @SuperTekBoy.

Leave a Reply