How to renew a certificate in Exchange
In this article, we explore the process of renewing a certificate in Exchange. We demonstrate how to accomplish this using the Exchange Admin Center and PowerShell. The high-level steps include:
- Create a new certificate signing request
- Upload the certificate signing request to your certificate provider
- Download the processed certificate from your certificate provider
- Install the certificate on Exchange
- Export the new certificate to a PFX file
- Import the certificate to all other Exchange servers
- Assign Exchange services to the new certificate on each server
- Delete the old certificate
Let’s get started!
Note: These steps are identical for Exchange 2013, Exchange 2016 CU22 and earlier, and Exchange 2019 CU11 and earlier. If you are using Exchange 2016 CU23 or greater or Exchange 2019 CU12 or greater, you must renew your certificate with all new PowerShell commands covered in the following article.
Renew a Certificate with Exchange Admin Center
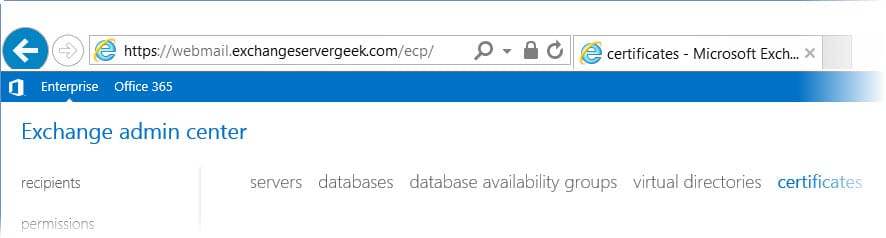
Log in to the Exchange Admin Center (EAC). Select the Servers tab and Certificates sub-tab.
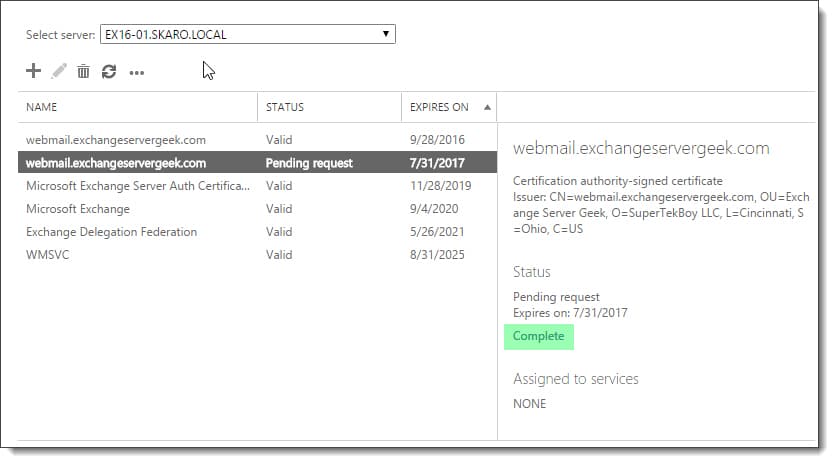
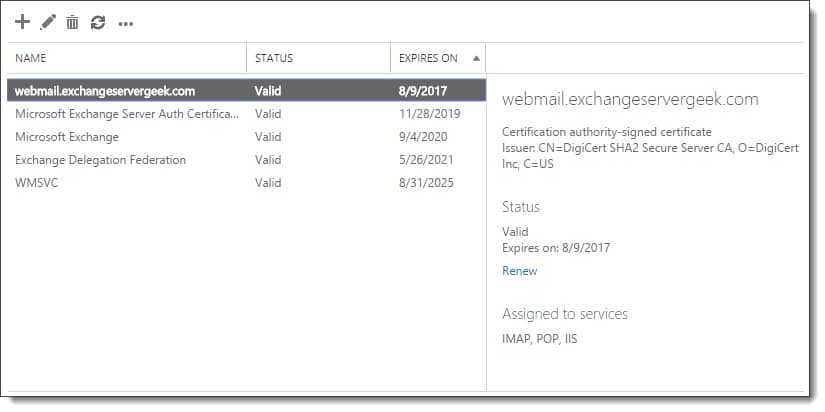
This page displays all currently installed Exchange certificates. In our example, we see four self-signed certificates. We also see the certificate that we acquired from a trusted certificate authority (affiliate). This certificate is named webmail.exchangeservergeek.com. This is the certificate we will be renewing.
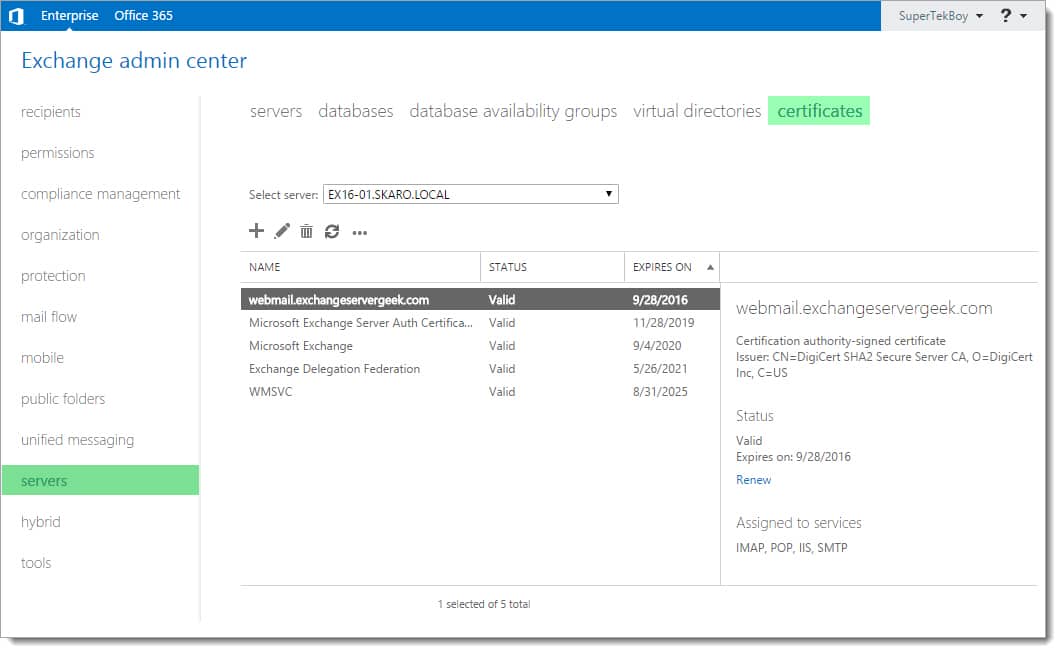
Select the certificate to be renewed (in our case webmail.exchangeservergeek.com) and click the Renew link in the task pane to the right.

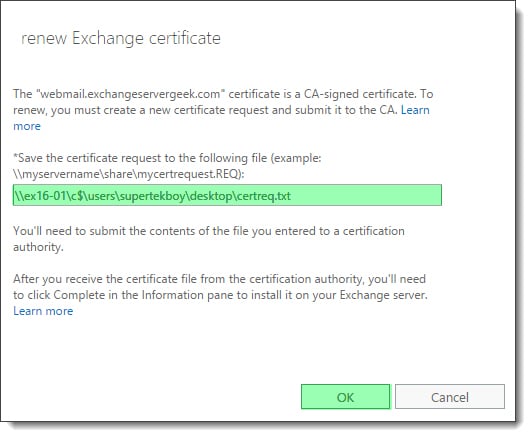
The renewal process will create a new certificate request to submit to our certificate authority. Specify a location to save this certificate request. This location must be in the form of a UNC path. In our example, we specify a file called certreq.txt at the path \\ex16-01\c$\users\supertekboy\desktop\. This will create a text file on our server’s desktop. Click Ok.
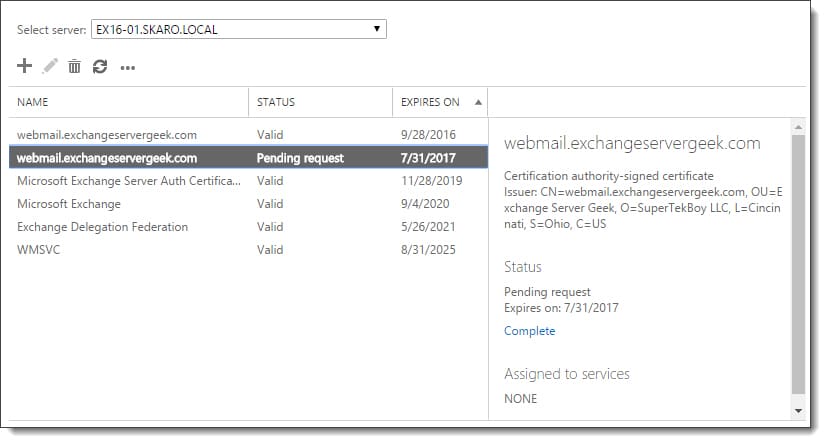
You will notice we now have a duplicate of the webmail.exchangeservergeek.com certificate in a Pending Request state. The duplicate minimizes downtime for your users because it allows you to process the certificate renewal without affecting the existing certificate.
Next, we must process this request through our third-party certificate provider. The specific steps for each certificate provider are different, but the principles remain the same. You provide a certificate request. The provider validates your identity. The provider then issues you a certificate.
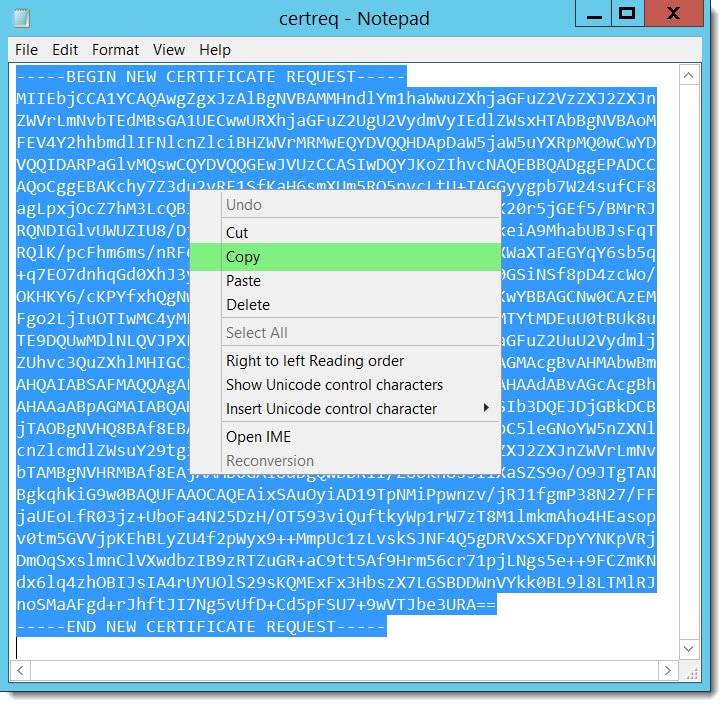
First, we need to get the certificate request we created in the previous steps. This should have created a file on your desktop (or the path you specified). Open this file with Notepad and copy the entire contents, including the BEGIN and END lines.
At some point, the third-party certificate authority will ask you to paste the contents of the certificate request file into their system for processing. For specific steps on how to do this, check with your certificate provider. From the certificate request file, the provider will identify all the subject and alternate names you need. The validation process will then begin.
The validation process can vary between providers as well. Some providers will perform a simple domain validation where they send an email to the recipients listed on your domain registration. Others will perform more extensive checks, including the validation of your business against various agencies.
Note: There are plenty out there, but I personally recommend DigiCert (affiliate). Not only do they have fantastic technical support, but they also have some really neat certificate tools. Best of all, their certificate turnaround time is incredibly fast (even on a Sunday at 9:07 pm–yep, personal experience right there.).
Once your identity has been validated and your certificate approved, download and unpack the cert. In our case, we will save the unpacked cert to our server’s desktop.
Complete the certificate renewal with Exchange Admin Center
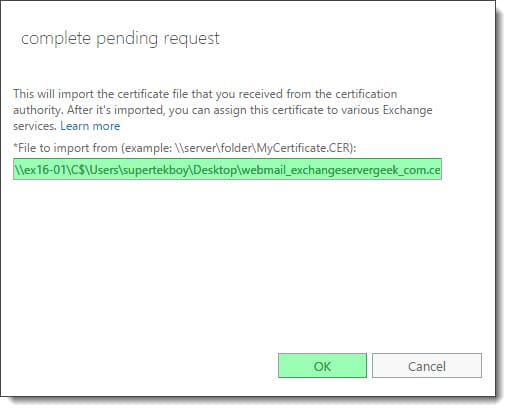
Select the Servers tab and Certificates sub-tab. Select your pending certificate request and click the Complete link from the action pane.
In the Complete Pending Request window, type the UNC path to the location of the unpacked certificate. Click OK.
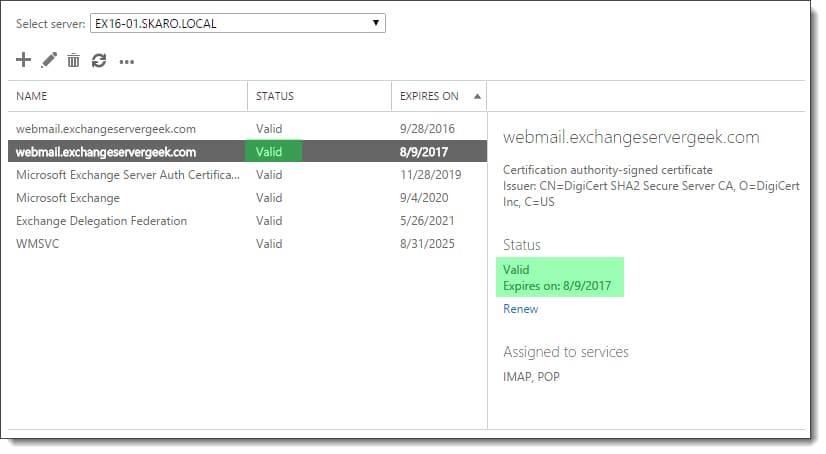
Once the task completes, the certificate will be listed as Valid in both the Status column and in the Status section in the action pane.
Assign Services to a Certificate with Exchange Admin Center
You will notice we still have a duplicate of the certificate. The one with the later expiration date is your new certificate. This certificate is not yet live. To make it live, we must assign services to the certificate.
Select the Servers tab and Certificates sub-tab. Select your certificate and click the Edit (![]() ) button.
) button.
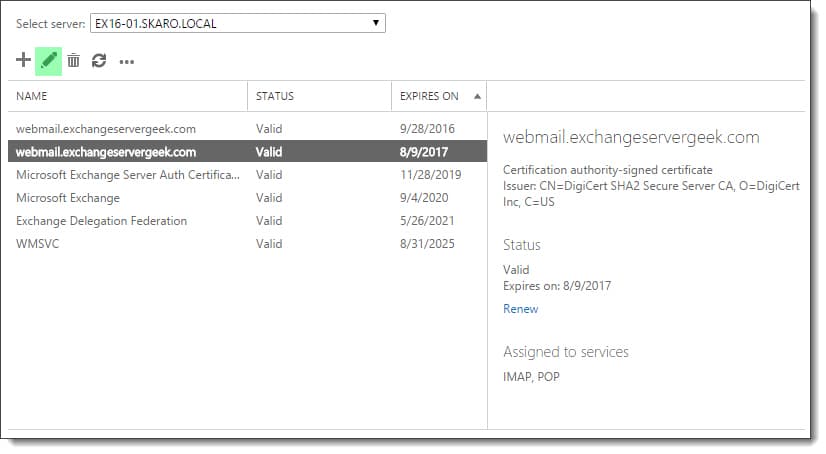
Select the Services tab. Pick your desired services. Click Save. In our example, we just picked IIS.

This may take a minute or so to process. Once complete, you will see the certificate has been assigned to the services you picked. In our case, IIS is now assigned to the certificate.

Once you have assigned services to this certificate, you can safely delete the old certificate.
Delete the old certificate
To delete your old certificate, select the certificate and click the Delete (![]() ) button.
) button.

You will be prompted to confirm the deletion. Click Ok to accept.

The old certificate will be removed.
Renew a Certificate with PowerShell
In this section, we will take a look at how to renew a certificate using PowerShell. First, we need to find the thumbprint of the certificate we plan to renew. To do this issue, the following command.
C:\> Get-ExchangeCertificate | Where {$_.IsSelfSigned -eq $false} | FL FriendlyName,CertificateDomains,Thumbprint,NotAfterThis will return all certificates that are not self-signed. In our example, we see just a single certificate returned. This certificate is named webmail.exchangeservergeek.com and has a corresponding thumbprint. This is the certificate we will be renewing.
 C:\> Get-ExchangeCertificate | Where {$_.IsSelfSigned -eq $false} | FL FriendlyName,CertificateDomains,Thumbprint,NotAfter

FriendlyName : webmail.exchangeservergeek.com
CertificateDomains : {webmail.exchangeservergeek.com, autodiscover.exchangeservergeek.com}
Thumbprint : 559642FCD3DD4769D79A457D11875AF9E6E49F3C
NotAfter : 9/28/2016 8:00:00 AM
Now that we have the thumbprint, let’s renew the certificate. To do this issue, the following command. Be sure to use your thumbprint here.
C:\> Get-ExchangeCertificate -Thumbprint 559642FCD3DD4769D79A457D11875AF9E6E49F3C | New-ExchangeCertificate -GenerateRequest -RequestFile "\\ex16-02\c$\users\supertekboy\desktop\certreq.txt" -PrivateKeyExportable:$trueIn this command:
-Thumbprint identifies the certificate we plan to renew.
-GenerateRequest specifies this will not be a self-signed certificate. Omitting this parameter would generate a self-signed certificate.
-RequestFile is the save location for the certificate request file. This location must be in the form of a UNC path. In our example, we specify a file called certreq.txt at the path \\ex16-02\c$\users\supertekboy\desktop\.
The certificate request data will be returned both in PowerShell and also saved to the file at the UNC path. Either copy the output from PowerShell, or, from the file located at the UNC. Be sure to include the BEGIN and END lines.
At some point, the third-party certificate authority will ask you to paste the contents of the certificate request file into their system for processing. For specific steps on how to do this, check with your certificate provider. From the certificate request, the provider will identify all the subject and alternate names you need. The validation process will then begin.
The validation process can vary between providers as well. Some providers will perform a simple domain validation where they send an email to the recipients listed on your domain registration. Others will perform more extensive checks, including the validation of your business against various agencies.
Once your identity has been validated and your certificate approved, download and unpack the cert. In our case, we will save the unpacked cert to our server’s desktop.
To complete the certificate request, we need to run the following command.
C:\> Import-ExchangeCertificate -FileName "\\ex16-02\c$\users\supertekboy\desktop\webmail_exchangeservergeek_com.cer" -PrivateKeyExportable:$true
In this command:
-FileName specifies the UNC path to the certificate file we unpacked.
-PrivateKeyExportable allows us to export the certificate for use elsewhere (when set to $true).
This will return a new thumbprint. The renewed certificate is actually a duplicate. This minimizes downtime for your users because it allows you to process the certificate renewal without affecting the existing certificate.
 C:\>

Thumbprint                               Services    Subject
----------                               --------    -------
95194B92F3CFFC9CE7F3C8A94B48E3973D472195 IP.....     CN=webmail.exchangeservergeek.com, OU=Exchange Server Geek, O=S...
If you rerun the Get-ExchangeCertificate cmdlet, you will notice the duplicate certificate. The one with the later “NotAfter” date is your new certificate. This certificate is not yet live. To make it live, we must assign services to the certificate. To do this, we run the following command. Be sure to use the new thumbprint.
C:\> Enable-ExchangeCertificate –Thumbprint 95194B92F3CFFC9CE7F3C8A94B48E3973D472195 –Services "IIS, SMTP, POP, IMAP"In this command:
-Thumbprint identifies the certificate we wish to modify.
-Services identify the services we wish to enable on our certificate.
In our example, we enabled IIS, SMTP, POP, and IMAP for our renewed certificate. Let’s see how things look by running a slightly different Get-ExchangeCertificate command.
 C:\> Get-ExchangeCertificate | where {$_.IsSelfSigned -eq $false} | Format-List FriendlyName,Thumbprint,NotAfter,Services

FriendlyName : webmail.exchangeservergeek.com
Thumbprint : 95194B92F3CFFC9CE7F3C8A94B48E3973D472195
NotAfter : 8/9/2017 8:00:00 AM
Services : IMAP, POP, IIS, SMTP

FriendlyName : webmail.exchangeservergeek.com
Thumbprint : 559642FCD3DD4769D79A457D11875AF9E6E49F3C
NotAfter : 9/28/2016 8:00:00 AM
Services : IMAP, POP, SMTP
The blue thumbprint identifies our new certificate. The yellow thumbprint identifies the old certificate that is about to expire. Now that we have successfully assigned services to our new certificate, we can safely delete our old certificate.
To delete your old certificate, run the following command, specifying the old thumbprint. Hit Enter to confirm.
 C:\> Remove-ExchangeCertificate -Thumbprint 559642FCD3DD4769D79A457D11875AF9E6E49F3C
Confirm
Are you sure you want to perform this action?
Remove certificate with thumbprint 559642FCD3DD4769D79A457D11875AF9E6E49F3C from the computer's certificate store?
[Y] Yes [A] Yes to All [N] No [L] No to All [?] Help (default is "Y"):
To confirm removal, rerun the Get-ExchangeCertificate cmdlet above.
Checking your work
Now that we have our new certificate installed, we need to test it to make sure it is working properly.
The easiest way to check is to enter your URL into a web browser. In our case, we enter https://webmail.exchangeservergeek.com/ecp.
First, this should result in no certificate errors.
Second, click the padlock in the address bar and select View Certificates. Examine the certificate expiration date. Your new expiration date should be reflected.
Test results all good? Awesome! Your certificate is correctly installed.
If you have Exchange Hybrid
If you have Exchange Hybrid, it is highly likely your old certificate is being used for hybrid mail flow (forced TLS) between Exchange Online and Exchange on-premises.
If you are running Exchange Hybrid, rerun the Hybrid Configuration Wizard and select your new certificate to be used for hybrid mail flow. When the hybrid configuration wizard completes, you will be able to delete the old certificate from Exchange.

More than one server?
If you have multiple Exchange servers, you will also need to copy this certificate to each Exchange Server. To do this, check our article on importing and exporting Exchange certificates. If you have a load balancer in the mix, you may also need to import this certificate to that device as well.
Further Reading
Here are some articles I thought you might like.
- Generate a Certificate Request in Exchange 2013
- Complete a Certificate Request in Exchange 2013
- Import & Export a Certificate in Exchange 2013
- Configure Kemp Load Balancer for Exchange 2016
- Install Exchange 2016 in your lab (7-part series)

Renew a Certificate with PowerShell with exchange 2019
Thanks for the great suggestion KONE. Check out the updated article here – https://supertekboy.com/2023/07/08/renew-a-certificate-in-exchange-2016-2019/
awesome and detailed step by step explanation, thank you Gareth!
Good job identifying all the necessary details.
I’ve read many an article where the author started, then jumped to the end…I need the details of what got you to the end. Thanks!!
B
Well, that was a pretty fascinating read, not going to lie. I really hope you continue to write. Probably one of the more informative pieces I’ve read on this subject. Thanks!