An HP Virtual SAN Appliance is a great way to take existing local storage from multiple physical servers and combine them into a Virtual SAN. A Virtual SAN is a great way to get all the benefits of a traditional SAN, but at a fraction of the cost. In essence, the SAN is entirely software-based. The Virtual SAN Appliances (VSAs) that make up the SAN can be hosted either on VMware ESXi or Microsoft Hyper-V.
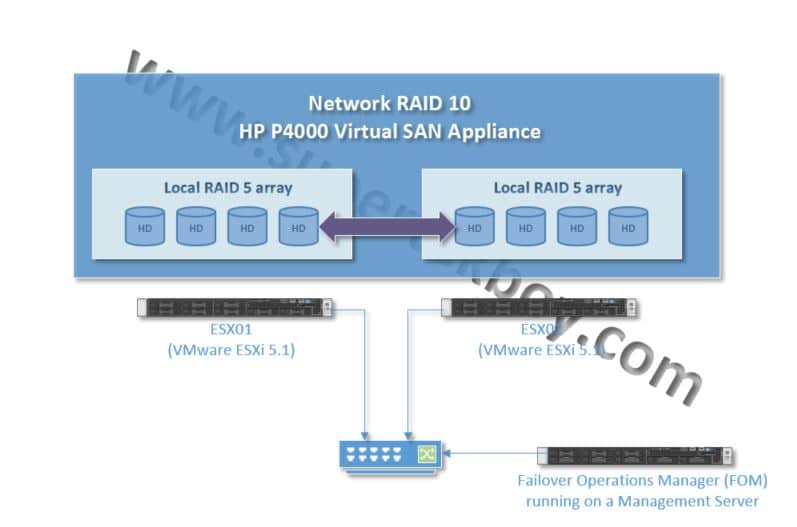
This particular article will focus on how to increase the storage space on a Virtual SAN Appliance that is already in production. It will focus specifically on a storage appliance hosted on VMware. In our scenario we will have two Virtual SAN Appliances, each running on VMware ESXi 5.1 with HP ProLiant Gen8 hardware. A Fail-Over Manager (FOM) will also exist and its sole purpose is to act as a tie-breaker during elections.
We will also run our VMware ESXi host operating system from an 8GB SD card, which is an option on most server motherboards now. This will allow us to use all available drive bays for our Virtual SAN Appliances.
In our plan, we will also have servers with 8 total bays. 4 already populated with hard drives that are in production and 4 open hot-swap bays.
This is what our network will look like (click the image for a larger view).
Step 1 – Adding hard drives
In our example, we are using hot-swap hard drive bays so the hard drives themselves can be inserted at any time. Adding hard drives will not affect business continuity and can be installed during regular business hours.
On HP ProLiant Gen8 servers when you insert a new hard drive in an empty bay the drive will flash for a few seconds and that go dark until it is added to a logical array.
We also have 4 available drive bays on each of our 2 servers, so we have purchased 8 drives total. We have decided to go with 900GB SAS drives.
Step 2 – Shut down the virtual environment
This process will require the servers to be shut down. Because these servers are also acting as VMware hosts they are running virtual machines. Given this we need to do our due diligence and either Vmotion our virtual machines to the other host, or, shut them down completely.
The beauty of the VSA solution is we only need to take down one virtual host at a time. We also only need to be licensed for VMware Essentials Plus. The Virtual SAN appliances replicate all changes between the two hosts so there is no need for Storage Vmotion. We only need Host Vmotion to move virtual machines safely and keep them up and running for business continuity.
Each virtual host will also have a virtual machine that is the Virtual SAN Appliance. These appliances are directly connected to the local storage so they can NEVER be Vmotioned. Instead, you will have to shut down the VSA. The VSA on the second host will remain functional as it will serve all the Virtual Machines.
To Vmotion the virtual machines do the following:
Log in to VMware vSphere Client. Click on the View menu, Inventory submenu and select Hosts and Clusters. In the left pane, expand the Datacenter and Cluster top-level tree nodes and select the name of the virtual host you plan to shut down first. Select the Virtual Machines tab in the right pane.
Select all the virtual machines you wish to Vmotion to another host. You can select multiples by either holding down the CTRL key or the SHIFT key.
Right-click on that virtual machine and select Migrate from the context menu.
On the first page of the Migrate Virtual Machine dialog box, make sure Change Host is selected, then click Next.

On the Select Destination page, select another host and click the Next button. Keep the recommended setting of High Priority on the vMotion Priority page and click Next. Click Finish.
In the Recent Tasks pane at the bottom, wait for the Migration to successfully complete. When all virtual machines have been migrated over to another host, shut down the Virtual SAN Appliance (VSA) virtual machine.
Once shut down you can safely put the host into Maintenance Mode. You do this by right-clicking on the name of your virtual host in Vcenter and selecting Enter Maintenance Mode from the menu. Click Yes when asked to confirm.
Once in Maintenance mode, you can then reboot the server. To do this, right-click on the host and select Reboot from the context menu. Click Yes when asked to confirm.
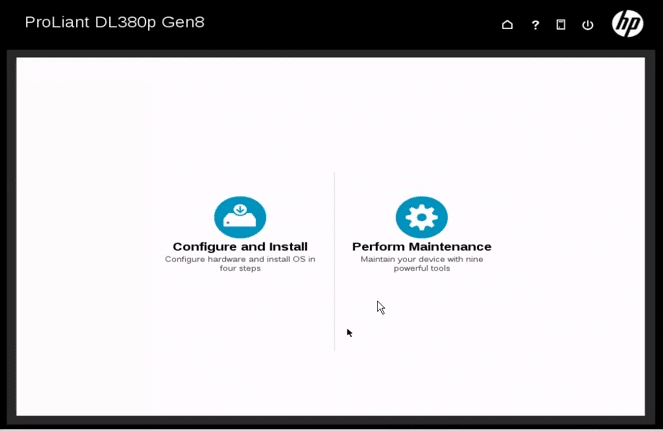
Now in our example, we are using HP ProLiant Gen8 servers so you will want to boot into Intelligent Provisioning. You do this by hitting F10 while the server is displaying the HP logo on POST.
If you are on G7 or earlier generations of ProLiant Servers you will want to make sure you had your SmartStart DVD available and mounted prior to rebooting.
Step 3 – Create a new logical array
Once booted into Intelligent Provisioning we need to put the four new hard drives into a new logical array. This array will run as RAID 5 so, we will lose one of the four drives to parity, reducing our total RAW space by 900GB.
To create a new logical array:
Select the Perform Maintenance icon.
Select the Array Configuration Utility icon.

Select the name of the array controller where the drives are attached. Select the Create Array button in the right pane. Click the Select All checkbox to select the four new drives.
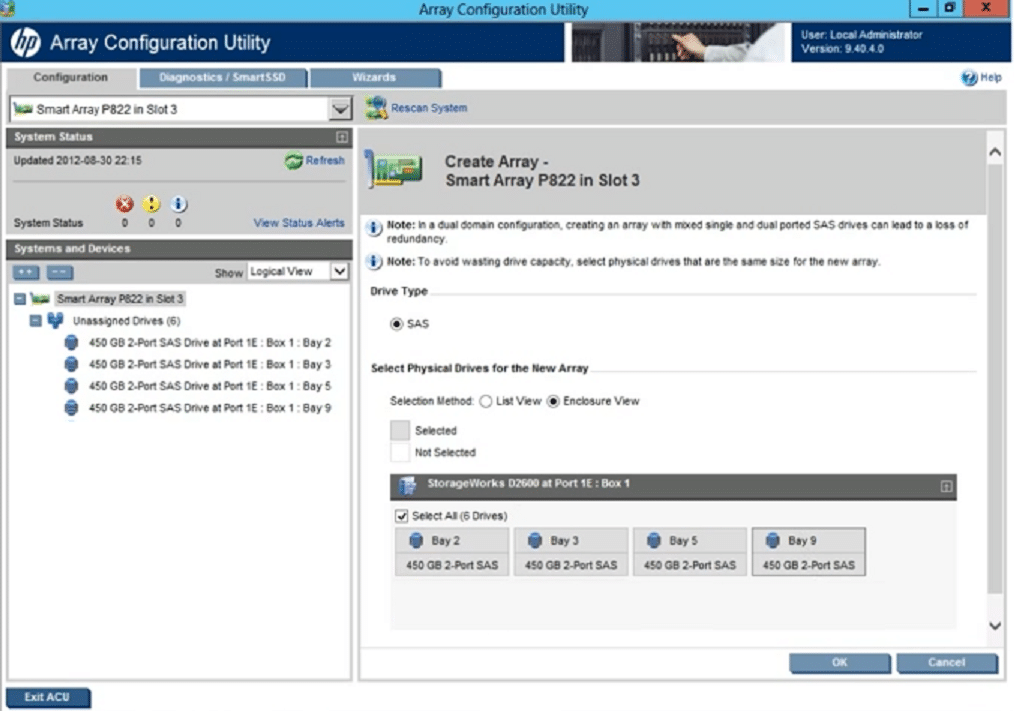
Click Ok. In the right pane click the Create Logical Drive button.
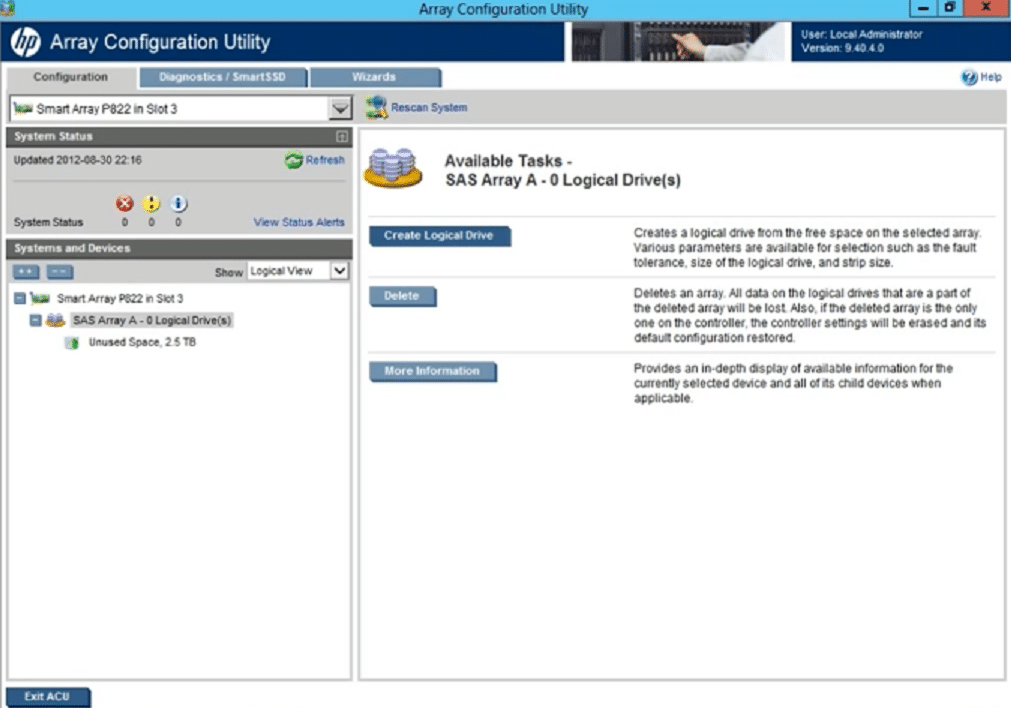
Select the RAID 5 checkbox. Verify that the Max Size checkbox is selected. Click Save.

Exit the Array Configuration Utility and reboot the server back into the VMware ESXi operating system.
Step 4 – Prepare the storage in VCenter
Once your ESXi host has booted back up you need to exit Maintenance Mode. You do this by right-clicking on the name of your virtual host in Vcenter and selecting Exit Maintenance Mode from the menu. Click Yes when asked to confirm.
Now we need to prepare the HP Logical Volume we just created as a datastore in VCenter. This datastore will exclusively house the new VSA storage. To do this:
Select the host we just created the logical array on and click the Configuration tab. Select Storage Adapters. Select the Rescan All… link in the top right of the right pane.
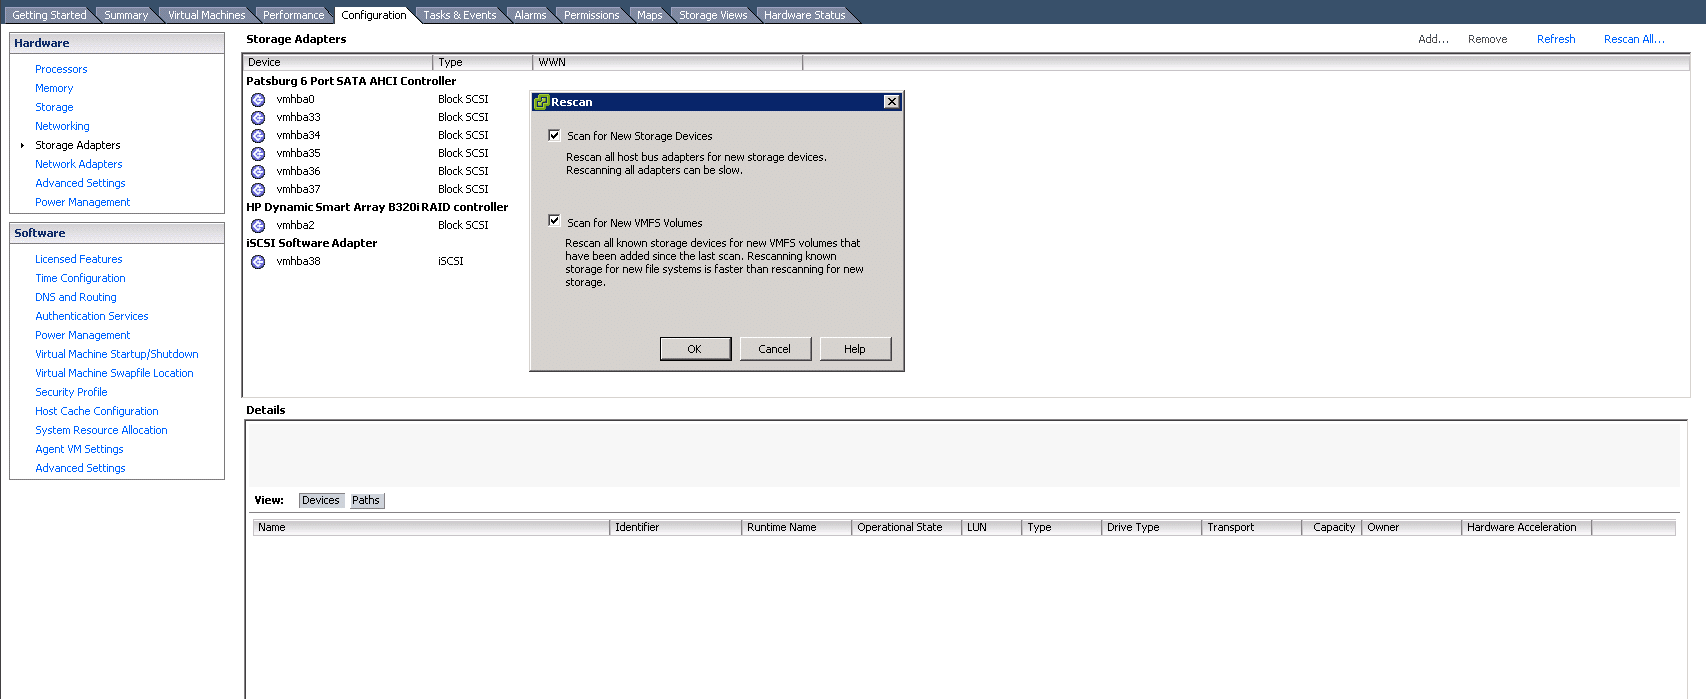
Click Ok on the Rescan dialog box, leaving both checkboxes selected by default. Select Storage. Select the Add Storage… link in the top right of the right pane. On the first page of the Add Storage dialog box, leave Disk LUN selected by default and click Next.
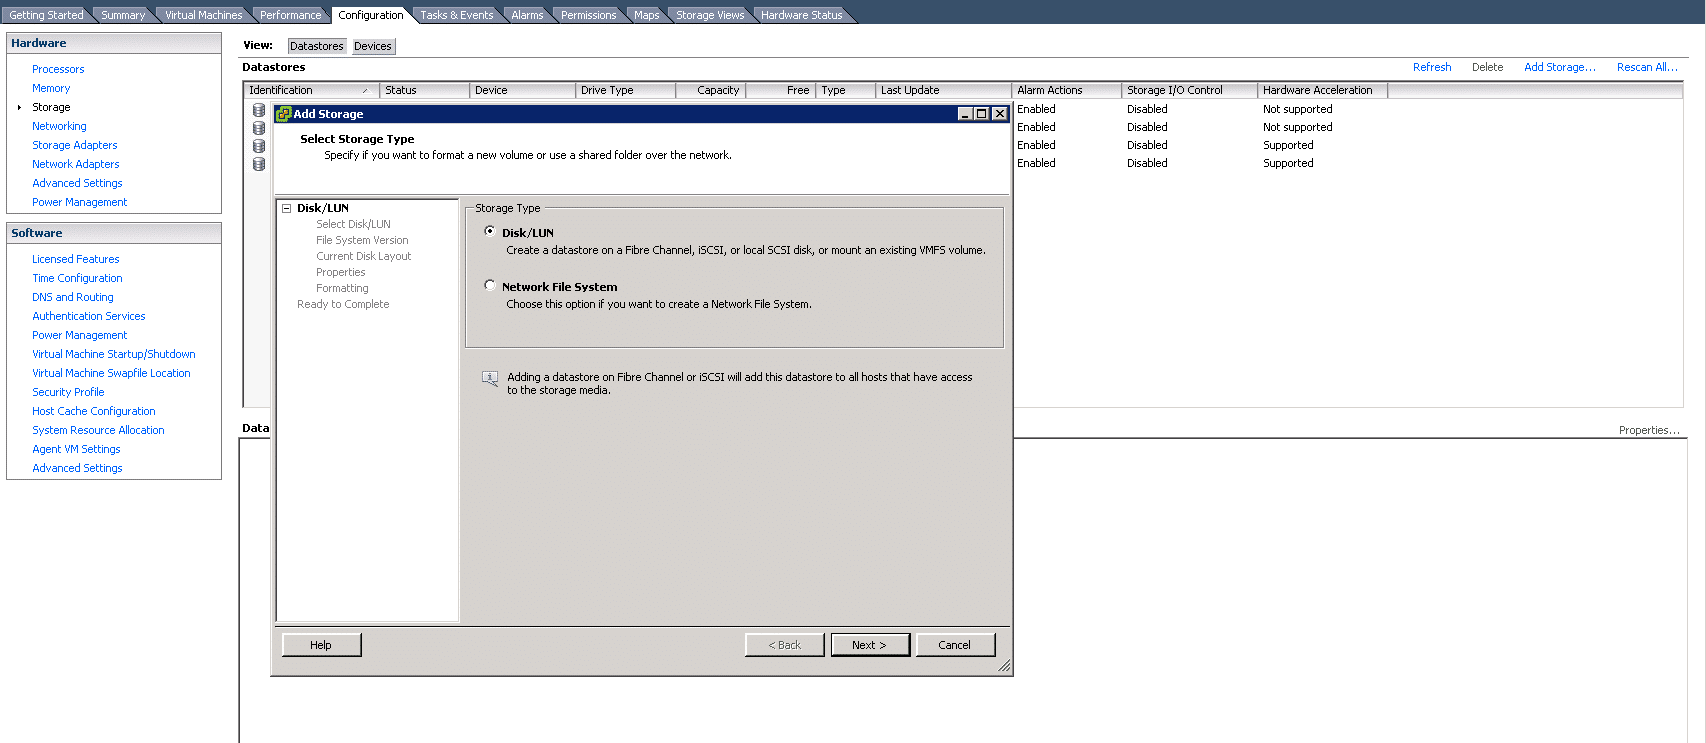
On the next page select the new logical array we just created. In our example, this will say HP LOGICAL VOLUME with a size of around 2.5TB. Click Next. Leave VMFS-5 selected and click Next. Click Next again. Because this datastore will exclusively house the VSA disks we will name this “VSA01 Datastore” and click Next. Select Maximum Available Space and click Next. Click the Finish button.
Step 5 – Add the storage to the VSA
Now that our HP Logical Volume has been created as a datastore in VCenter, we need to add all that space as virtual disks to our Virtual SAN Appliance. We do this with the following steps.
Right-click on the Virtual SAN Appliance in VCenter. It should still be powered down. Select Edit Settings from the context menu.
Click the Add button on the Virtual Machine Properties dialog box. Select Hard Disk and click Next. Keep Create New Virtual Disk selected and click Next.
Under Capacity created a disk size of 2TB. Even though in our example we have around 2.5TB usable storage (after RAID and VMware overhead) we can only add a maximum disk size of 2TB. To work around this, once you have the 2TB disk added, repeat these steps and add the remaining space (around 500GB) as a second disk for the VSA virtual machine.
Verify Thick Provisioned is selected. Under Location select the Specify a datastore checkbox and click the Browse button. Pick the datastore we just created, “VSA01 Datastore”, and click Ok. Click Next.
Under Virtual Device Node specify a SCSI ID. Our original VSA disks are likely using SCSI ID 1:0. Pick the next SCSI ID in sequence, which is SCSI ID 1:1. For the second disk (500GB) we need to add later be sure to pick SCSI ID 1:2.

Click Next. Click Finish. Click Ok.
Because this is a datastore dedicated solely to the Virtual SAN Appliance, which is Thick Provisioned and won’t be using snapshots, we can provision disks that go well beyond the recommended free space minimum for a VMware datastore.
Power On the Virtual SAN Appliance. To do this right-click on the VSA Virtual Machine select Power from the context menu and Power On from the submenu.
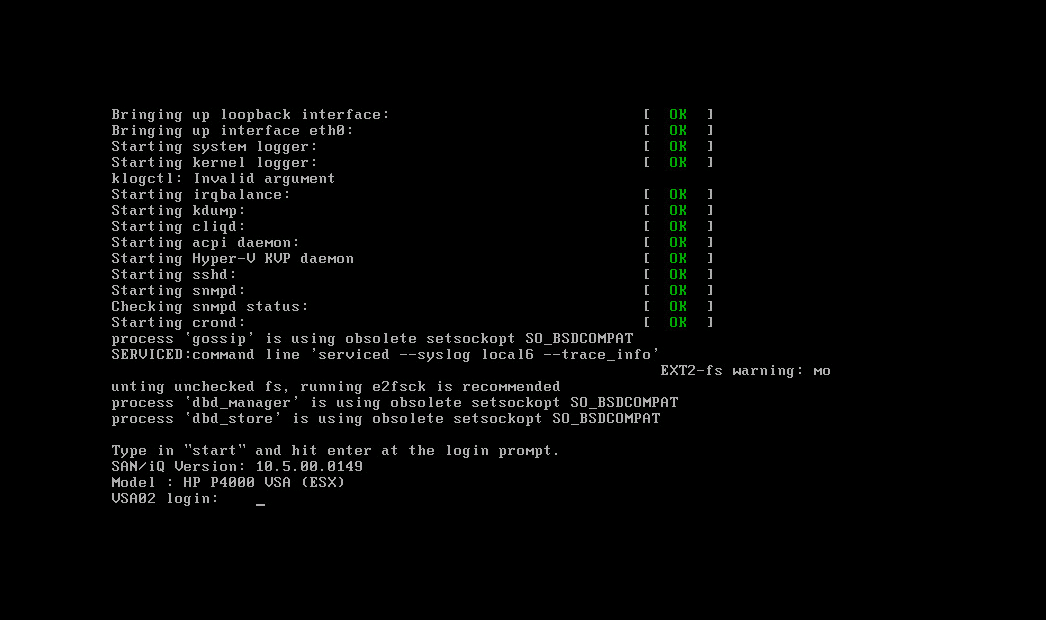
Wait for the Virtual SAN Appliance to boot. You can monitor its progress by right-clicking on the VSA and select Open Console.
A fully booted VSA will look like the screenshot below. Once booted, close the Console.
Before we move any further this is a good time to repeat these steps for the second VSA. So repeat steps 1 through 5 for the second Virtual SAN Appliance.
In Part II we will continue with Step 6, which will involve provisioning the storage in HP StoreVirtual Management Console as a Network RAID 10 array.
Next: How to add space to an HP StoreVirtual Virtual SAN Appliance – PART II

Hey Gareth! Thanks for the guide. I had to add 10 SSDs to my two hosts and this guide is very useful as a detailed step-by-step of the procedure. Just a note: disks added to VSA VMs (scsi 1:x) must be set as Independent and Persistent (or at least this is what HPE says in its documentation). 😉
Francesco B. B.
So you create a disk in vcenter that the vsa uses to then again make a disk that vsa made from those to supply vm’s ? aint this double dipping ? DISK -> vcenter -> VSA -> vcenter -> vm ? wouldnt that slow things down ?
Yea, that’s a good question.
Each layer of disk takes away from the overall capacity because of each layer of overhead. But it is direct attached storage versus iSCSI or Fiber Channel. Local bus versus remote bus. On the same token the VSA is going to consume more local RAM and CPU versus dedicated SAN hardware.
Personally I prefer hardware SANs because of the performance. Hardware SANs will always be better than software SANs. But software SANs are a good fit when there is no budget, or, you want to repurpose servers with a lot of direct attached storage and still have high availability.
I’d rather see a client spend the extra money and get an HP MSA (physical) over an HP VSA (virtual)
Hey there ! Thanks for this post.
However I think you may have used a less aggressive method avoiding the reboot of ESXi.
If you used the HP Custom ESXi CD to install the ESXi then you have access to a CLI to configure the RAID card. Depending on your version it could be a tool called hpacucli (old one) or a module to esxcli called hpssacli (new one).
You sould be able to create a new raid with these tools then directly add newly created storage in vSphere.
Hey Tibo. Thanks for the tip!