In the third part of our Exchange lab series we:
In the fourth part of our Exchange lab series we:
- Discuss the importance of a correctly configured namespace
- Configure URLs via Exchange Admin Center (EAC)
- Configure URLs via PowerShell
- Configure Split-DNS
Let’s get started!
Note: For instructions on previous versions of Exchange check the following articles:
Designing a simple namespace for Exchange 2013
Designing a simple namespace for Exchange 2010
What’s in a namespace?
A namespace is critically important.
Not only does namespace govern the availability of services like Outlook Web App, or, ActiveSync, but it also governs items such as the distribution of the Offline Address Book, or, Autodiscover. In addition–beginning with Exchange 2013 and continued with 2016–all client requests are made over HTTPS versus straight TCP/IP. This means Outlook Anywhere now manages Outlook connectivity internally as well as externally.
It is imperative we correctly configure our URLs and apply a certificate containing those URLs. Otherwise, our clients won’t be able to establish the necessary SSL connections. Which will lead to all sorts of problems.
Out of the box, Exchange configures its internal URLs to match its internal hostname. It leaves its external URLs blank. Due to recent restrictions, third-party certificate providers no longer allow internal hostnames on certificates. An example of an internal hostname would be anything that ends .LOCAL or .PRIV. In short, it is any top-level domain that is not routable on the internet.
The challenge? If our internal hostnames cannot be found on our certificate it will give our test users a variety of security warnings. This makes it difficult to use internal hostnames with Exchange.
The simplest solution? Don’t use internal hostnames. Instead, use only external hostnames. We will use the same external hostname for both our internal and external URLs. Our URLs for each service will be as follows:
| Service | Internal and External URL |
| AutoDiscover | https://autodiscover.exchangeservergeek.com/Autodiscover/Autodiscover.xml |
| Exchange Control Panel | https://webmail.exchangeservergeek.com/ecp |
| Exchange Web Services | https://webmail.exchangeservergeek.com/EWS/Exchange.asmx |
| Exchange ActiveSync | https://webmail.exchangeservergeek.com/Microsoft-Server-ActiveSync |
| Offline Address Book | https://webmail.exchangeservergeek.com/OAB |
| Outlook Web App | https://webmail.exchangeservergeek.com/owa |
| MAPI over HTTP | https://webmail.exchangeservergeek.com/mapi |
| Outlook Anywhere | webmail.exchangeservergeek.com |
That solves our certificate problem. But how does that work with DNS?
We do this by way of split-DNS. Split-DNS allows us to use the same URLs internally as we do externally. Split-DNS is a non-authoritative copy of our external DNS hosted internally. This non-authoritative copy uses the internal IPs of our servers (versus the public IPs the authoritative copy is using).
For example, our external DNS provider will resolve webmail.exchangeservergeek.com to 7172.
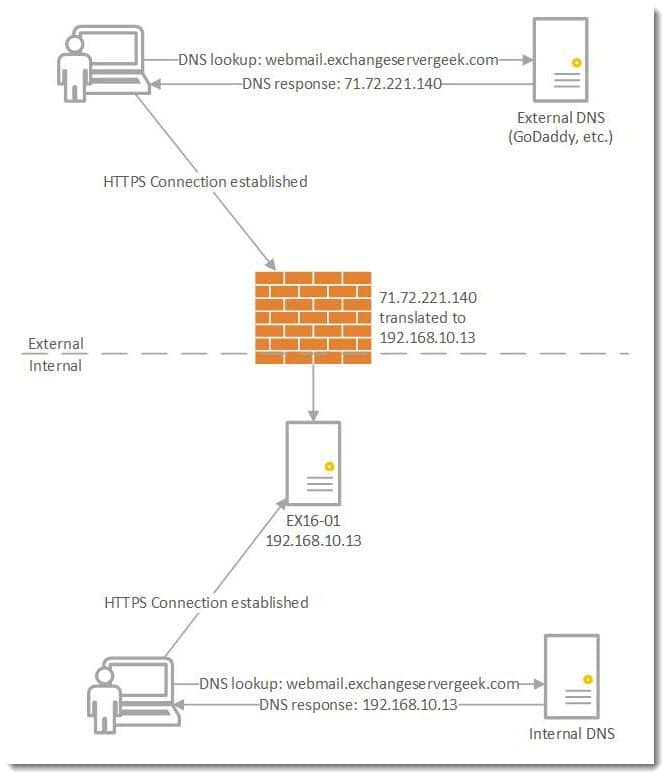
The need for split-DNS is to keep our local traffic on the local LAN. Without split-DNS, all local traffic would go out the firewall for name resolution only to try and come back in later with the public IP of Exchange. Not only is this an unnecessary detour for your internal clients–plus the unnecessary consumption of internet bandwidth–but most firewalls will block this kind of behavior deeming it suspicious.
Configure URLs via Exchange Admin Center (EAC)
Whether you plan to put your lab on the internet or not we felt it was still good practice to learn how to configure both external and internal URLs. This may be especially true if you are coming from Exchange 2010 and this is your first exposure to the Exchange Admin Center (EAC). That said, let’s get to it.
First, we need to configure our external URLs.
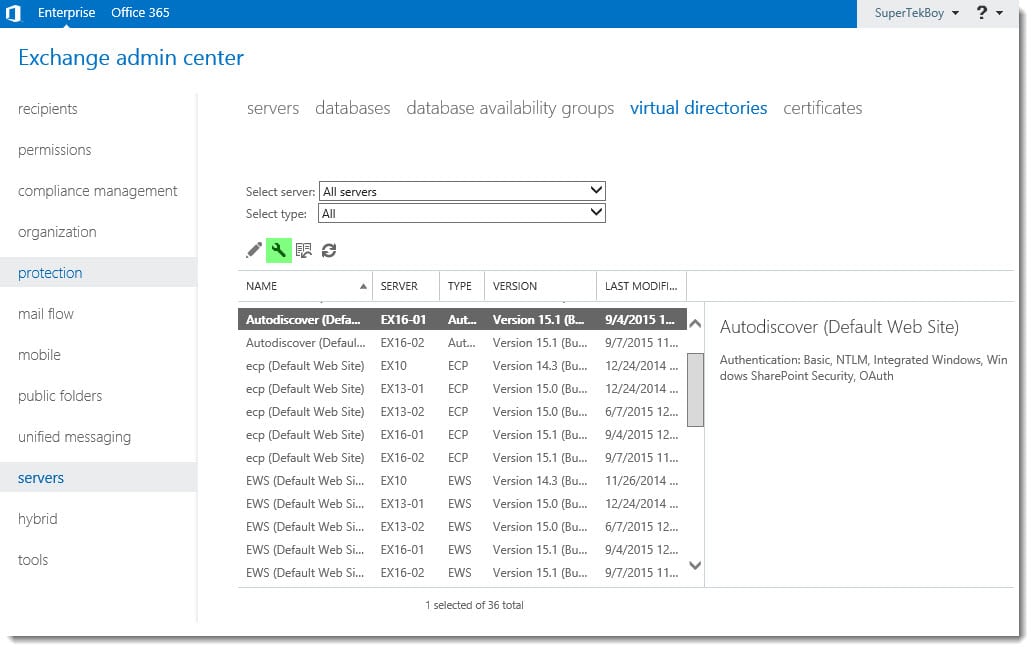
Log in to the Exchange Admin Center. Select the Servers tab. Select the Virtual Directories tab.
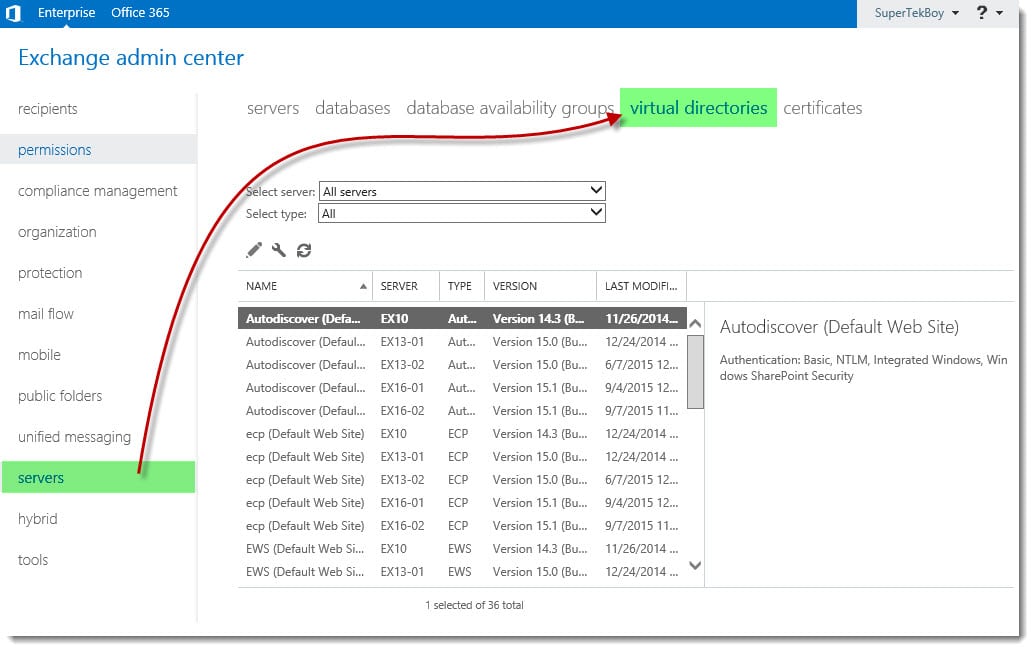
Select the Configure External Access Domain (![]() ) button.
) button.
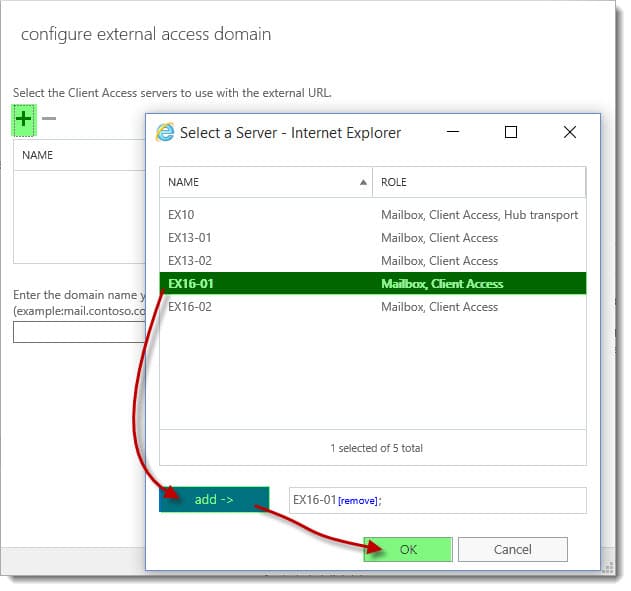
On the Configure External Access Domain dialog click the Add (![]() ) button.
) button.
On the Select a Server dialog, pick the Exchange 2016 server(s) you wish to configure external URLs on. Then click Add. To remove a server click the [remove] link to the right of its name. Once you have all the required servers click OK.
In our example, we will just be configuring EX16-01 but you can select as many servers as you like.
Enter the domain name you wish to use externally. In our case we want our external users to go to webmail.exchangeservergeek.com. Click Save.
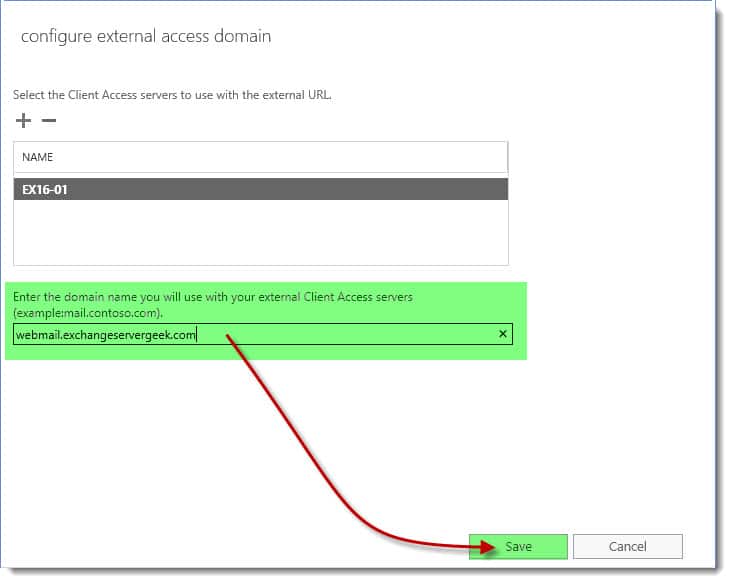
Depending on how many servers you are configuring at once, this may take some time. Once complete click Close.
Now that our external URLs are configured. Let’s configure our internal URLs.
In the Select Server drop-down box, pick the server you wish to modify. Only the virtual directories for that server will be displayed.

Let’s start with the Exchange Control Panel. Double-click to open the ECP (Default Web Site) properties.
Copy the contents of the External URL and paste over the contents of the Internal URL. Click Save.

Repeat for:
- EWS (Default Web Site)
- Microsoft-Server-ActiveSync (Default Web Site)
- MAPI (Default Web Site)
- OAB (Default Web Site)
- OWA (Default Web Site)
- PowerShell (Default Web Site)
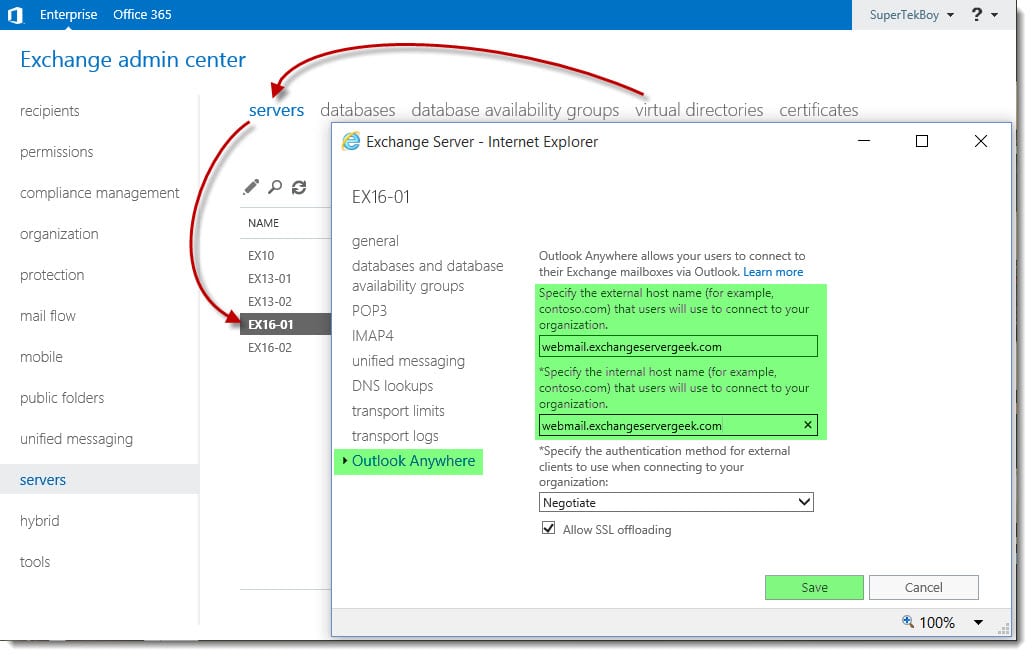
We also need to modify the Outlook Anywhere URLs.
Select the Servers sub-tab. Double-click the server you wish to change. Select the Outlook Anywhere tab.
Set the internal and external URLs to your desired URL. In our case, we made both of these webmail.exchangeservergeek.com. Click Save.
We also need to make a change to one additional namespace; Autodiscover. If you double-clicked on the Autodiscover virtual directory you may have noticed it did not have a place to modify the URLs in the GUI.
Open the Exchange Management Shell and issue the following commands.
Note: Be sure to change EX16-01 on this command to the internal hostname of your Exchange server.
C:\> Set-ClientAccessServer -Identity EX16-01 –AutoDiscoverServiceInternalUri https://autodiscover.exchangeservergeek.com/Autodiscover/Autodiscover.xml
To confirm this change type the following. You should receive an output similar to that below.
 C:\> Get-ClientAccessServer | fl identity,autodiscoverserviceinternaluri

Identity                       : EX16-01
AutoDiscoverServiceInternalUri : https://autodiscover.exchangeservergeek.com/Autodiscover/Autodiscover.xml
That wraps up our URL configuration. In the next section, we will discuss an alternative way to configure all your URLs–PowerShell.
Configure URLs via PowerShell
You may prefer to configure the URLs with PowerShell. Let’s explore how to do this.
Note: Be sure to change EX16-01 on these examples to the internal hostname of your Exchange server.
To set multiple servers at once you can pipe the Get- verb into its Set- counterpart. The only drawback is this example will reconfigure every OWA URL in your environment.
For example:
Get-OwaVirtualDirectory | Set-OwaVirtualDirectory -ExternalUrl https://webmail.exchangeservergeek.com/owa -InternalUrl https://webmail.exchangeservergeek.com/owa.
To configure both URLs for OWA on a single server:
C:\> Set-OwaVirtualDirectory -Identity "EX16-01\OWA (Default Web Site)" -ExternalUrl https://webmail.exchangeservergeek.com/owa -InternalUrl https://webmail.exchangeservergeek.com/owa
To confirm this change type the following. You should receive an output similar to that below.
 C:\> Get-OwaVirtualDirectory | Select Server,ExternalURL,InternalURL | fl

Server      : EX16-01
ExternalUrl : https://webmail.exchangeservergeek.com/owa
InternalUrl : https://webmail.exchangeservergeek.com/owa
You would have received a warning that you must also reconfigure the URLs for ECP. Let’s take care of that one next.
C:\> Set-EcpVirtualDirectory -Identity "EX16-01\ECP (Default Web Site)" -ExternalUrl https://webmail.exchangeservergeek.com/ecp -InternalUrl https://webmail.exchangeservergeek.com/ecp
To confirm this change type the following. You should receive an output similar to that below.
 C:\> Get-EcpVirtualDirectory | Select Server,ExternalURL,InternalURL | fl

Server      : EX16-01
ExternalUrl : https://webmail.exchangeservergeek.com/ecp
InternalUrl : https://webmail.exchangeservergeek.com/ecp
Let’s take care of Exchange Web Services (EWS) next. It really doesn’t matter what order we do these in as long as we get them all done.
C:\> Set-WebServicesVirtualDirectory -Identity "EX16-01\EWS (Default Web Site)" -ExternalUrl https://webmail.exchangeservergeek.com/EWS/Exchange.asmx -InternalUrl https://webmail.exchangeservergeek.com/EWS/Exchange.asmx
To confirm this change type the following. You should receive an output similar to that below.
 C:\> Get-WebServicesVirtualDirectory | Select Server,ExternalURL,InternalURL | fl

Server      : EX16-01
ExternalUrl : https://webmail.exchangeservergeek.com/EWS/Exchange.asmx
InternalUrl : https://webmail.exchangeservergeek.com/EWS/Exchange.asmx
Next up is the ActiveSync virtual directory.
C:\> Set-ActiveSyncVirtualDirectory -Identity "EX16-01\Microsoft-Server-ActiveSync (Default Web Site)" -ExternalUrl https://webmail.exchangeservergeek.com/Microsoft-Server-ActiveSync -InternalUrl https://webmail.exchangeservergeek.com/Microsoft-Server-ActiveSync
To confirm this change type the following. You should receive an output similar to that below.
 C:\> Get-ActiveSyncVirtualDirectory | select server,externalurl,internalurl | fl

Server      : EX16-01
ExternalUrl : https://webmail.exchangeservergeek.com/Microsoft-Server-ActiveSync
InternalUrl : https://webmail.exchangeservergeek.com/Microsoft-Server-ActiveSync
Next up is the Offline Address Book (OAB).
C:\> Set-OabVirtualDirectory -Identity "EX16-01\OAB (Default Web Site)" -ExternalUrl https://webmail.exchangeservergeek.com/OAB -InternalUrl https://webmail.exchangeservergeek.com/OAB
To confirm this change type the following. You should receive an output similar to that below.
 C:\> Get-OabVirtualDirectory | Select Server,ExternalURL,InternalURL | fl

Server      : EX16-01
ExternalUrl : https://webmail.exchangeservergeek.com/OAB
InternalUrl : https://webmail.exchangeservergeek.com/OAB
Next up is the MAPI virtual directory.
C:\> Set-MapiVirtualDirectory -Identity "EX16-01\mapi (Default Web Site)" -ExternalUrl https://webmail.exchangeservergeek.com/mapi -InternalUrl https://webmail.exchangeservergeek.com/mapi
To confirm this change type the following. You should receive an output similar to that below.
 C:\> Get-MapiVirtualDirectory | Select Server,ExternalURL,InternalURL | fl

Server : EX16-01
ExternalUrl : https://webmail.exchangeservergeek.com/mapi
InternalUrl : https://webmail.exchangeservergeek.com/mapi
Next up is Autodiscover.
C:\> Set-ClientAccessServer -Identity EX16-01 –AutoDiscoverServiceInternalUri https://autodiscover.exchangeservergeek.com/Autodiscover/Autodiscover.xml
To confirm this change type the following. You should receive an output similar to that below.
 C:\> Get-ClientAccessServer | fl identity,autodiscoverserviceinternaluri

Identity                       : EX16-01
AutoDiscoverServiceInternalUri : https://autodiscover.exchangeservergeek.com/Autodiscover/Autodiscover.xml
Finally, let’s configure Outlook Anywhere.
C:\> Set-OutlookAnywhere -Identity "EX16-01\RPC (Default Web Site)" -ExternalHostname webmail.exchangeservergeek.com -InternalHostname webmail.exchangeservergeek.com -ExternalClientsRequireSsl $true -InternalClientsRequireSsl $true -DefaultAuthenticationMethod NTLM
To confirm this change type the following. You should receive an output similar to that below.
 C:\> Get-OutlookAnywhere | Select Server,ExternalHostname,Internalhostname | fl

Server           : EX16-01
ExternalHostname : webmail.exchangeservergeek.com
InternalHostname : webmail.exchangeservergeek.com
Now that we are all done with URLs we need to implement split DNS. We address that in the next section.
Note: Rather than configuring these one at a time you may also be interested in scripting. Exchange MVP Paul Cunningham has a great set of scripts for setting URLs in bulk. I highly recommend them.
Configure Split DNS
Alright, let’s get our split DNS configured next. Our internal DNS servers will hold a non-authoritative copy of our external namespace. In short, with the exception of a few minor tweaks to our Exchange records, we are cloning everything in our external DNS to an internal DNS server. This will only be used by our internal users.
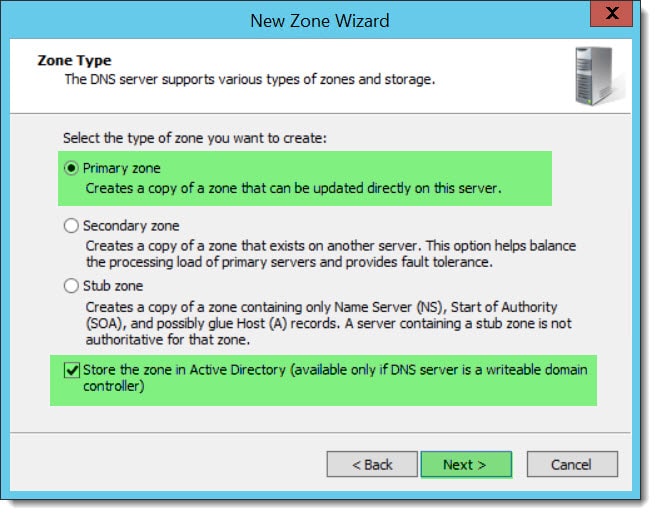
On your DNS server open DNS Manager. Right-click on Forward Lookup Zone and select New Zone… from the context menu.
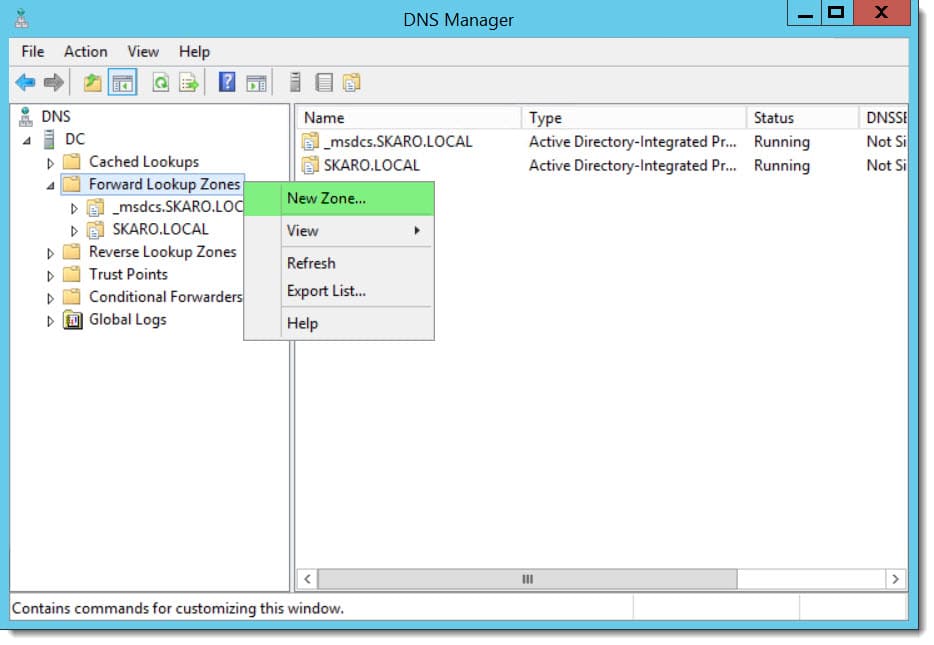
Click Next.
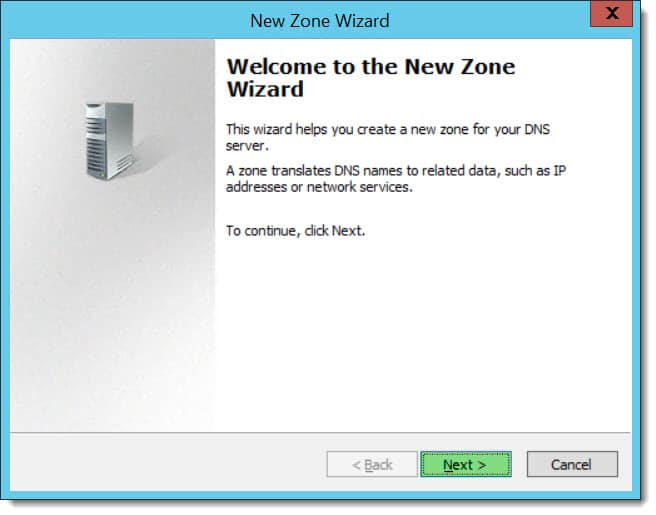
Keep the default settings. Click Next.
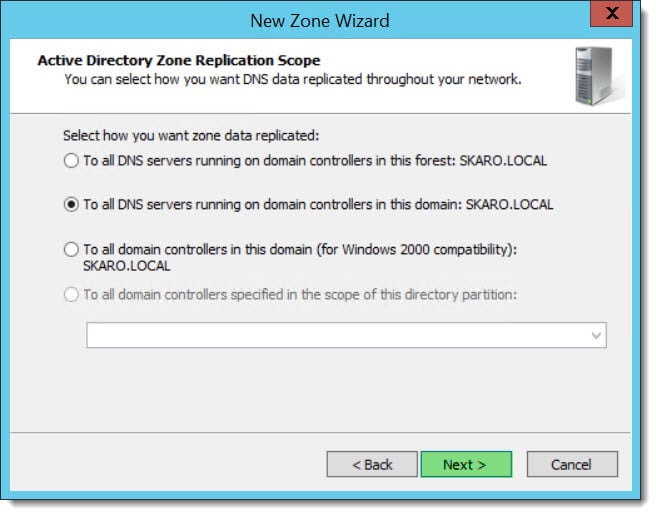
Keep the default settings. Click Next.
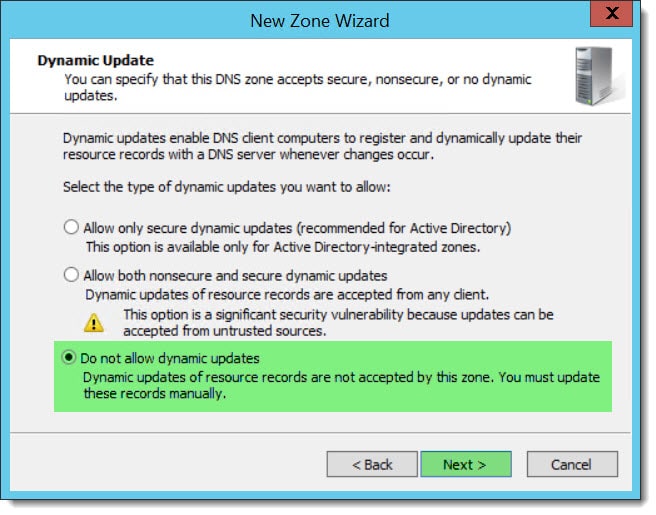
In the Zone Name field enter your external domain name (in our example exchangeservergeek.com).

We will manually create all the records in this zone so select Do not allow dynamic updates. Click Next.
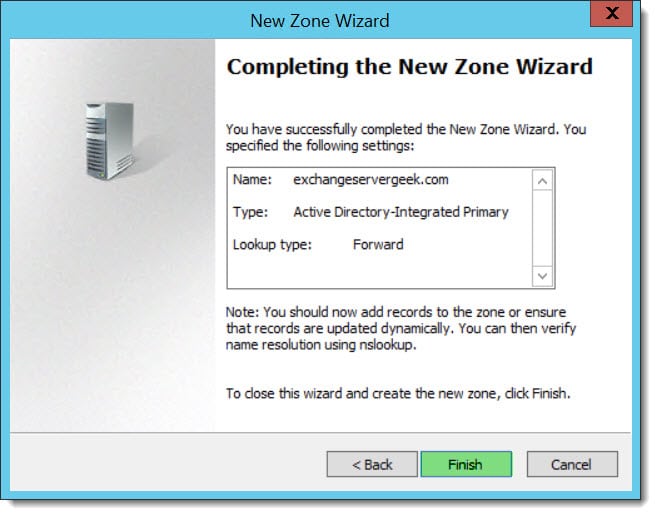
Click Finish.
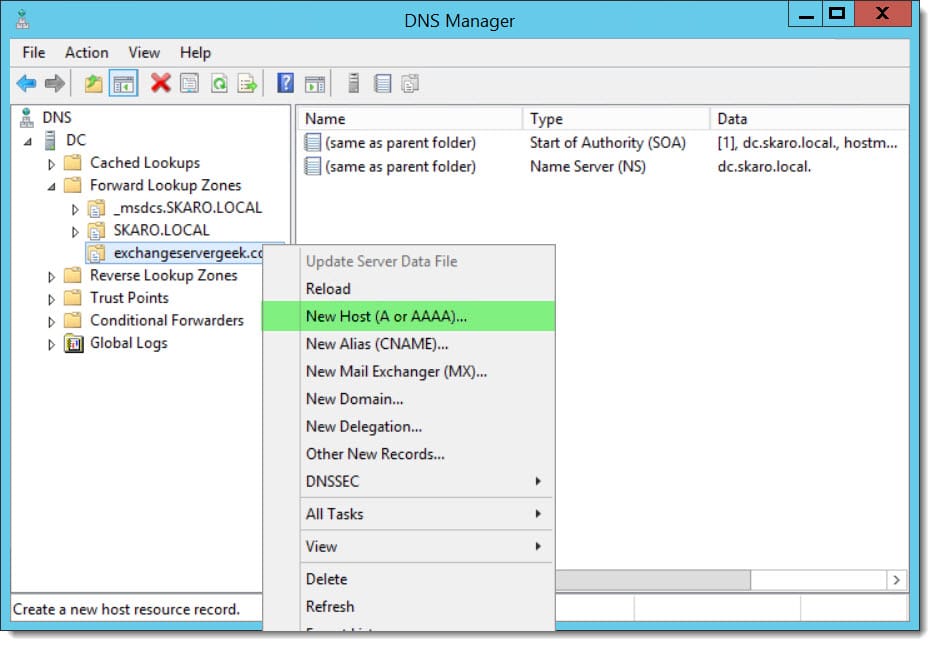
Expand Forward Lookup Zones. In the left pane, right-click on exchangeservergeek.com zone and select New Host (A or AAAA) from the context menu.
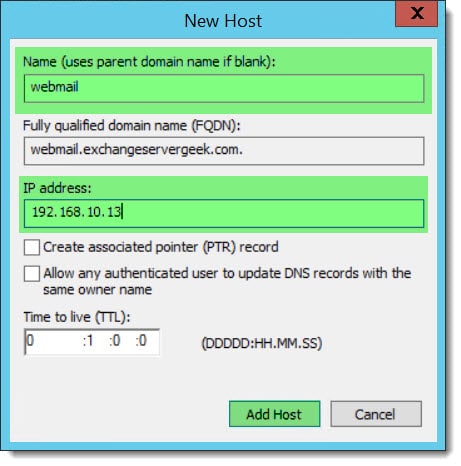
In the Name field, type the first name on your certificate. In the IP address field, type the internal IP of your Exchange server. In our example, it is 192.168.10.13. Click Add Host.
Note: If you are using Kemp’s free virtual load balancer in your lab, you would enter that IP instead.
Repeat these steps for all other names on your certificate.
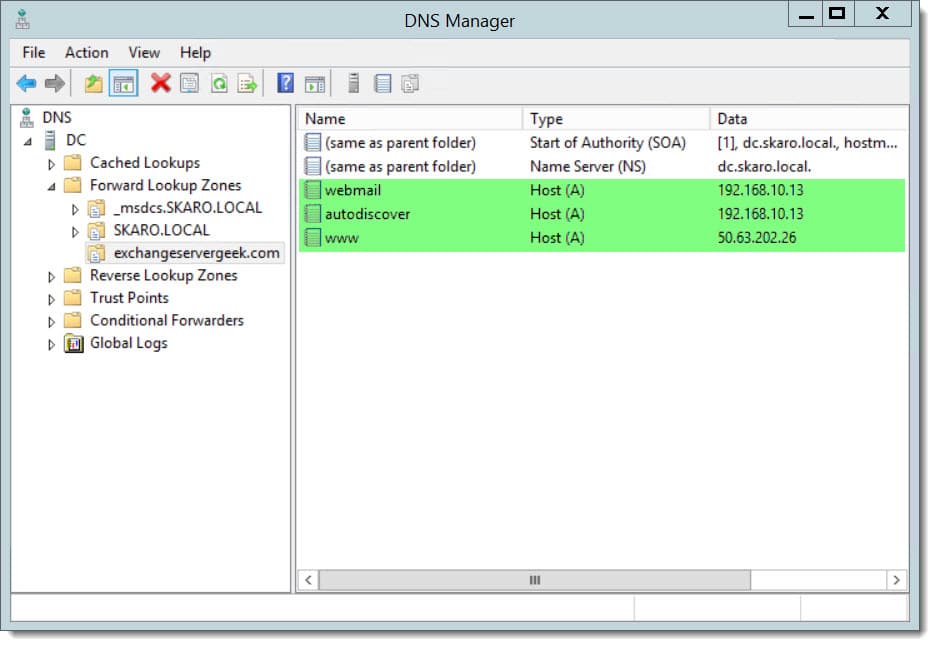
Referring to our namespace table at the start of this lesson our end result will be this. Your lab may look similar.
We are all set. At this point use ping to verify responses from all the host records you just created. Also, make sure you can get Outlook Web App and Autodiscover internally with a web browser. For example, point your web browser to https://webmail.exchangeservergeek.com/owa. You will see still a certificate error but you should reach the login page and be able to log in.
Note: You will need to repeat the previous steps for any additional resources you have in your external zone. For example, if your website is www.exchangeservergeek.com, you will need to create a www A record and point it to the public IP address of your hosting provider. We have an example of this in the screenshot above.
Next Steps
In part five of our series, we process and complete a certificate request for our lab. We also assign services to our new certificate.

Is it technically possible to have two Ex 2016 MBX servers in the same AD site each one configured with a different internal and external URL – owa.contoso.com on the first server and webmail.contoso.com on the second?
I am curious to understand if accessing owa.contoso.com to access the mailbox on MBX2 will redirect to webmail.contoso.com or will it proxy to render the mailbox hosted on MBX2.
Any thoughts?
Thank you so much brother. Very helpful.
interesting tutorial, but i am missing a mx record in your dns. You dont need that?
Hi,
excuse me, my Exchange 2016 internal/external namespace is webmail.demo.com, it’s on a OVH dedicated server.
About “autodiscover”, do I have to create the relative record (autodiscover.demo.com) on my internal dns or I can use the original namespace (webmail.demo.com)?? And, on my external dns (Aruba), what I have to do for make Outlook automatically “discover” that ovh dedicate server? I’ve just created on Aruba a record name pointing to it, so webmail, via dns name is ok, now I’ve to setup Outlook, and I’m blocked in certificate/autodiscover phase. Can You help me?
Thank You
Alessandro
I noticed when you were setting up split DNS you added entries for webmail, autodiscover and www. Is www required for exchange setup or was that added only because it is also on your certificate?
Hey Jordan,
Its not for Exchange. Often companies use the same domain name for their email address as they use for their public website. Which is fine. However, if you use split-DNS you may need to recreate any records from your public DNS zone to your new internal split-DNS zone. One such example could be a website (“www”). That way your internal users can still get to their public website from inside the network.
I was just reading through the article again and caught the note about that. We host our website on-premise as well so I was able to add that as a local IP address. Thank you! I did happen to notice my install does not have MAPI listed. I don’t know if that should be a cause for concern yet.
Hey Jordan,
In the older cumulative updates the MAPI vDir was missing from the Exchange Admin Center and could only be set via PowerShell. The screenshots in this article are a couple of years old now so they don’t show the MAPI vDir in the EAC. The new CUs show the MAPI vDir in the EAC. Are you installing your lab or environment with the latest cumulative update?
if we have exchange 2016 two server,,, how can we map two name of server on certificate?
for EX: EX1 192.168.1.30, EX2 192.168.1.31 to name: mail.abc.com with the VIP 192.168.1.40?
thank you.
Hey daronhim,
I recommend keeping the URLs on all services, except autodiscover, the same. For example, OWA, ECP, MAPI, OAB all use mail.abc.com on both their external and internal URLs. Then use split-DNS. Then the only names you will need on your cert would be mail.abc.com and autodiscover.abc.com. More info on requesting and applying the cert can be found on Part 5 of this series. http://supertekboy.com/2015/09/22/install-exchange-2016-in-your-lab-part-5/
To have two names on a cert you will either need to acquire a UC/SAN or Wildcard certificate. You can also use a single name SSL cert if your external DNS provider supports SRV records.
Once you have applied the cert on one Exchange server you export and import it to your second Exchange server. I have an article on that process here.
http://supertekboy.com/2015/10/28/export-import-ssl-certificates-in-exchange-server-2016/
You may also need to import the cert to your load balancer and apply it to the VIP if doing SSL bridging. Not sure which load balancer you are using but I have an article on the free Kemp load balancers and configuring them for Exchange 2016 here.
http://supertekboy.com/2015/11/17/configure-kemp-load-balancer-for-exchange-2016/
Was the Autodiscover Uri meant to be “https://webmail..” instead of “https://autodiscover…” in your example?
Ah, I may need to clarify that a bit better. Autodiscover is part of my namespace. Autodiscover is also a subject alternative name on my certificate and is configured as an A record on both sides of my split-DNS. It’s in my table at the top. Probably should add that to my diagram as well.
nm – i see in the DNS area you have autodiscover
Curious if mapi vDir external URL is set when you run the wizard from EAC. In my experience it always missed the MAPI external URL. Also, wizard only sets external URL so for internal URLs, you still need to run cmdlets from shell.
Forgot to mention, you can always set internal URLs using UI as you mentioned in your post, PS is just preferred and faster for me.
Hey Bhargav, you are correct. The MAPI external URL is not set with the EAC wizard. Unless this changes with the 2016 general release, you will need to set both the MAPI external and internal URLs with PowerShell. I had actually expected MAPI to make a debut in the 2016 EAC seeing as it is now the preferred protocol.