In the fourth part of our Exchange lab series we:
- Discussed the importance of a correctly configured namespace
- Configured URLs via Exchange Admin Center (EAC)
- Configured URLs via PowerShell
- Configured split DNS
In the fifth part of our Exchange lab series we:
- Generate a certificate request
- Process a certificate request
- Complete a certificate request
- Assign services to a certificate
- Check our work
Let’s get started.
Generate a Certificate Request
In the last part of our series, we got our namespace configured. Now we need to make sure we have a certificate for that namespace.
Note: Adding a certificate to your lab is optional. Whether you choose to go with a certificate really depends on how close to a production experience you want to be. You can always purchase a certificate for your lab and import it into production later on. If a certificate is not critical for your lab experience you may still wish to review this section in preparation for production.
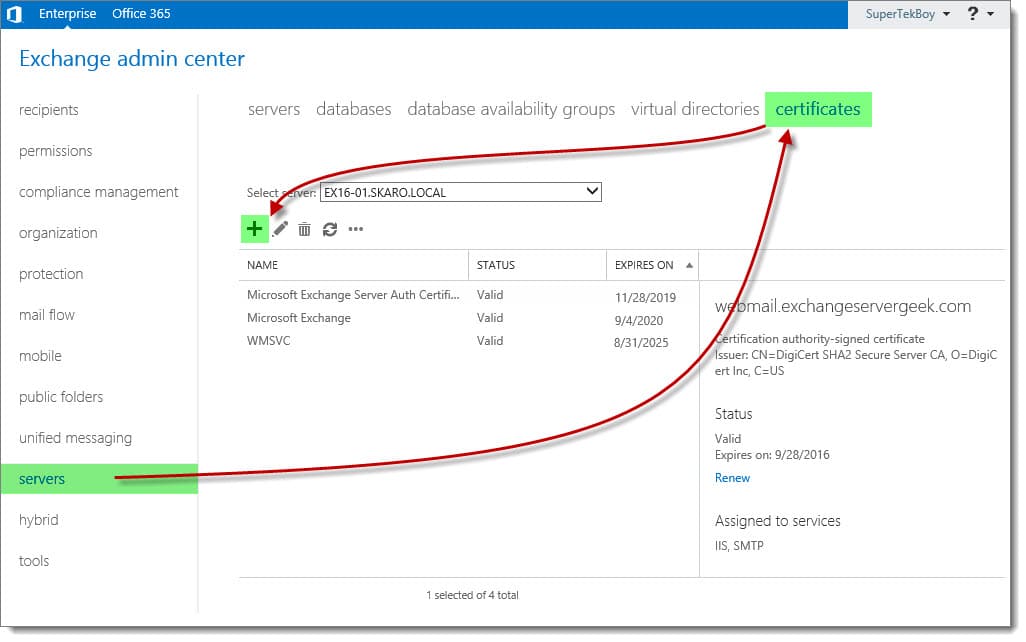
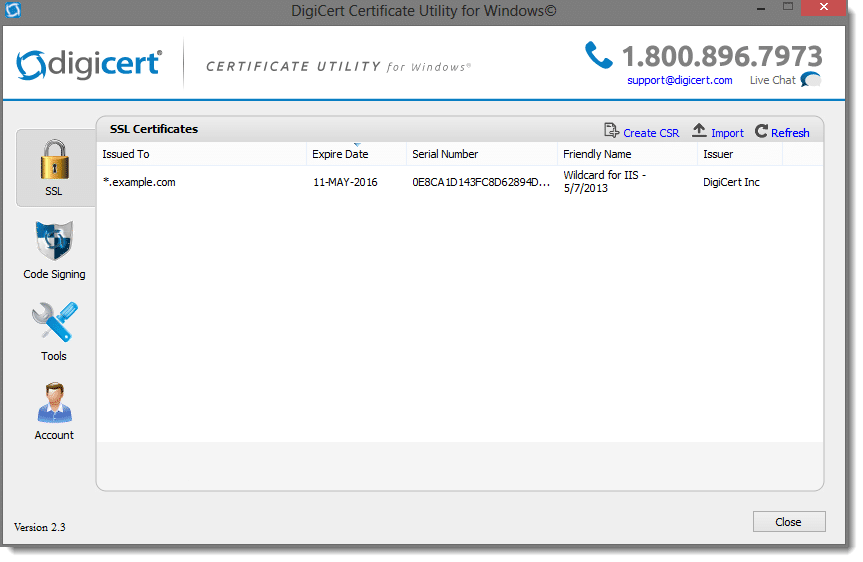
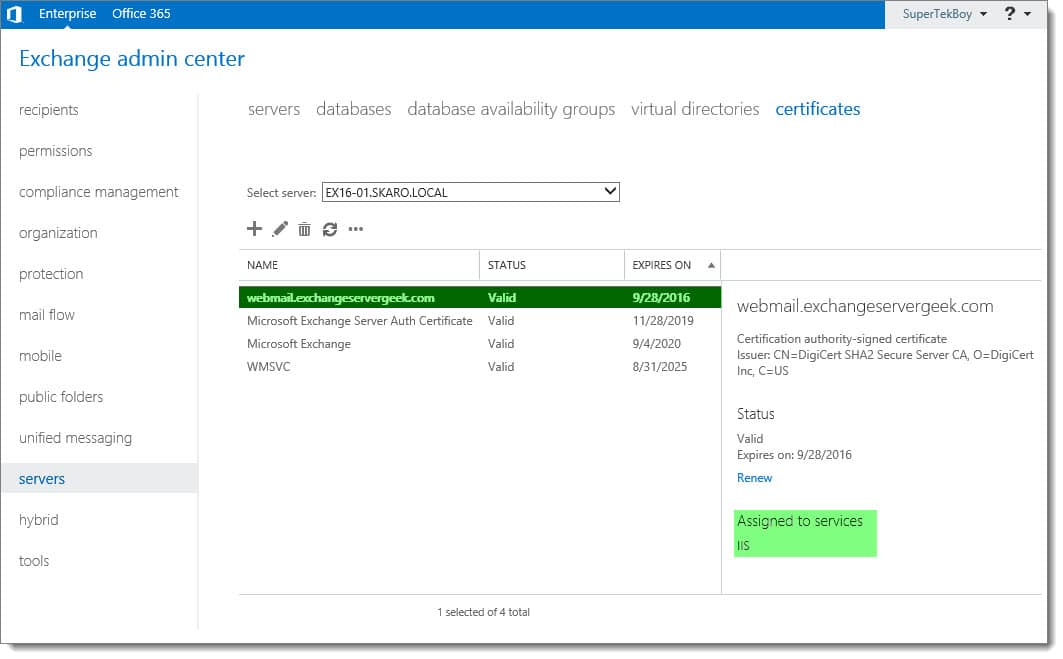
Log in to the Exchange Admin Center (EAC). Select the Servers tab and Certificates sub-tab.
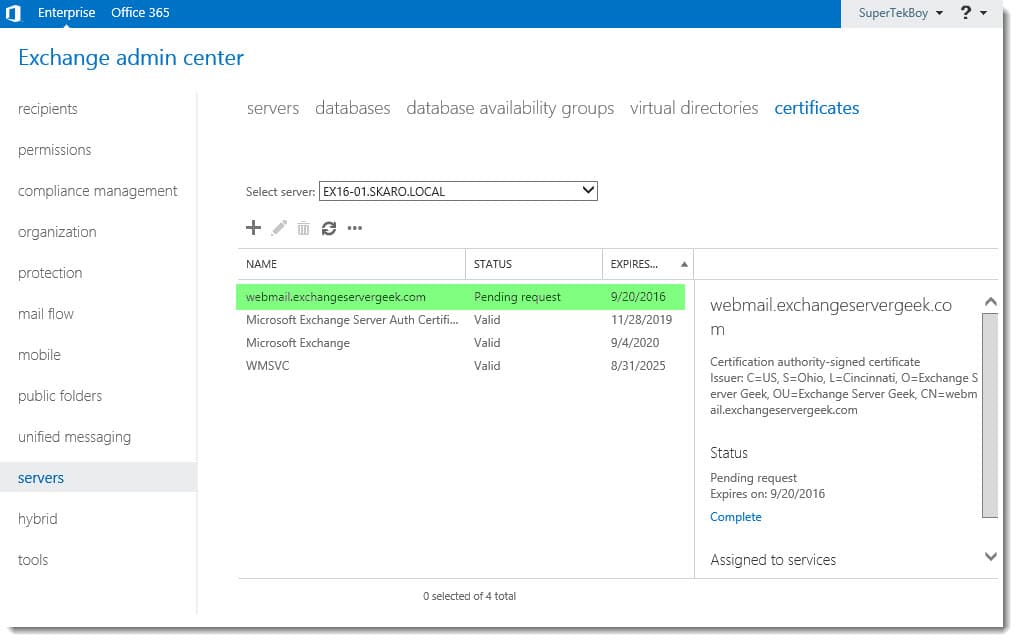
This page displays all currently installed Exchange certificates. These three self-signed certificates are installed with Exchange out of the box. The self-signed certificate titled “Microsoft Exchange” is the one that Exchange is currently using for all of its web services. That’s the one that we will replace with a trusted 3rd party certificate.
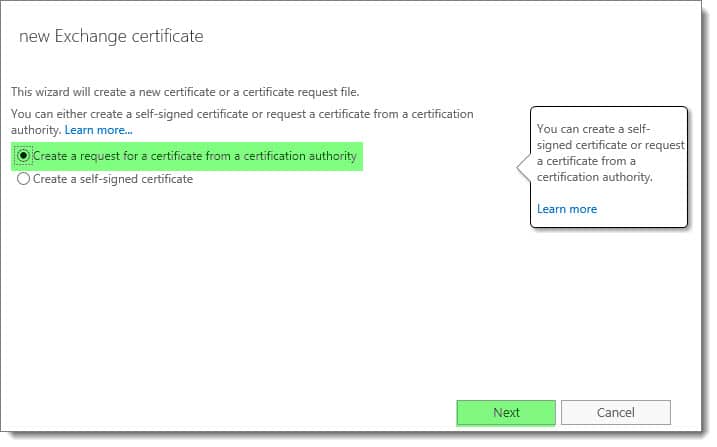
Like its predecessor, Exchange 2016 maintains the Certificate Request Wizard. This wizard takes all the guesswork out of generating a certificate request.
To launch the wizard click the New (![]() ) button.
) button.
In the New Exchange Certificate wizard select Create a request for a certificate from a certification authority. Click Next.
In the Enter a friendly name field, enter a display name for your certificate.
This is what will appear under the Name column on the main certificates page. You should choose a name that will easily identify the certificate. My personal preference is to make the name the same as the subject of my certificate. For example, webmail.exchangeservergeek.com.
When ready click Next.

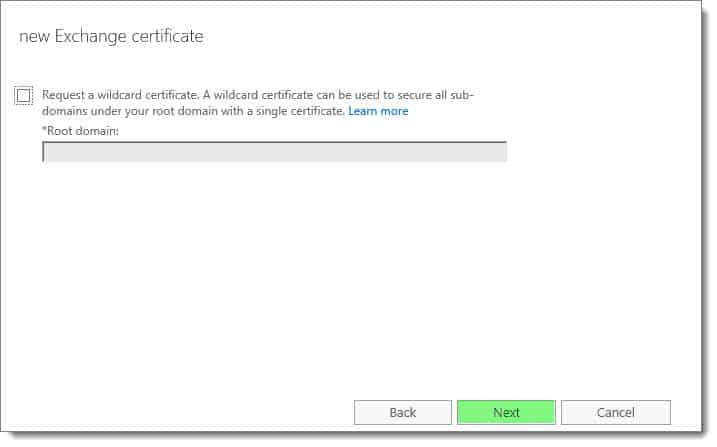
Leave wildcard unchecked. Click Next.
Click Browse. Select the Exchange server you wish to store this request on. Click OK. Click Next.

The next screen identifies all the names you have configured in your namespace. You can make edits here if you like. I typically skip past this and make changes on the following screen. Click Next.
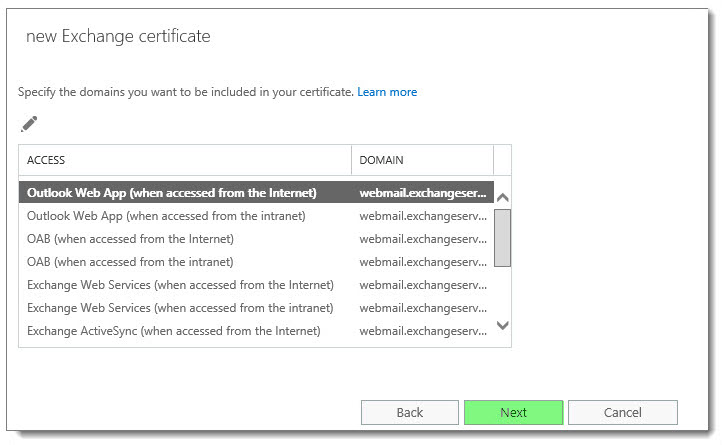
Select the Add, Edit or Remove buttons to make any tweaks to the names you require on your Exchange certificate.
Be sure to remove any internal hostnames from the certificate request. Third-party certificate providers no longer allow internal hostnames on certificates. An example of an internal hostname would be anything that ends .LOCAL or .PRIV. In short, it is any top-level domain that is not routable on the internet.
In our example, we had to remove SKARO.LOCAL and EX16-01.
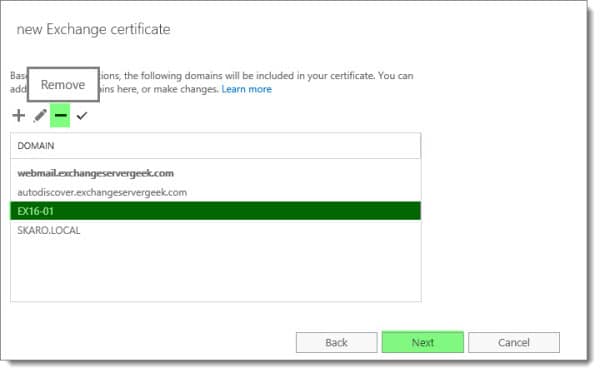
You can also confirm which name is Set as the common name (in our example this is webmail.exchangeservergeek.com).
The end result is that this screen should contain every name you have configured on your Exchange server. Going back to our table at the beginning of part four, we had autodiscover.exchangeservergeek.com and webmail.exchangeservergeek.com.
Click Next.

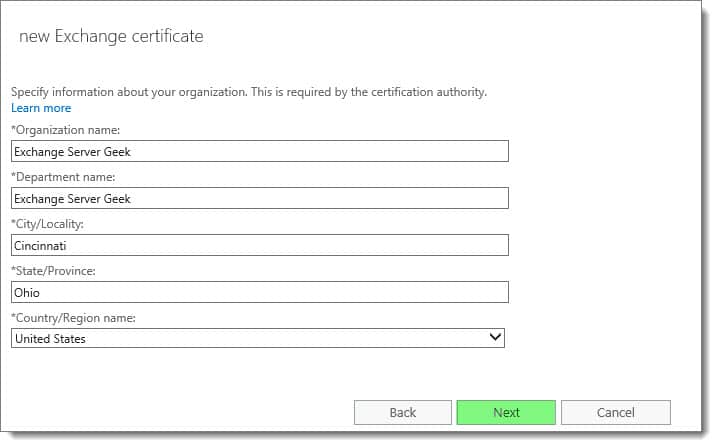
Complete all organization information. Click Next.
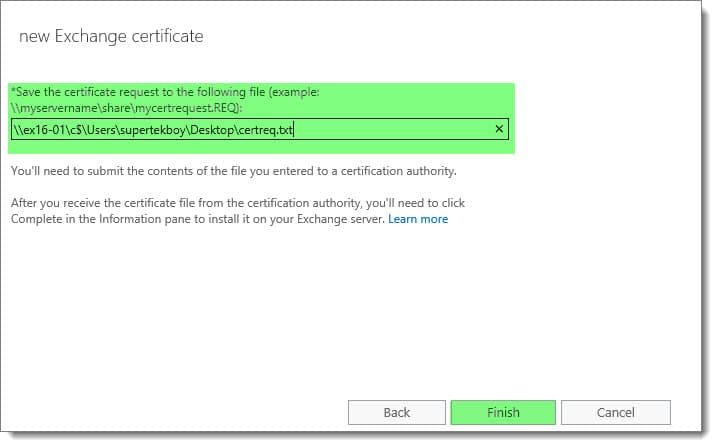
Specify a UNC path to where you want to save the certificate request file. In our example, we saved this to our desktop as a text file. Click Finish.
You will notice we have a certificate in a Pending Request state. This leads us right into our next section.
If you prefer to generate the certificate request from PowerShell you would use the New-ExchangeCertificate cmdlet. Using our example from the wizard our command would look like this:
C:\> New-ExchangeCertificate –Server EX16-01 –GenerateRequest –FriendlyName webmail.exchangeservergeek.com –PrivateKeyExportable $true –SubjectName "c=US, s=Ohio, l=Cincinnati, o=Exchange Server Geek, ou=Exchange Server Geek, cn=webmail.exchangeservergeek.com" –DomainName webmail.exchangeservergeek.com,autodiscover.exchangeservergeek.com –RequestFile "\\EX16-01\c$\users\supertekboy\desktop\certreq.txt"
In this command:
- -Server specifies the server to generate the request on.
- -GenerateRequest prepares a 3rd party certificate request, not self-signed.
- -FriendlyName is what you see under the name column in the GUI.
- -PrivateKeyExportable allows you to export/import the certificate to other Exchange servers.
- -SubjectName is the primary FQDN for the certificate.
- -DomainName is the subject alternate names for the certificate.
- -RequestFile is the export file for the certificate request.
Processing a certificate request
Before we can use our certificate we must process this request through a third-party certificate provider. There are plenty out there but I personally recommend DigiCert (affiliate). Not only do they have fantastic technical support but they also have some really neat certificate tools. Best of all, their certificate turnaround time is incredibly fast (even on a Sunday at 7:42 pm–yep, personal experience right there.).
One such example is the DigiCert Certificate Utility (affiliate). I keep this utility installed on my laptop at all times. It’s a lightweight executable to help you manage all your certificates. The tool lets you generate and complete certificate requests, then export to a number of different formats (IIS, Apache, etc.). The utility is free and not just limited to certificates from DigiCert. I used it just recently for ADFS.
The specific steps for each certificate provider are different but the principles remain the same. You provide a certificate request. The provider validates your identity. The provider then issues you a certificate.
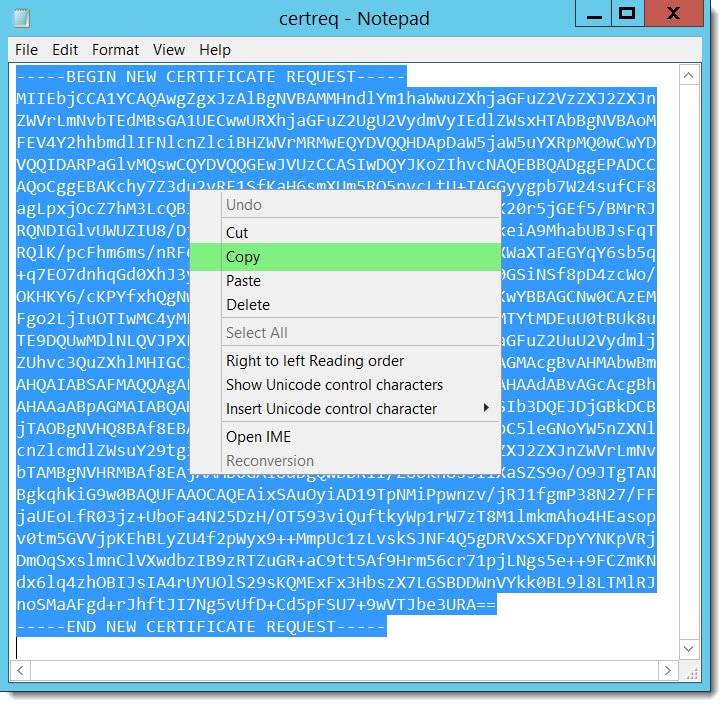
First, we need to get the certificate request we created in the previous section. This should have created a file on your desktop (or the path you specified). Open this file with Notepad and copy the entire contents, including the BEGIN and END lines.
Next, we need a Unified Communications (UC) certificate. This is also referred to as a Subject Alternative Name (SAN) certificate. As mentioned above I recommend DigiCert (affiliate). However, for a full list of Microsoft recommended certificate authorities check https://support.microsoft.com/en-us/kb/929395.
At some point, the 3rd party certificate authority will ask you to paste the contents of the CSR file into their system for processing. From this file, the provider will identify all the subject and alternate names you need. The validation process will then begin.
The validation process can vary between providers as well. Some providers will perform a simple domain validation where they send an email to the recipients listed on your domain registration. Others will perform more extensive checks including the validation of your business against various agencies.
Once your identity has been validated and your certificate approved, download and unpack the cert.
Completing a certificate request
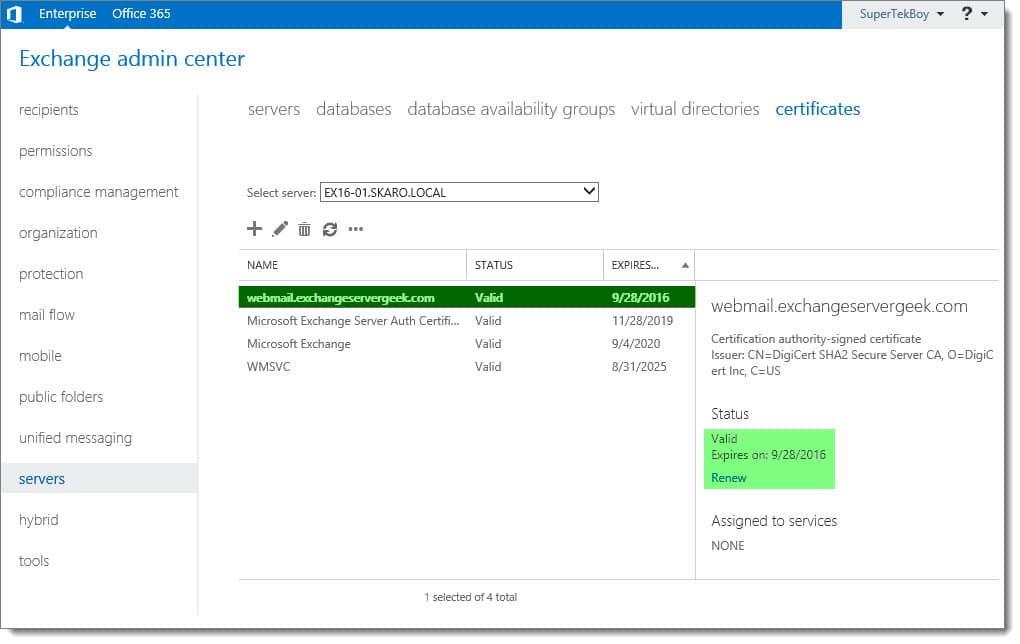
While still on the Certificates tab, select your pending certificate request and click the Complete link from the action pane.

In the Complete Request window, type the UNC path to the location of the unpacked certificate.

Click OK.
Once the task completes the certificate will be listed as Valid in both the Status column and in the Status section in the action pane.
If you prefer to complete the certificate request from PowerShell you would use the Import-ExchangeCertificate cmdlet. Using our example above our command would look like this:
C:\> Import-ExchangeCertificate -FileData ([Byte[]]$(Get-Content -Path \\EX16-01\C$\Users\supertekboy\Desktop\webmail_exchangeservergeek_com.cer -Encoding byte -ReadCount 0))
In this command:
- -Path is the location of the certificate file you were issued.
Assigning Services to your Certificate
Exchange Web Services are still assigned to the self-signed certificate. Let’s get these switched over to the new certificate.
While still on the Certificates tab, select your newly added certificate and click the Edit button.
Select the Services tab. Select IIS. Click Save.
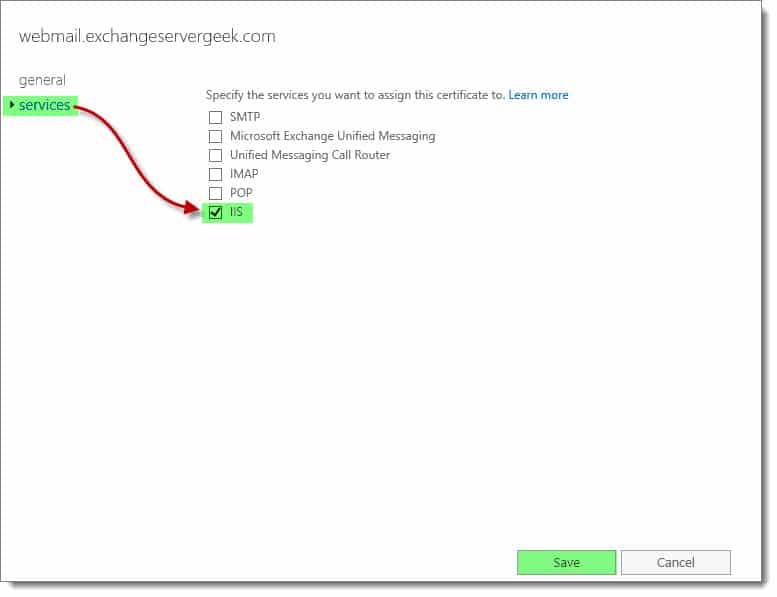
This may take a minute or so to process. Once complete you will see the new certificate has been assigned to IIS. This 3rd-party certificate will now answer all web requests.
If you prefer to assign services using PowerShell you would use the Enable-ExchangeCertificate cmdlet. Using our example above our command would look like this:
C:\> Enable-ExchangeCertificate -Thumbprint <ID> -Services IIS
In this command:
- -Thumbprint specifies the certificate to configure via its thumbprint.
- -Services define which components you want to use the certificate with (e.g. IIS, SMTP, etc.).
You can obtain the thumbprint either by running Get-ExchangeCertificate, or, by reviewing the properties of the certificate in your web browser.
Checking your work
Now that we have our new certificate installed, we need to test to make sure it is working properly.
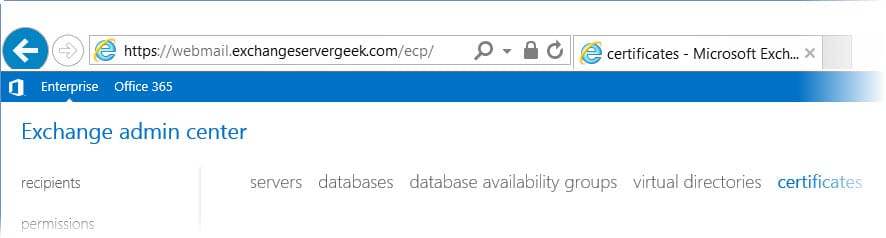
The easiest way to check is to enter your external URL into a web browser. In our case, we enter https://webmail.exchangeservergeek.com/ecp. This should result in no certificate errors.
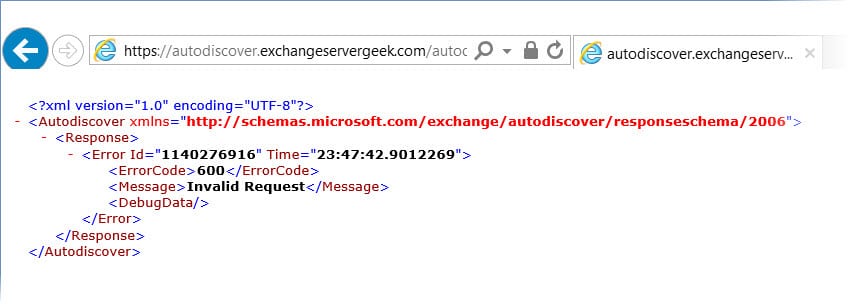
Let’s test AutoDiscover as well. In our case https://autodiscover.exchangeservergeek.com/autodiscover/autodiscover.xml. You will be prompted for credentials. Once entered you will receive the following response. Despite it being an error it is expected behavior. Autodiscover was expecting Outlook, not Internet Explorer.
Tests results look good? Awesome!
Next Steps
In the sixth part of our lab series, we move the database to its dedicated drives on L and M. We will also explore circular logging in a lab setting.

Great tutorial for setting up Exchange 2016 on Server 2016.
I am a bit confused though. How can step 5 (Cert) be performed unless you are able to send and receive externally email from your new Exchange 2016? Would there not be a step tutorial for that before being able to communicate with CA?
Thanks
If you haven’t heard of it already, Let’s Encrypt is awesome for creating an SSL certificate for a lab environment. I wrote the initial Wiki article for the C# Windows client here: https://github.com/Lone-Coder/letsencrypt-win-simple/wiki/Create-a-SAN-certificate-for-Exchange-2016 and thought you might like to integrate the process into this article.
Hi Gareth,
Great tutorial, it was very informative and did not result in catastrophic failure unlike the Exchange 2016 Deployment Assistant did. (At least from my experience with it).
Glad I was able to assist Alex. Hope you like the rest of the site!
Sure do! It’ll be one of the elite websites that makes my favourites bar.
Quick question, have you had any experience with decommissioning an Exchange 2010 server post Exchange 2016 (or 2013) upgrade?
I read a lot about arbitration inboxes and other bits and peices people say are important to successful decom’s and, for that matter, 2013/2016 upgrade deployments.
However, I did notice that when the Exchange 2010 machine in my Lab was offline the mailboxes on the Exchange 2016 mailboxes continued to work fine so I’m somewhat sceptical of what impact there is by just uninstalling Exchange 2010 and shutting down the VM would have.
Any insight is appreciated.
I followed your instruction and all went well except this certificate error: “The name on the security certificate is invalid or does not match the name of the site” and is coming from my internal DNS name (exchange server). This is weird all virtual directories are set for both internal and external as external URL. If i click ok i can get into Outlook and everytime i open Outlook it just pop up this error. Can we advise?
Hey Radu,
Does the certificate contain all the URLs you have configured? Is it a 3rd party cert or a self-signed cert?
Hi Gareth,
Certificate contains autodiscover.domain.com and ootw.domain.com since all URL are configured as ootw.domain.com/owa/ecp/…. Certificate is coming from internal CA.
Sounds like the Outlook client does not trust your internal CA. Is the CA and your Outlook client all part of the same domain?
It believe it’s fixed now :). Re-checked all URL and somehow MAPI virtual directory was not set for internal with external URL.
Awesome. The URLs will do it too. 🙂