In this article, we will take a look at how to enable explicit DKIM signing in Office 365.
What exactly is DKIM?
DomainKeys Identified Mail (DKIM) is an email authentication mechanism designed to prevent email spoofing. DKIM utilizes a cryptographic key pair and DNS records to provide sender validation and message integrity. It does this in the following way.
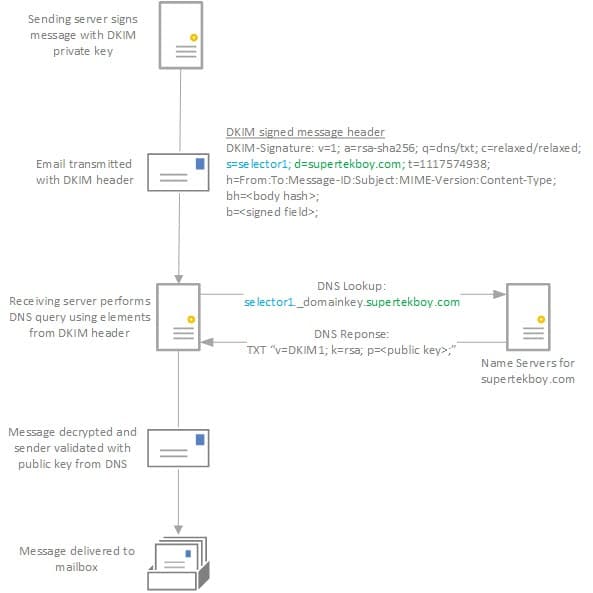
The sender encrypts selected parts of the message header with its private key. This is defined by the “h” field in the diagram above. In our example, we are encrypting the From, To, and Subject fields to name a few. Portions or all of the message body may also be hashed. The DKIM header itself is not encrypted. In the DKIM header, the “d” value identifies the sender domain. The “s” value identifies a unique selector defined by the sender.
The recipient combines the selector and domain values to form a DNS query. Using our diagram above the domain field is marked as supertekboy.com and the selector field is marked as selector1. Using these values the recipient forms the following DNS query.
selector1._domainkey.supertekboy.com
The _domainkey portion of the query is a fixed part of the protocol.
The name servers for the sender respond with a TXT record containing the public key. The recipient can then use this public key to decrypt the header (and any parts of the body).
Successful decryption validates the sender. A DKIM=Pass is attached to the message header which increases the confidence level of the message.
One of the drawbacks of DKIM is that it doesn’t prevent close misspellings of a domain. For example, I could register supertecboy.com and configure DKIM signing. DKIM will pass because the messages are coming from supertecboy.com. But to an untrained eye, supertekboy.com and supertecboy.com might be considered the same entity. When in fact the latter is a spoofer.
Microsoft is already signing your messages
As of December 2015, Microsoft started rolling out DKIM signing to Office 365 domains. It does this through implicit DKIM signing. For example, if your service domain is supertekboy.onmicrosoft.com and your provisioned domain is supertekboy.com then your message headers will be signed as follows.
From: Gareth @ SuperTekBoy <gareth@supertekboy.com>
DKIM-Signature: v=1; a=rsa-sha256; q=dns/txt; c=relaxed/relaxed;
s=selector1-supertekboy-com; d=supertekboy.onmicrosoft.com; t=1429912795;
h=From:To:Message-ID:Subject:MIME-Version:Content-Type;
bh=<body hash>;
b=<signed field>;
Microsoft uses this method because they have no ability to edit your DNS zone file. But they do control onmicrosoft.com. This is where they provision DKIM DNS records. They also couple this with DMARC. With DMARC they tell recipients to accept a sender address of supertekboy.com with a DKIM domain of supertekboy.onmicrosoft.com. For more information on Microsoft’s workaround with implicit signing, I recommend this article by Terry Zink at Microsoft.
If you are like me, you may want to tidy things up a bit. I prefer the domain field in my DKIM header to match my from address. The remainder of this article describes how to accomplish that goal by enabling explicit DKIM signing.
Reviewing current Office 365 settings
Let’s verify how everything is currently configured in our tenant.
Log into your Office 365 Admin Center. Under Admin Centers select Exchange. This will launch the Exchange Admin Center in a new tab.

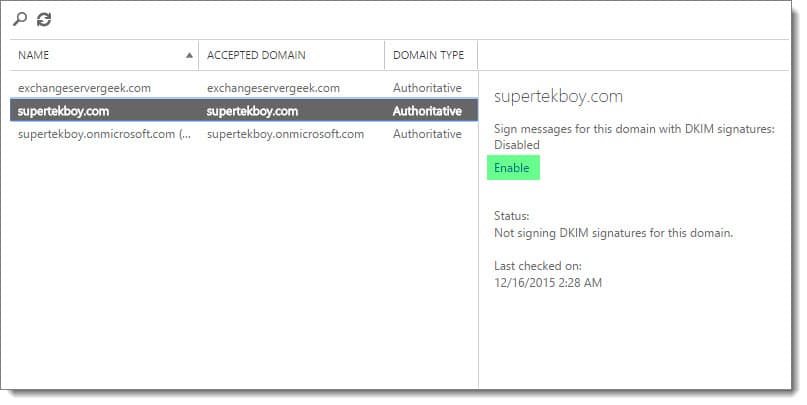
From the Exchange Admin Center select the Protection tab and DKIM sub-tab.
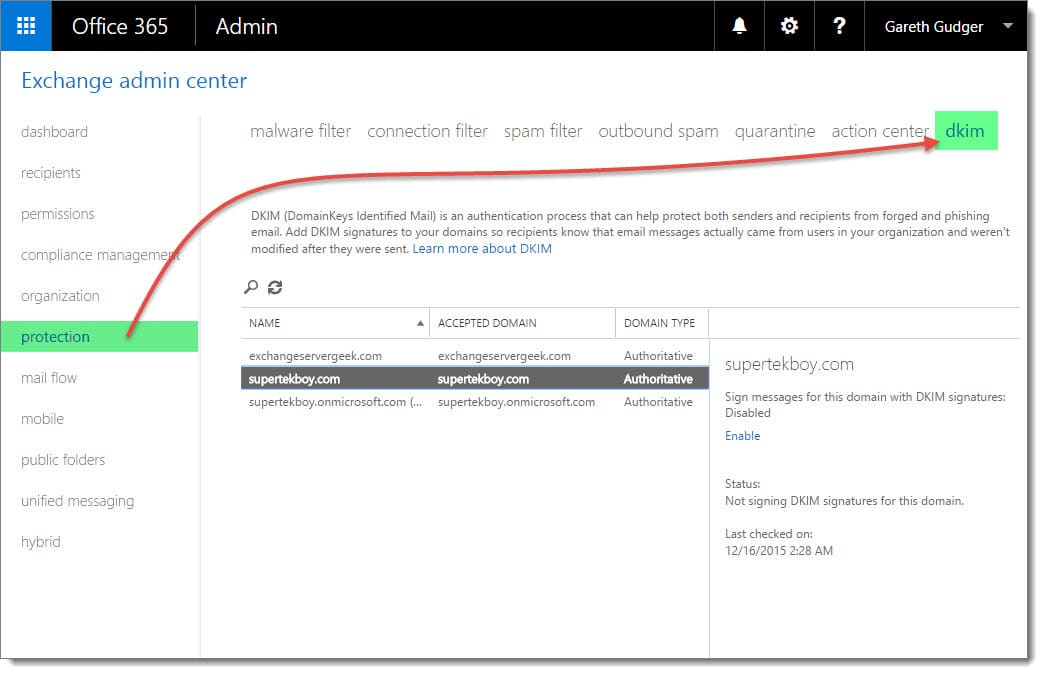
From the task view, you will notice the initial service domain, in our case supertekboy.onmicrosoft.com, is already enabled for DKIM signing. Our other domains are not.

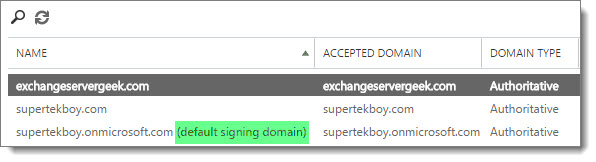
The initial service domain, supertekboy.onmicrosoft.com, is also designated as the default signing domain for all email domains. As mentioned earlier supertekboy.onmicrosoft.com is implicitly signing outbound email for all our domains. Let’s change that.
DNS records needed for Office 365 DKIM
Before we enable DKIM signing we need to create two CNAME records in our external DNS zone. This may appear to contradict the TXT record described in the diagram at the beginning of the article. That’s because it does. Traditionally a TXT record would contain your public encryption key. Microsoft does not give you this key. Instead, they take care of it for you on the back end. This is similar to how they handle certificates for your client access services. All you need to do is to create a CNAME record to forward DKIM requests from your DNS to Microsoft. This makes configuring DKIM incredibly easy.
Tip: The drawback with Microsoft maintaining this key pair is that you can not export your DKIM key for use in other applications. Nor can you import a key pair you may already be using elsewhere. For these scenarios, you would need to maintain a separate key pair and set of DNS records. We will try to cover that in a future article.
The CNAME records will be in the form of:
selector1-<domain guid>._domainkey.<initial service domain>
selector2-<domain guid>._domainkey.<initial service domain>
The <initial service domain> is the onmicrosoft domain you received when you first signed up. In our case this is supertekboy.onmicrosoft.com. The domain guid is the same domain guid you see from your MX record. We can find this using NSLOOKUP. The value we need is the portion of the MX record before mail.protection.outlook.com (highlighted in yellow).
Non-authoritative answer:
supertekboy.com MX preference = 0, mail exchanger = supertekboy-com.mail.protection.outlook.com
In our example, these will look like the following.
selector1-supertekboy-com._domainkey.supertekboy.onmicrosoft.com
selector2-supertekboy-com._domainkey.supertekboy.onmicrosoft.com
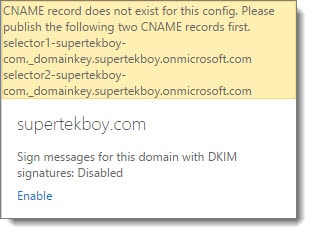
I think the easier way to get this value is to click Enable in the DKIM task pane. This will give you an error. But it will tell you exactly what record Office 365 is looking for.
To do this, select the domain you plan to enable DKIM signing on and click Enable in the task pane. You should see an error similar to the following. This error gives us the same values we identified above.
The final DNS records should look similar to the following.
Type:   CNAME
Host:   selector1._domainkey
Target: selector1-supertekboy-com._domainkey.supertekboy.onmicrosoft.com
TTL:    3600

Type:   CNAME
Host:   selector2._domainkey
Target: selector2-supertekboy-com._domainkey.supertekboy.onmicrosoft.com
TTL:    3600
Keep in mind that you will need two CNAME records for each domain you plan to enable DKIM on. For example, our CNAME records for exchangeservergeek.com would look like the following. Here you can see the domain guid changes but the initial service domain remains the same.
Type:   CNAME
Host:   selector1._domainkey
Target: selector1-exchangeservergeek-com._domainkey.supertekboy.onmicrosoft.com
TTL:    3600

Type:   CNAME
Host:   selector2._domainkey
Target: selector2-exchangeservergeek-com._domainkey.supertekboy.onmicrosoft.com
TTL:    3600
Configure Office 365 DKIM records at GoDaddy
Let explore how to configure these records at a popular DNS provider such as GoDaddy.
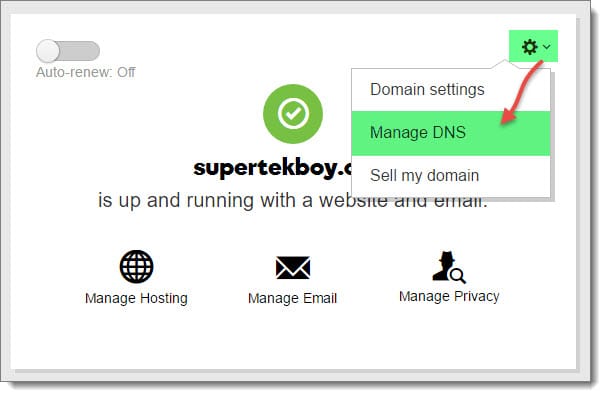
Once logged in to your GoDaddy account you will need to manage DNS.
For the appropriate domain, in this case, SuperTekBoy.com, select the cogwheel icon. Then select Manage DNS from the drop-down menu.
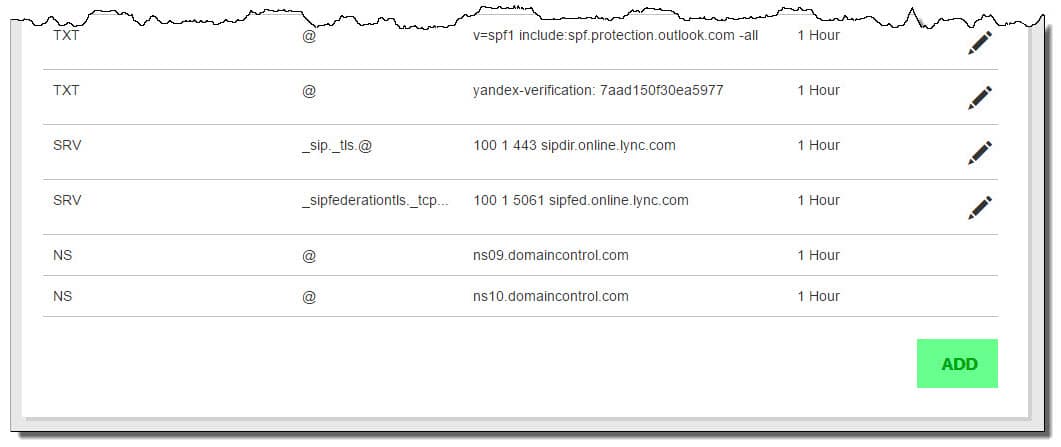
This will bring up a page that lists all your DNS records. Scroll to the bottom and select the Add button.
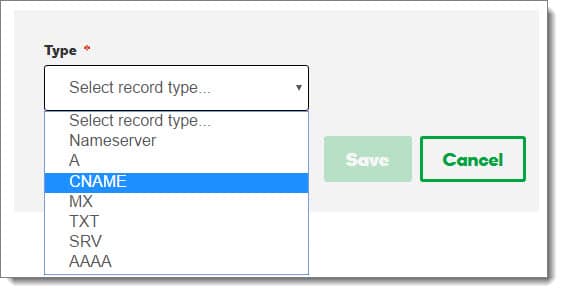
From the Type down-drop, we need to select CNAME.
We then need to enter the details of our CNAME record. The entries you make in your DNS management system should be very similar.
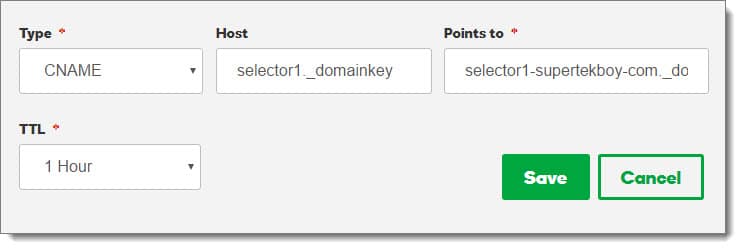
Click Save. Repeat these steps to create the second selector. The end result should look similar to this.

Enable explicit DKIM signing on your Office 365 messages
Navigate to the DKIM sub-tab under the Protection main tab.
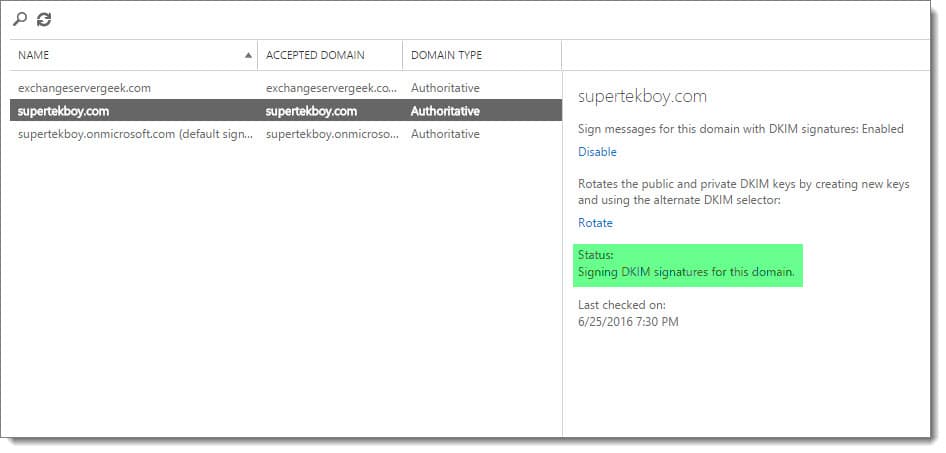
Select the domain you wish to enable explicit DKIM signing on and click Enable in the task pane.
At this point, Microsoft will check your external DNS for the presence of the two CNAME records. It will respond with an error if it can not find these records.
If successful the task pane will update the Status section to “Signing DKIM signatures for this domain”.
Let’s do some testing!
Verifying explicit DKIM signing
Let’s verify that our headers reflect the new DKIM signature.
To do this, let’s send a test email from our Office 365 mailbox to an external email address. In my case, I will send as gareth@supertekboy.com to an external Outlook.com account.
I pasted the received headers into the message analyzer at https://testconnectivity.microsoft.com/. Check the screenshot below.
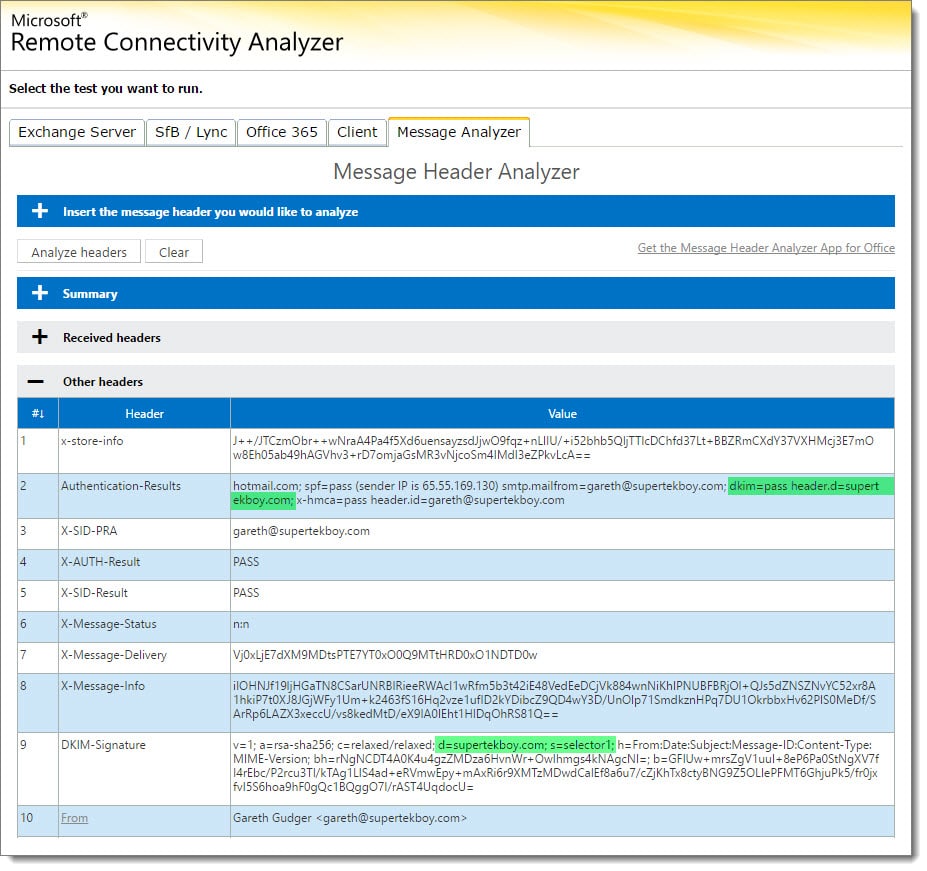
We see a couple of things happening in this result.
The first is on line 9. On line 9, we see the domain value is d=supertekboy.com and not d=supertekboy.onmicrosoft.com. This indicates our domain messages are now being explicitly signed versus implicitly signed.
Second is line 2. On the second line, we see a value in the authentication results of dkim=pass header.d=supertekboy.com. Not only does this indicate that DKIM is fully passing authentication checks but it also reaffirms we are signing with a key from the supertekboy.com domain.
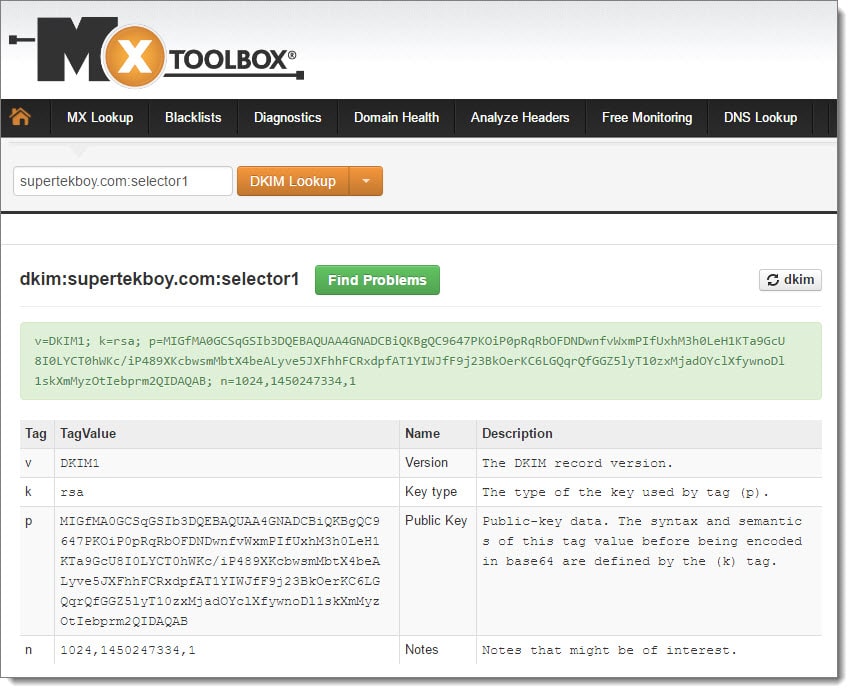
MXToolbox.com also has a nice verification tool located at http://mxtoolbox.com/dkim.aspx. This tool also gives us a positive result.

You are all set! How did your implementation go? Drop a comment below or join the conversation on Twitter @SuperTekBoy.

thanks after looking all over it was perfectly what I needed. my main hang up was the cname setting on what the hostname should be. once i had what you had it worked perfectly.
how do you obtain the private key, if you have local relay smtp servers.
Hey Miguel,
Unfortunately, you can’t.
Really well explained.
One question, lets say spf passes and dkim fails or vice versa, what will happen to the email? Will this be delivered normally?
Perfect explanation, Thanks!
Thank you so much for your perfect article.its much much better from microsoft support page & other websites.you are the best
The implicit vs explicit explanation really helped me out. Great article.
What if our DNS provider doesn’t support CNAME entries using the “selector1._domainkey” format? It gives error messages saying we entered a wrong format.
We tried
selector1._domainkey
selector1._domainkey..
both are not accepted.
Is there a way to use TXT instead of CNAME?
Thx, Markus
The 2nd entry should look like
selector1._domainkey.fqdn.com.
Hey Markus,
Each DNS provider seems to be a little different when it comes to their DNS system and the syntax they want you to enter. For example, when provisioning the TXT record to verify a new domain in Office 365 some providers support the @ symbol where others do not. The only supported method I have seen from Office 365 is to use a CNAME for DKIM. You can’t use a more traditional TXT record because Office 365 doesn’t provide you with the public key. Who is your provider?
Worked for me. Question, what the heck use is it? There is nothing in the client apps (like outlook 2016) that gives anything meaningful to users?
Hey Alex,
It allows a mail server/or service to verify the sender is who they say they are. So, its all on the back end. Aides in the prevention of phishing and spoofing email attacks.
The GoDaddy portion has you using selector1._domainkey as the hostname, however on TechNet it is listed as selector1.domainkey.
Oops, selector1.domainkey.
Hey Tuco. Do you have a link to the KB article in question?
_domainkey is a fixed part of the Sender ID protocol. This is what mail servers are looking for.
In addition, if you check the screenshot where I clicked ‘Enable’ (before I had the DNS records in place) Office 365 reports an error that it is looking for two records containing ‘_domainkey’.
Thank you for the guide, much easier to follow than Microsoft Technet Article.
Gooood 🙂
Good Post!
Glad you like it!