In previous articles, we generated and completed a certificate request. Keep in mind that despite the request being completed, it is not yet live. We must still assign services to that certificate.
In this article, we explore the process of assigning services to a third-party certificate for Exchange 2016 CU23 and greater and Exchange 2019 CU12 and greater. Unlike the previous articles, where this process was only available in PowerShell, assigning services is still available in the Exchange Admin Center. In this article, we will cover both methods of assigning services to a certificate.
Let’s get started!
Note: When you assign services to a certificate, it will impact current connections to Exchange. For example, assigning IIS to a certificate can cause Outlook clients to reconnect. You may wish to perform this action during a maintenance window or after hours.
Assign Services to a Certificate with Exchange Admin Center
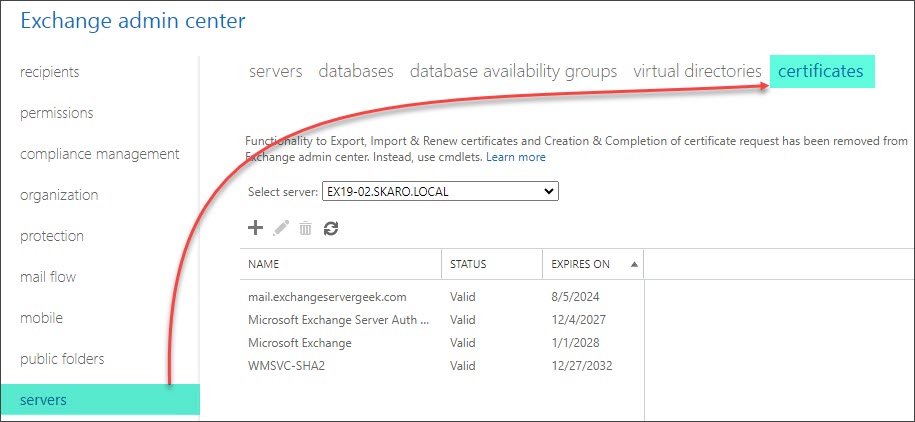
Log in to the Exchange Admin Center (EAC). Select the Servers tab and Certificates sub-tab.
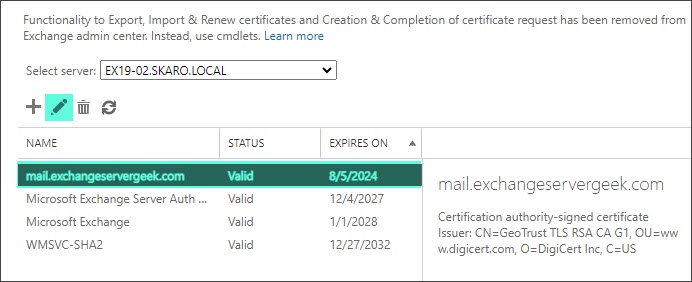
Select your certificate and click the Edit (![]() ) button.
) button.
Select the Services tab. Pick your desired services. In our example below, we picked IIS and SMTP. Click Save. If you selected the SMTP checkbox, you will be asked if you want to replace your default SMTP certificate. Select Yes.
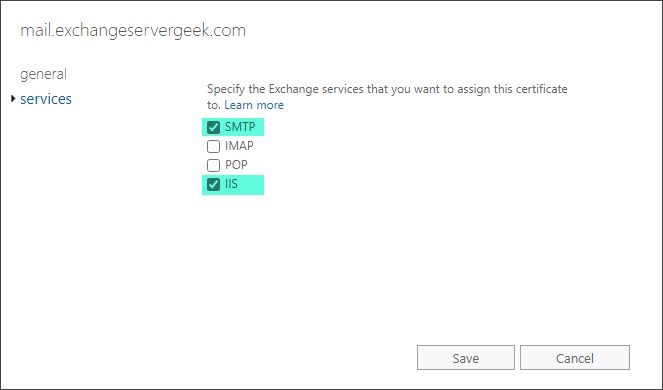
This may take a minute or so to process. Once complete, you will see the certificate has been assigned to the services you picked. In our example, IIS and SMTP are now assigned to the certificate.
Assign Services to a Certificate with PowerShell
To assign services using PowerShell, we will need to capture the thumbprint of our new certificate. To do this, we will need to first run the Get-ExchangeCertficate command.
 C:\> Get-ExchangeCertificate | Format-Table Subject, Thumbprint

Subject                        Thumbprint
-------                        ----------
CN=mail.exchangeservergeek.com B26C3C9B30A2A7371767275043816466CB921738
CN=EX19-01                     C232F4D642F74B9DC7E4ED33D4AB56E68C10CA76
CN=Microsoft Exchange Serve... 411A27BA64FD140523E4D1CF088589C228CA9C5E
CN=WMSvc-SHA2-EX19-01          D894B092E2ABE925E7104A0C9DFF6C448182CA30
From the example above, we can see the thumbprint for mail.exchangeservergeek.com is B26C3C9B30A2A7371767275043816466CB921738. Now that we have our thumbprint, we can use the Enable-ExchangeCertificate command.
C:\> Enable-ExchangeCertificate -Server EX19-01 -Thumbprint B26C3C9B30A2A7371767275043816466CB921738 -Services IIS,SMTPIn this command:
- Server specifies which server you want the action performed against. If you omit this parameter, the action is performed against the server where PowerShell is connected.
- Thumbprint specifies the certificate to configure via its thumbprint
- Services define which components you want to use the certificate with (e.g. IIS, SMTP, POP, IMAP, etc.)
If you specified SMTP as a service to add to the new certificate, you will be prompted on whether to overwrite the existing default SMTP certificate. Enter Y and press Enter.
Overwrite the existing default SMTP certificate?
Current certificate: '5FA62F11B524678090B752F48E207DEC3A0DFF46'
Replace it with certificate: 'B26C3C9B30A2A7371767275043816466CB921738'
[Y] Yes  [A] Yes to All  [N] No  [L] No to All  [?] Help (default is Y): Y
To verify the services have been assigned, run the Get-ExchangeCertificate command.
 C:\> Get-ExchangeCertificate | Format-Table Subject, Services

Subject                                                   Services
-------                                                   --------
CN=mail.exchangeservergeek.com                           IIS, SMTP
CN=EX19-01                                               IIS, SMTP
CN=Microsoft Exchange Server Auth Certificate                 SMTP
CN=WMSvc-SHA2-EX19-01                                         None
The services column indicates what services are currently assigned to the certificate. In the example above, IIS and SMTP have been assigned to the mail.exchangeservergeek.com certificate. Other possibilities include POP, IMAP, and Federation. For Exchange 2016, Unified Messaging is an additional option (no longer supported in Exchange 2019).
Checking your work
Now that we have our new certificate installed, we need to test it to make sure it is working properly.
The easiest way to check is to enter your URL into a web browser. In our case, we enter https://mail.exchangeservergeek.com/ecp. This should result in no certificate errors.

Let’s test Autodiscover as well. In our example, our Autodiscover URL is, https://autodiscover.exchangeservergeek.com/autodiscover/autodiscover.xml. You will be prompted for credentials. Once entered, you will receive the following response. Despite it being an error, it is expected behavior. Autodiscover was expecting Outlook, not Microsoft Edge.

Do the test results look good? Awesome! Your certificate is correctly installed.
More than one server?
If you have multiple Exchange servers, it is important that we copy this certificate to each Exchange Server. To do this, check our article on importing and exporting Exchange certificates.
If you have Exchange Hybrid
If you have Exchange Hybrid, it is highly likely your old certificate is being used for hybrid mail flow (forced TLS) between Exchange Online and Exchange on-premises.
If you are running Exchange Hybrid, rerun the Hybrid Configuration Wizard and select your new certificate for hybrid mail flow. When the hybrid configuration wizard is complete, you can delete the old certificate from Exchange.

Delete the old certificate with PowerShell
Now that everything is correctly installed, we can delete the old certificate. To delete your old certificate, run the following command, specifying the old thumbprint. Hit Enter to confirm.
Note: I would recommend delaying the deletion of the old certificate for a few days just in case you need to roll back your changes.
 C:\> Remove-ExchangeCertificate -Server EX19-01 -Thumbprint B26C3C9B30A2A7371767275043816466CB921738
Confirm
Are you sure you want to perform this action?
Remove certificate with thumbprint B26C3C9B30A2A7371767275043816466CB921738 from the computer's certificate store?
[Y] Yes [A] Yes to All [N] No [L] No to All [?] Help (default is "Y"):
The old certificate will be removed. To confirm removal, rerun the Get-ExchangeCertificate cmdlet above.
Blocked from deleting the certificate?
If you are blocked from deleting the certificate because it is still bound to a connector, you can try a couple of things.
If the Hybrid Configuration Wizard created the connector, I would recommend rerunning the Hybrid Configuration Wizard and selecting the new certificate. Then, try to delete your certificate.
If the connector was not created with the Hybrid Configuration Wizard, or rerunning the Hybrid Configuration Wizard does not solve your problem, you can run the following commands.
First, we’ll need to capture the thumbprint from our new certificate. To do this, we will need to run the Get-ExchangeCertficate command. Using our previous example, the thumbprint highlighted in yellow, with the NotAfter date of 7/15/2024, is our new certificate.
 C:\> Get-ExchangeCertificate | Format-Table Subject, Thumbprint, NotAfter

Subject                          Thumbprint                               NotAfter
-------                          ----------                               --------
CN=mail.exchangeservergeek.com   BD09E758DF572307128D878697D3A766BDBEBF35 7/15/2024
CN=mail.exchangeservergeek.com   B26C3C9B30A2A7371767275043816466CB921738 7/15/2023
With the thumbprint identified, we store our certificate in a variable with the following command.
C:\> $tlscert = Get-ExchangeCertificate -Thumbprint BD09E758DF572307128D878697D3A766BDBEBF35We then need to grab two smaller pieces of data from that variable and store those two pieces in a new variable. In our example below, we capture the Issuer and Subject fields stored in the $tlscert variable, stitch them together, and store them in the $tlscertname variable.
C:\> $tlscertname = (‘<I>’+$tlscert.issuer+'<S>’+$tlscert.subject)
You can type $tlscertname if you are curious about what that variable now contains.
Now that we have everything we need, we can reconfigure the connector with the old certificate attached. If you are unsure which connector the certificate is bound to, try deleting the certificate again, and the error will identify the connector using the certificate.
In our example below, we reconfigured our “Outbound to Office 365” send connector with the new certificate. We do this with the Set-SendConnector command.
C:\> Set-SendConnector -Identity "Outbound to Office 365" -TLSCertificateName $tlscertname
Repeat the final command on any additional send connectors. If you need to change this on a receive connector, you will use the Set-ReceiveConnector cmdlet instead.
Further Reading
Here are some articles I thought you might like.
- Generate a Certificate Request for Exchange 2016 and Exchange 2019
- Complete a Certificate Request for 2016 and Exchange 2019
- Import & Export SSL Certificates in Exchange 2016 and Exchange 2019
- Renew a Certificate in Exchange 2016 & 2019
- Generate a Certificate Request for Exchange 2013
- Complete a Certificate Request in Exchange 2013
- Assign Services to a Certificate in Exchange 2013
- Import & Export a Certificate in Exchange 2013
- Renew a Certificate in Exchange 2013

Great !!
Nice article ..
much information got it about certificates
Thanks Gareth!
With this new powershell only procedure, do you still need to apply the certificate to each of your exchange connectors? Or does this just “apply” it to them now when you assign the services of IIS, SMTP?