In this article, we explore the process of generating a certificate request to obtain a third-party certificate for Exchange 2016 CU23 and greater and Exchange 2019 CU12 and greater. This process differs from the older cumulative updates (and Exchange 2013), where it was still possible to generate a third-party certificate request through the Exchange Admin Center (GUI).
If you are still on Exchange 2013, or older versions of Exchange 2016 or Exchange 2019, consider using this article instead for the Exchange Admin Center method.
In future articles, we will explore completing that request, assigning services to the certificate, and importing that certificate to other Exchange servers.
Let’s get started!
Note: It is still possible to use the Exchange Admin Center to generate and renew self-signed certificates. Self-signed certificates are out of the scope of this article.
How to generate a certificate request in PowerShell
As mentioned earlier, newer versions of Exchange 2016 and Exchange 2019 require that third-party certificate requests be conducted through PowerShell. Third-party certificate requests can no longer be requested or renewed through the Exchange Admin Center.
To start, launch the Exchange Management Shell (either from the Exchange Server or a workstation that has the Exchange Management Tools installed).
The first command we run stores the output of New-ExchangeCertficate into the variable $certrequest.
C:\> $certrequest = New-ExchangeCertificate -GenerateRequest -FriendlyName mail.exchangeservergeek.com -SubjectName "c=US,o=Exchange Server Geek,cn=mail.exchangeservergeek.com" -DomainName autodiscover.exchangeservergeek.com -PrivateKeyExportable $true
The example above is leveraging the following parameters:
- GenerateRequest is used to generate a certificate request for a third-party certificate authority. Without this parameter, you would generate a self-signed certificate issued by the Exchange Server.
- FriendlyName is purely for display. It identifies how you want the certificate to appear in the Exchange Admin Center and PowerShell. It is beneficial to put something descriptive in this field. If you omit this field, Exchange names the certificate “Microsoft Exchange”. In our example below, we made the friendly name the same as the subject name.
- SubjectName is the primary certificate name. This is represented as “cn=mail.exchangeservergeek.com” in our example above and is the name that is most visible to end-users. It also contains other fields that you want to appear on the certificate, such as the country code or organization name. In our example, we list the United States as “c=US” and an organization as “o=Exchange Server Geek”.
- DomainName is any subject alternative name you need to appear on this certificate. This is common for Exchange, and as we show in our example above, we are adding autodiscover.exchangeservergeek.com with this parameter. This means our certificate will be valid for both mail.exchangeservergeek.com and autodiscover.exchangeservergeek.com.
- PrivateKeyExportable allows you to copy this certificate to other Exchange Servers. If you have more than one Exchange Server, you need this parameter set to $true. If you omit this parameter (or set it to $false), you can only use this certificate on the Exchange Server that generated the certificate request.
Now that we have the Exchange certificate stored in a variable, we need to get that variable saved into a file. To do that, run the following command.
C:\> [System.IO.File]::WriteAllBytes('\\EX19-01\C$\Users\<user>\Desktop\certrequest.txt', [System.Text.Encoding]::Unicode.GetBytes($certrequest))In this command, two things are important. First, you must specify a UNC path to where you want to save the certificate request file. In our example, we saved this to our desktop as a text file named certrequest.txt. The second is what we are exporting into that file. In this case, it is the contents of the variable $certrequest. As soon as you run this command, the file will be created in the location specified.
By running the following command, you will notice we have a new certificate in a Pending Request state. This certificate will also show up in the Exchange Admin Center under Servers > Certificates.
 C:\> Get-ExchangeCertificate | Format-Table FriendlyName, Subject, Status

FriendlyName                 Subject                         Status
------------                 -------                         ------
mail.exchangeservergeek.com  CN=mail.exchangeservergeek.com  PendingStatus
Microsoft Exchange           CN=EX19-01                      Valid
Microsoft Exchange Server... CN=Microsoft Exchange Server... Valid
WMSVC-SHA2                   CN=WMSvc-SHA2-EX19-01           Valid
Processing a certificate request
Before we can use our certificate, we must process this request through a third-party certificate provider. There are plenty out there, but I personally recommend DigiCert (affiliate). Not only do they have fantastic technical support, but they also have some really neat certificate tools. Best of all, their certificate turnaround time is incredibly fast (even on a Sunday at 7:42 pm–yep, personal experience right there.).
The specific steps for each certificate provider are different, but the principles remain the same. You provide a certificate request. The provider validates your identity. The provider then issues you a certificate.
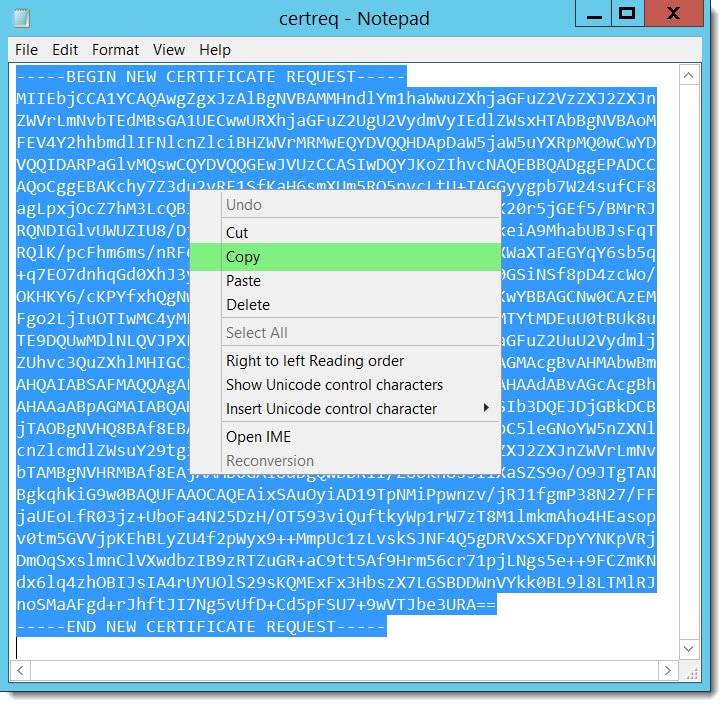
First, we need to get the certificate request we created in the previous section. This should have created a file on your desktop (or the path you specified). Open this file with Notepad and copy the entire contents, including the BEGIN and END lines.
Next, we need a Unified Communications (UC) certificate. This is also referred to as a Subject Alternative Name (SAN) certificate. As mentioned above, I recommend DigiCert (affiliate). However, for a full list of Microsoft recommended certificate authorities check https://support.microsoft.com/en-us/kb/929395.
At some point, the 3rd party certificate authority will ask you to paste the contents of the CSR file into their system for processing. From this file, the provider will identify all the subject and alternate names you need. Using our previous example, the certificate provider identified we requested both mail.exchangeservergeek.com and autodiscover.exchangeservergeek.com. The validation process will then begin.
The validation process can vary between providers as well. Some providers will perform a simple domain validation where they send an email to the recipients listed on your domain registration. Others will perform more extensive checks, including the validation of your business against various agencies.
Once your identity has been validated and your certificate approved, download and unpack the cert. Often providers will ask you what system the certificate is for. If you have the option for Exchange, this will give you the appropriate certificate bundle. You will then be ready to complete your certificate request.
Further Reading
Here are some articles I thought you might like.
- Complete a Certificate Request for 2016 and Exchange 2019
- Assign Services to a Certificate for Exchange 2016 and Exchange 2019
- Import & Export SSL Certificates in Exchange 2016 and Exchange 2019
- Renew a Certificate in Exchange 2016 & 2019
- Generate a Certificate Request for Exchange 2013
- Complete a Certificate Request in Exchange 2013
- Assign Services to a Certificate in Exchange 2013
- Import & Export a Certificate in Exchange 2013
- Renew a Certificate in Exchange 2013

Hi
Very nice series of articles but with one change/correction. To save that $certrequest to a file the command should be
[System.IO.File]::WriteAllBytes(‘\\myserver\c$\users\Administrator.LAB\Downlo
ads\myserver.lab.cayes.no.crt’, [System.Text.Encoding]::UTF8.GetBytes($certrequest))
Unicode.GetBytes will create a file with every other character a Nul (0) which some tools like OpenSSL don’t like.
Thanks