If you have multiple Exchange servers, it is imperative that each server have a valid third-party certificate reflecting the namespace. If you don’t, some client connections will get certificate errors.
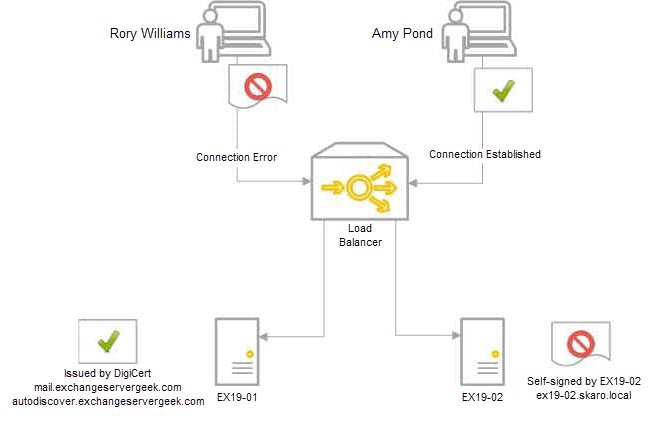
In our example below, we have two Exchange 2019 servers behind a load balancer in a single site; EX19-01 and EX19-02. Our third-party certificate request was generated and completed on EX19-01. We have also assigned services to that certificate. However, that certificate does not yet exist on EX19-02. Only the default out-of-the-box certificates exist on EX19-02.
When user Amy Pond connects, she is load balanced to EX19-01, which has a third-party certificate. The certificate matches the namespace. Her connection is established without error. On the other hand, when Rory Williams connects, he is load balanced to EX19-02. EX19-02 returns its self-signed certificate. This certificate does not match the namespace. Rory receives a security error.
In this article, we explore transferring a third-party SSL certificate from one Exchange server to another using PowerShell. This process differs from the older cumulative updates (and Exchange 2013), where it was still possible to complete a third-party certificate request through the Exchange Admin Center (GUI).
If you are still on Exchange 2013, or older versions of Exchange 2016 or Exchange 2019, consider using this article instead for the Exchange Admin Center method.
Let’s get started!
Export the certificate with PowerShell
As mentioned earlier, newer versions of Exchange 2016 and Exchange 2019 require that third-party certificate actions, such as exporting or importing, be completed through PowerShell. These actions can no longer be processed through the Exchange Admin Center.
To start, launch the Exchange Management Shell (either from the Exchange Server or a workstation that has the Exchange Management Tools installed).
To export the certificate, we will need to capture the thumbprint of our certificate. To do this, we will need to first run the Get-ExchangeCertficate command.
 C:\> Get-ExchangeCertificate | Format-Table Subject, Thumbprint

Subject                        Thumbprint
-------                        ----------
CN=mail.exchangeservergeek.com BD09E758DF572307128D878697D3A766BDBEBF35
CN=EX19-01                     C232F4D642F74B9DC7E4ED33D4AB56E68C10CA76
CN=Microsoft Exchange Serve... 411A27BA64FD140523E4D1CF088589C228CA9C5E
CN=WMSvc-SHA2-EX19-01          D894B092E2ABE925E7104A0C9DFF6C448182CA30
If you are not on the server where you completed the original certificate request, you can add the Server parameter. For example.
C:\> Get-ExchangeCertificate -Server EX19-01 | Format-Table Subject, Thumbprint
From the example above, we can see the thumbprint for mail.exchangeservergeek.com is B26C3C9B30A2A7371767275043816466CB921738. Now that we have our thumbprint, we can use the Export-ExchangeCertificate command and store the output in a variable named $cert.
C:\> $cert = Export-ExchangeCertificate -Thumbprint BD09E758DF572307128D878697D3A766BDBEBF35 -BinaryEncoded -Password (Get-Credential).passwordIn our example:
- Thumbprint specifies the certificate we are exporting.
- BinaryEncoded specifies to use DER encoding. If you omit this parameter, then BASE64 encoding is used instead. The benefit of using this parameter (and DER encoding) is that it will export all intermediary certificates in the chain. It is recommended to use this parameter.
- Password specifies the password to protect the file. Rather than visibly typing a password in PowerShell, we pass the Get-Credential cmdlet with this parameter. This will launch a Windows logon prompt where inputting a password will be hidden. When you get this prompt, you will need to enter both a username and password, however, only the password field from the Windows logon box will be captured. I recommend making the password as long and cryptic as possible. Should this file ever fall into the wrong hands, we want to make it as difficult as possible to retrieve the private key. If you ever suspect your private key has fallen into the wrong hands, you should rekey your certificate.
Now that we have the Exchange certificate stored in a variable, we need to get that variable saved into a file. To do that, run the following command.
C:\> [System.IO.File]::WriteAllBytes('\\EX19-01\C$\Users\<user>\Desktop\mail_exchangeservergeek_com.pfx', $cert.FileData)In this command, two things are important. First, you must specify a UNC path to where you want to save the certificate request file. In our example, we saved this to our desktop as a text file named mail_exchangeservergeek_com.pfx. The second is what we are exporting into that file. In this case, it is the contents of the variable $cert. As soon as you run this command, the file will be created in the location specified.
Now that we have our exported certificate, let’s move to the import process.
Import the certificate with PowerShell
To import the certificate to other servers, we need to use the Import-ExchangeCertificate command.
C:\> Import-ExchangeCertificate -Server EX19-02 -FileData ([System.IO.File]::ReadAllBytes('\\EX19-01\C$\Users\Supertekboy\Desktop\mail_exchangeservergeek_com.pfx')) -Password (Get-Credential).password -PrivateKeyExportable $trueIn our example:
- Server specifies which server you want the action performed against. If you omit this parameter, the action is performed against the server where PowerShell is connected. In our example above, we are importing this certificate to a server named EX19-02 (the certificate was exported from EX19-01).
- FileData is the UNC path to the PFX file. From our example in the export section, we saved this to our desktop in a file named mail_exchangeservergeek_com.pfx.
- Password specifies the password to open the file. This is the password we set during the export section. Like before, you will get a Windows logon prompt requiring you to enter a username and password. You can put whatever you want in the username; only the password needs to match.
- PrivateKeyExportable allows you to copy this certificate to other Exchange Servers. If you omit this parameter (or set it to $false), you can only export the certificate from the Exchange Server that originally generated the certificate request. In our case, this would be EX19-01. If we set this to $true, it gives us the option to export this certificate from either EX19-01 or EX19-02 in the future.
If successful, you should receive an output similar to that below.
Thumbprint                                    Services
----------                                    --------
BD09E758DF572307128D878697D3A766BDBEBF35      .......
Take note that the Services column lists all periods. This indicates no services are currently assigned to the certificate. Check this article for more information on how to assign services to the certificate. The certificate is not live, or in production, until you assign services to it.
Once we have assigned services, we can check the validity of the certificate by running the following command. This certificate will also show up in the Exchange Admin Center under Servers > Certificates.
Repeat the steps in this import process for each of your Exchange Servers.
 C:\> Get-ExchangeCertificate -Server EX19-02 | Format-Table FriendlyName, Status, Services

FriendlyName                               Status               Services
------------                               ------               --------
mail.exchangeservergeek.com                 Valid   IMAP, POP, IIS, SMTP
Microsoft Exchange                          Valid              IIS, SMTP
Microsoft Exchange Server Auth Certificate  Valid                   SMTP
WMSVC-SHA2                                  Valid                   SMTP
Common errors when exporting and importing certificates
One common error when exporting and importing certificates is the following:
A special Rpc error occurs on server EX19-01: The private key couldn't be exported as PKCS-12. It either couldn't be accessed or isn't exportable.
This error occurs if you missed the PrivateKeyExportable parameter (or did not set it to $true) when generating the original certificate, or if you tried to export the certificate from a server that did not use the parameter during its own import process. To fix this issue, you may need to rekey the certificate (invalidating the certificate across all servers) or identify a server where the private key is exportable.
You can do this with the following command. In the example below, we can see the private key for the mail.exchangeservergeek.com certificate on the server EX19-01 is exportable.
 C:\> Get-ExchangeCertificate -Server EX19-01 | Format-Table FriendlyName, Status, PrivateKeyExportable

FriendlyName                             Status   PrivateKeyExportable
------------                             ------   --------------------
mail.exchangeservergeek.com              Valid    True
Microsoft Exchange                       Valid    False
Microsoft Exchange Server Auth Cert...   Valid    True
WMSVC-SHA2                               Valid    True
Further Reading
Here are some articles I thought you might like.
- Generate a Certificate Request for Exchange 2016 and Exchange 2019
- Complete a Certificate Request for 2016 and Exchange 2019
- Assign Services to a Certificate for Exchange 2016 and Exchange 2019
- Renew a Certificate in Exchange 2016 & 2019
- Generate a Certificate Request for Exchange 2013
- Complete a Certificate Request in Exchange 2013
- Assign Services to a Certificate in Exchange 2013
- Import & Export a Certificate in Exchange 2013
- Renew a Certificate in Exchange 2013

Can’t you just export it through the Certificate Manager?
I want to know this too. Much easier IMHO.
really it’s very important and the steps are much clearer but I have only one doubt here, can you please clarify, really it will help us more
existing thumbprint
CN=mail.exchangeservergeek.com BD09E758DF572307128D878697D3A766BDBEBF35 7/15/2024
New cert thumbprint
CN=mail.exchangeservergeek.com B26C3C9B30A2A7371767275043816466CB921738 7/15/2023
but in the export process, you are exporting old thumbprints for the second exchange server to be imported which is B26C3C9B30A2A7371767275043816466CB921738
Good catch Salman. Should be fixed now with the correct thumbprint example.