• Skip to primary navigation
  • Skip to main content
  • Skip to primary sidebar
  • Skip to footer

SuperTekBoy

Practical Help for Exchange & Office 365

  • Exchange
    • News
    • Tutorials
    • Solve a Problem
  • Office 365
    • News
    • Tutorials
    • Solve a Problem
  • Outlook
    • Tutorials
    • Solve a Problem
  • Books
  • Podcasts
  • Quick Links…
    • Generate or Renew SSL Certs for Exchange
    • Connect PowerShell to Exchange Online
    • Connect PowerShell to Office 365
    • Extend Schema for Exchange
    • Exchange Schema & Build Numbers
  • More…
    • Kemp Load Balancers
    • Other tech…
    • Videos
    • About SuperTekBoy
    • Contact Us

Office 365 Tutorials

Add a legal disclaimer to all outbound email (Exchange/O365)

January 7, 2016 By Gareth Gudger 7 Comments

Share
Tweet
Share

Adding a legal disclaimer to all outbound email is an important task. Thankfully, this is a simple process in Exchange on-premises and Office 365. In fact, the instructions are identical for Exchange 2013, Exchange 2016 and Office 365.

For this article, our example company, Time Travel Research, wishes that all email leaving the organization have a legal disclaimer. Time Travel Research is not concerned about applying a disclaimer if the message remains inside the organization. For example, a disclaimer between two employees is not necessary. However, they would like all external messages, whether it be to a customer or a vendor, to have this disclaimer.

Let’s get started!

Add a legal disclaimer to all outbound email

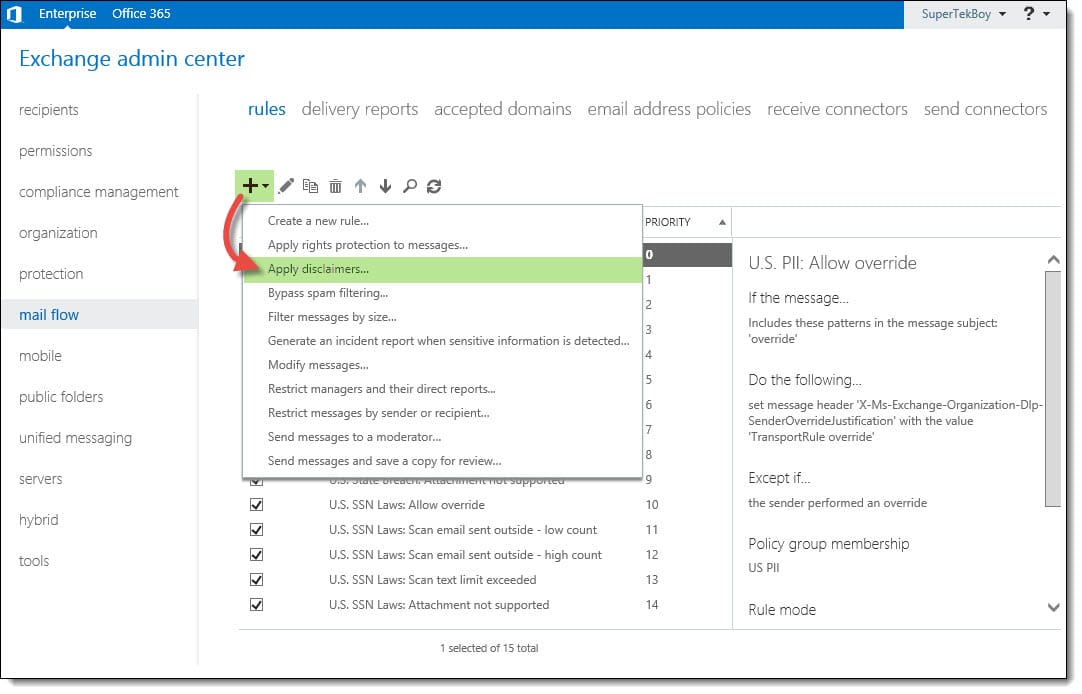
Log in to the Exchange Admin Center. Once logged in, navigate to Mail Flow >> Rules. Click the New (Excchange 2016 New) button.

From the drop-down menu, you will notice several choices. These choices are rule templates. We could just select Create a new rule. That would start us with a blank rule with no conditions. However, to give us a head start lets pick the Apply disclaimers template. This will configure a couple of items for us.

Add a legal disclaimer to all outbound email Exchange Office 365
[Read more…] about Add a legal disclaimer to all outbound email (Exchange/O365)
Share
Tweet
Share

Filed Under: Exchange Tutorials, Office 365 RSS, Office 365 Tutorials

Don’t feed the Phish

October 27, 2015 By Gareth Gudger Leave a Comment

Share
Tweet
Share

This morning I woke up to a very interesting phishing email. I never blog about phishing attacks but I found this one particularly interesting as it was spoofing Microsoft account services.

Identify the Phish

Phishing emails are always getting more creative. Sometimes it is hard to spot a fake from a legitimate email. But there are always a couple of tells on a fake email. The one I received this morning had a few.

Outlook.com Microsoft Team Phishing Attack

The first was the email address. Despite it displaying outlook.com the part to the left of the at symbol read “outlooo.teeam”. This was the first red flag.

The second red flag is the sketchy use of the English language throughout the body of the message itself. It just doesn’t read well.

Then comes the Verify Your Account button. This was the ultimate red flag. Without clicking I hovered my mouse pointer over the button. It revealed where it was going to take me. Even if the email address had been formatted better and the body of the message was grammatically correct the link was the surefire tell. In the screenshot above I superimposed the link so you can see where it was taking me. Clearly not a Microsoft site. But some site in India.

The final red flag was the trademark symbol at the end of the message. I have no idea why the word “team” (or perhaps the entire phrase) is a trademark.

Now that we have identified a phishing email what’s next? I recommend reporting it to your anti-spam provider. Below are the steps for reporting it to Microsoft. If you have a 3rd party vendor for spam, check with your system admin on how to submit messages to them for analysis.

[Read more…] about Don’t feed the Phish

Filed Under: Office 365 Tutorials, Outlook Tutorials

Easily Connect to Exchange Online with PowerShell

April 30, 2015 By Gareth Gudger 8 Comments

Share
Tweet
Share

In a previous article, I explained how to connect to Office 365 with PowerShell. In this article, we explore how to use PowerShell to connect to Exchange Online.

Note: This article only covers the PowerShell v2 and v3 modules. Exchange Online PowerShell v1 module was removed from this article as it is deprecated as of October 1st, 2022, with the deprecation of basic authentication.

Let’s get started!

Exchange Online PowerShell Module

One of the challenges of a large Exchange Online organization is that PowerShell commands can take a very long time to run. The Exchange Team released the Exchange Online PowerShell V2 module to combat this problem, which ships with all new Exchange cmdlets while still supporting the old cmdlets. Microsoft has determined that these new cmdlets are up to eight times faster in certain instances. I highly recommend using this module over the V1 module. The V2 module has been generally available since June 2020.

To use the new Exchange Online module, launch PowerShell as an administrator and run the following command.

 C:\> Install-Module ExchangeOnlineManagement

If you did not have NuGet previously installed from another PowerShell library you will be prompted to install it. Press Y and hit Enter.

 NuGet provider is required to continue.
PowerShellGet requires NuGet provider version '2.8.5.201' or newer to 
interact with NuGet-based repositories. The NuGet provider must be 
available in 'C:\Program Files\PackageManagement\ProviderAssemblies' or
'C:\Users\<user>\AppData\Local\PackageManagement\ProviderAssemblies'. 

You can also install the NuGet provider by running 'Install-PackageProvider 
-Name NuGet -MinimumVersion 2.8.5.201 -Force'. 

Do you want PowerShellGet to install and import the NuGet provider now?
[Y] Yes [N] No [S] Suspend [?] Help (default is "Y"): Y
[Read more…] about Easily Connect to Exchange Online with PowerShell
Share
Tweet
Share

Filed Under: Office 365, Office 365 RSS, Office 365 Tutorials

Office 365: Set Passwords To Never Expire

February 26, 2014 By Gareth Gudger 1 Comment

Share
Tweet
Share

If you have ever tried to tweak the password policy in Office365 then you have likely encountered this warning.

Office365 Admin Center Password Expiration

Unfortunately, this restricts us to a password that can never be used for more than 730 days (2 years). Anything outside that range and you receive an error like the one above.

Does this mean that a password must expire?

Well, no, it does not have to.

Now password expiration is a best practice but, you may have a situation that necessitates having a more permanent password. One such example could be a service account for a network copier. The copier would use this account to perform scan-to-email functions. A user would scan a hardcopy of a document into the scanner and send it to email leveraging Office 365.

Most likely, you are never going to log with the scanner account. This means you will never see the expiration notice. You could set up a calendar reminder for yourself. You could also plaster your monitor with sticky notes. But, more than likely, your scan-to-email will break one day and leave you scratching your head as to why.

So, how do you set a password to never expire? The Admin Center gives you an error. So, what is left?

[Read more…] about Office 365: Set Passwords To Never Expire

Filed Under: Office 365, Office 365 RSS, Office 365 Tutorials

Easily Connect to Office 365 with PowerShell

February 20, 2014 By Gareth Gudger 2 Comments

Share
Tweet
Share

Office 365 is great, but the Admin Center does not bode well for bulk tasks. What might take an insanely massive amount of time in the graphical user interface may only take seconds in PowerShell.

In the first part of this article, we discuss all the prerequisites required to make the connection. The second part discusses how to make the connection.

Prerequisites

First, we need to install the MSOnline module in PowerShell. To do this launch PowerShell as an administrator.

Then type the following:

 C:\> Install-Module -Name MSOnline

You may be prompted to install the NuGet provider if it is missing or out of date. Type Y and press enter to install NuGet.

NuGet provider is required to continue

PowerShellGet requires NuGet provider version '2.8.5.201' or newer to interact with NuGet-based repositories. The NuGet provider must be available in 'C:\Program Files\PackageManagement\ProviderAssemblies' or
'C:\Users\Administrator\AppData\Local\PackageManagement\ProviderAssemblies'. You can also install the NuGet provider by running 'Install-PackageProvider -Name NuGet -MinimumVersion 2.8.5.201 -Force'.

Do you want PowerShellGet to install and import the NuGet provider now?
[Y] Yes [N] No [S] Suspend [?] Help (default is "Y"): Y

You may be prompted to allow installation from an untrusted repository. With this being a known module from the PowerShell Gallery, type Y and press enter. However, it is always wise to scrutinize all modules, regardless of where they are sourced.

Untrusted repository

You are installing the modules from an untrusted repository. If you trust this repository, change its InstallationPolicy value by running the Set-PSRepository cmdlet.

Are you sure you want to install the modules from 'PSGallery'?
[Y] Yes [A] Yes to All [N] No [L] No to All [S] Suspend [?] Help (default is "N"): Y

With the module installed you will need to close any PowerShell windows. 

[Read more…] about Easily Connect to Office 365 with PowerShell

Filed Under: Office 365, Office 365 RSS, Office 365 Tutorials

  • « Go to Previous Page
  • Page 1
  • Interim pages omitted …
  • Page 3
  • Page 4
  • Page 5

Primary Sidebar

Want to stay up to date?

Sidebar Form

Join thousands of IT professionals and get the latest Exchange & Office 365 tips and tutorials direct to your inbox

DigiCert Banner 300x348

(help support us using our affiliate link)

Footer

Site Navigation

  • Subscribe to blog
  • About SuperTekBoy
  • Disclaimer
  • Privacy & Cookies
  • Contact Us

Want to stay up to date?

Footer Form

Join thousands of IT professionals and get the latest Exchange & Office 365 tips and tutorials direct to your inbox

Join the conversation

  • Twitter
  • LinkedIn
  • Facebook
  • RSS

Copyright © 2026 · SuperTekBoy LLC