If you have multiple Exchange servers, it is imperative that each server have a valid 3rd-party certificate reflecting the namespace. If you don’t, some client connections will get certificate errors.
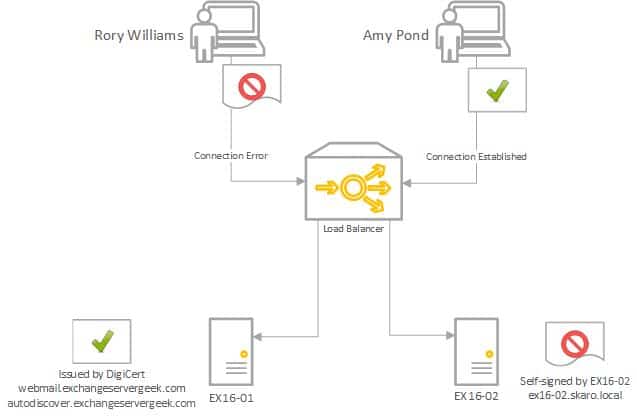
In our example below, we have two Exchange 2016 servers behind a load balancer in a single site; EX16-01 and EX16-02. Our third-party certificate request was generated and completed on EX16-01. We have also assigned services to that certificate. However, that certificate does not yet exist on EX16-02. Only the default out-of-the-box certificates exist on EX16-02.
When user Amy Pond connects, she is load balanced to EX16-01, which has a 3rd party certificate. The certificate matches the namespace. Her connection is established without error. On the other hand, when Rory Williams connects, he is load balanced to EX16-02. EX16-02 returns its self-signed certificate. This certificate does not match the namespace. Rory receives a security error.
In this article, we explore transferring a third-party SSL certificate from one Exchange server to another.
We explore this process through both the Exchange Admin Center and PowerShell.
Let’s get started!
Note: These steps are identical for Exchange 2013, Exchange 2016 CU22 and earlier, and Exchange 2019 CU11 and earlier. If you are using Exchange 2016 CU23 or greater or Exchange 2019 CU12 or greater, you must renew your certificate with all new PowerShell commands covered in the following article.
Export the certificate with Exchange Admin Center
Log in to the Exchange Admin Center. It doesn’t have to be the server you created your request on.
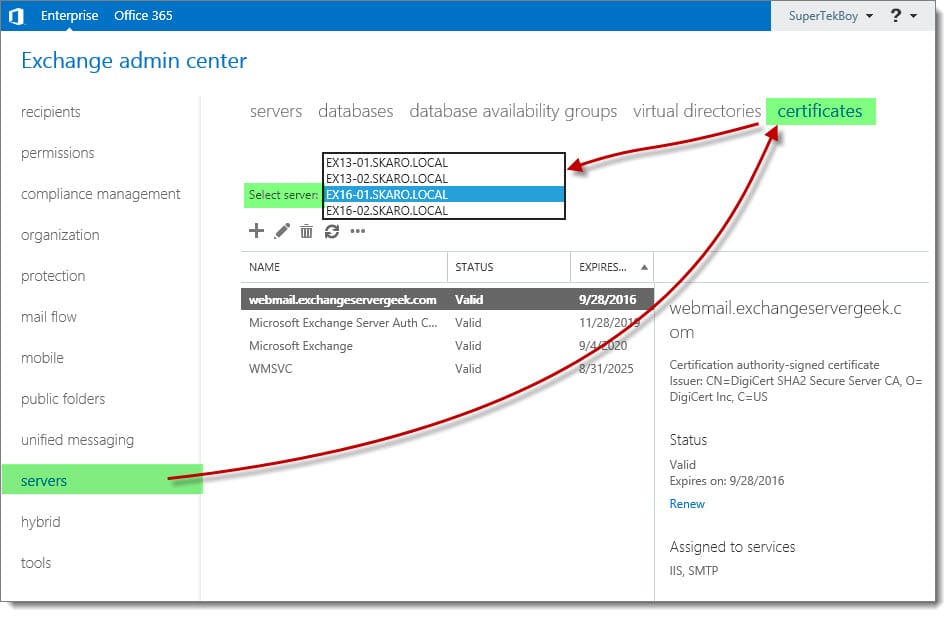
Navigate to the Servers tab and Certificates sub-tab.
In the Select Server drop-down, pick the server you completed the certificate request on. In our example, this was EX16-01.
With the certificate selected, click More (![]() ) >> Export Exchange Certificate. In our example, we selected the webmail.exchangeservergeek.com certificate.
) >> Export Exchange Certificate. In our example, we selected the webmail.exchangeservergeek.com certificate.

On the Export Exchange Certificate dialog, specify a path for the export. This will need to be a UNC path and a PFX file type. In our example, we saved this to the desktop of our server – \\EX16-01\C$\Users\SuperTekBoy\Desktop\ExportedCert.PFX. You will also need to specify a password. I recommend making it something long and cryptic. Should this file ever fall into the wrong hands, we want to make it as difficult as possible to retrieve that private key. Click Ok.

It will take a few seconds for the key to save to the location specified.
Export the certificate with PowerShell
The export process via PowerShell is a little more involved. The command Export-ExchangeCertificate uses the thumbprint of the certificate versus the friendly name. This means we will have to run Get-ExchangeCertificate to list all our thumbprints.
 C:\> Get-ExchangeCertificate

Thumbprint                                Services   Subject
----------                                --------   -------
559642FCD3DD4769D79A457D11875AF9E6E49F3C  ...WS..    CN=webmail.exchangeservergeek.com, OU=Exchange Server Geek, O=S...
If you are not on the server where you completed the original certificate request, you can add the -Server parameter. For example.
C:\> Get-ExchangeCertificate -Server EX16-01
Now that we have our thumbprint, we need to run Export-ExchangeCertificate. Microsoft requires us to export the certificate through a variable. More info on that here.
C:\> $file = Export-ExchangeCertificate -Thumbprint 559642FCD3DD4769D79A457D11875AF9E6E49F3C -BinaryEncoded:$true -Password (ConvertTo-SecureString -String "Password1" -AsPlainText -Force)
In our example:
-Thumbprint specifies the certificate we are exporting.
-BinaryEncoded specifies Base64 or DER encoding. $true defaults to DER encoding.
-Password specifies the password to protect the file.
Let’s export the data from that variable into a file. For this, we use the Set-Content command.
C:\> Set-Content -Path "\\EX16-01\C$\Users\SuperTekBoy\Desktop\ExportedCert.PFX" -Value $file.FileData -Encoding Byte
This should immediately create a file at the path specified. Unlike the Exchange Admin Center, you can use a local path here versus a UNC path. For example, C:\Users\SuperTekBoy\Desktop\ExportedCert.PFX.
Now that we have our exported certificate, let’s move to importing.
Import the certificate with Exchange Admin Center
From the Certificates tab, click More (![]() ) >> Import Exchange Certificate.
) >> Import Exchange Certificate.

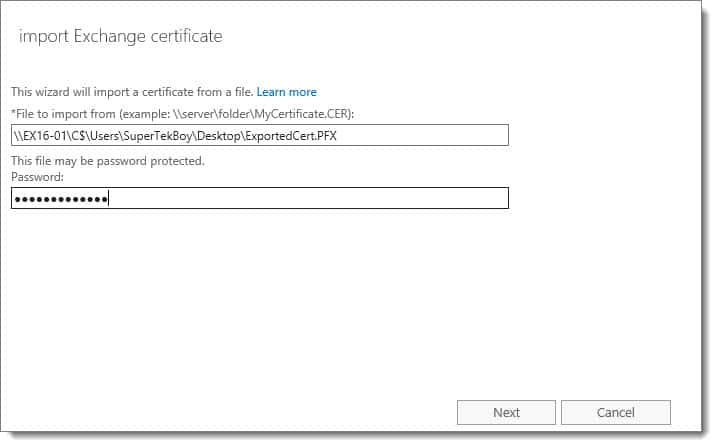
On the Import Exchange Certificate dialog, specify the path to the PFX file we created earlier. In our example, we had saved this to the desktop of our server – \\EX16-01\C$\Users\SuperTekBoy\Desktop\ExportedCert.PFX. Enter the password you specified in the previous section. Click Ok.
Next, specify all servers you want to import this certificate to.
To do this, click the Add (![]() ) button.
) button.
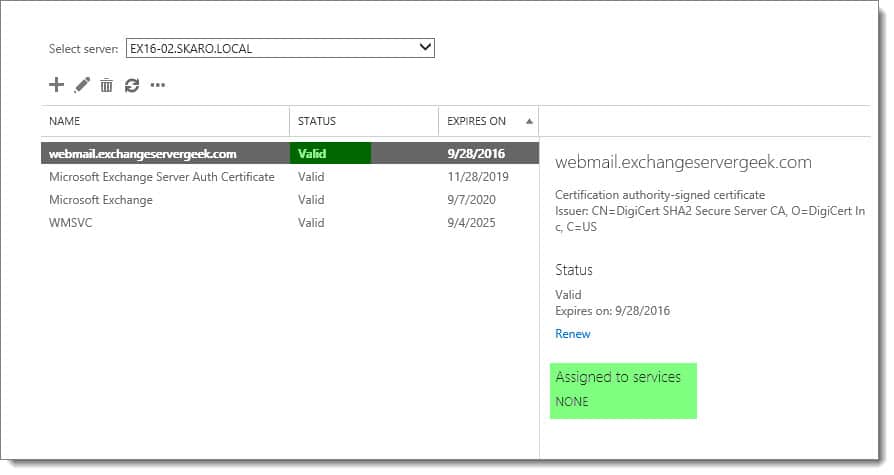
On the Select Server dialog, pick your server and click the Add button. To remove a server, click the Remove link to the right of its name. Click Ok. In our example, we will just be importing to EX16-02.
When ready, click Finish.

Once completed, your certificate will be displayed as Valid in the Status column. Keep in mind that you will still need to assign services to the certificate before it will be live.
Import the certificate with PowerShell
If you prefer to import with PowerShell, we need to use the Import-ExchangeCertificate command.
C:\> Import-ExchangeCertificate -Server EX16-01 -FileName "\\EX16-01\C$\Users\SuperTekBoy\Desktop\ExportedCert1.PFX" -PrivateKeyExportable:$true -Password (ConvertTo-SecureString -String "Password1" -AsPlainText -Force)
In our example:
-FileData calls the Get-Content command.
-Path specifies the location of the PFX file.
-Password specifies the password to open the file.
If successful, you should receive an output similar to that below.
Thumbprint                                Services   Subject
----------                                --------   -------
559642FCD3DD4769D79A457D11875AF9E6E49F3C  .......    CN=webmail.exchangeservergeek.com, OU=Exchange Server Geek, O=S...
Take note that the Services column lists all periods. This indicates no services are currently assigned to the certificate. As mentioned in the previous section, you need to assign services to the certificate before it will be live.
Further Reading
Here are some articles I thought you might like.
- Generate a Certificate Request for Exchange 2016 and Exchange 2019
- Complete a Certificate Request for 2016 and Exchange 2019
- Assign Services to a Certificate for Exchange 2016 and Exchange 2019
- Import & Export SSL Certificates in Exchange 2016 and Exchange 2019
- Renew a Certificate in Exchange 2016 & 2019
- Generate a Certificate Request for Exchange 2013
- Complete a Certificate Request in Exchange 2013
- Assign Services to a Certificate in Exchange 2013
- Renew a Certificate in Exchange 2013

Hi, Gareth! Nice article.
One more thing:
For security reason you need delete certificate from EX16-01 and import it again from pfx file. This procedure will clear “Private key exportable” flag, and malicious user can’t access it’s private key even if this server would be compromised.