• Skip to primary navigation
  • Skip to main content
  • Skip to primary sidebar
  • Skip to footer

SuperTekBoy

Practical Help for Exchange & Office 365

  • Exchange
    • News
    • Tutorials
    • Solve a Problem
  • Office 365
    • News
    • Tutorials
    • Solve a Problem
  • Outlook
    • Tutorials
    • Solve a Problem
  • Books
  • Podcasts
  • Quick Links…
    • Generate or Renew SSL Certs for Exchange
    • Connect PowerShell to Exchange Online
    • Connect PowerShell to Office 365
    • Extend Schema for Exchange
    • Exchange Schema & Build Numbers
  • More…
    • Kemp Load Balancers
    • Other tech…
    • Videos
    • About SuperTekBoy
    • Contact Us

Exchange

Using Exchange Cmdlets in Azure Cloud Shell

June 25, 2019 By Gareth Gudger Leave a Comment

Share
Tweet
Share

The Exchange Team has announced the general availability of the Exchange Online PowerShell Module in Azure Cloud Shell.

Azure Cloud Shell is a web-based version of PowerShell that can be launched from within any web browser by navigating to shell.azure.com, or, clicking the PowerShell icon in the Azure portal (portal.azure.com).

In this article, we will explore how to initially configure Azure Cloud Shell, cover the basics of the interface, connect to Exchange Online, and perform some basic Cloud Shell tasks, such as managing files and running some Exchange cmdlets.

Let’s get started!

Running the Azure Cloud Shell for the first time

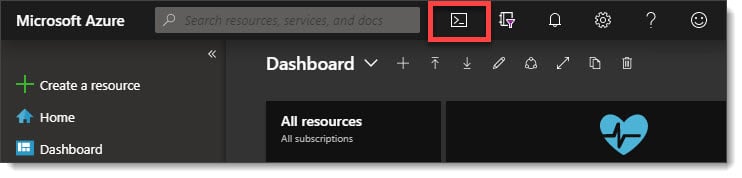
To get started with Azure Cloud Shell you can either navigate to shell.azure.com or, click the PowerShell icon in the Azure Portal. The icon is at the top of the screen, to the right of the search box (pictured in the screenshot below)

Access Azure Cloud Shell

The first time you open Cloud Shell you will be asked if you want to connect to PowerShell or Bash. Click PowerShell.

Cloud Shell PowerShell or Bash

You will then be prompted to create storage for use with Cloud Shell. You will be given a drop down of all your available Azure subscriptions. Pick an Azure subscription with active credit and click Create Storage.

[Read more…] about Using Exchange Cmdlets in Azure Cloud Shell

Filed Under: Exchange Tutorials, Office 365 Tutorials

Exchange June 2019 Updates

June 20, 2019 By Gareth Gudger Leave a Comment

Share
Tweet
Share
Exchange 2019 Cumulative Update 1

This week was a big week for Exchange. Microsoft released its second cumulative update for Exchange 2019 as well as cumulative updates for Exchange 2016 and 2013.

As always, test these updates in a lab first! I recommend checking out this 7-part guide on configuring Exchange in your lab. It doesn’t take much to get one going.

The updates are as follows:

Exchange 2013 Cumulative Update 9

Exchange 2019 Cumulative Update 2 (VLSC)| KB4488401

Exchange 2016 Mini

Exchange 2016 Cumulative Update 13 | KB4488406 | UM Language Pack

Exchange 2013 Cumulative Update 9

Exchange 2013 Cumulative Update 23 | KB4489622 | UM Language Pack

Exchange 2010 Mini

Exchange 2010 SP3 Rollup 27 | KB4491413

The final countdown – 208 days left for Exchange 2010

Here is a quick reminder that extended support for Exchange 2010 is coming to an end. After January 14th, 2020, no further technical support or updates will be available. This includes security, bug and time zone updates.

Unfortunately, there is no direct path to Exchange 2019 from 2010. If you do plan to stay on-prem you will need to migrate to either 2013 or 2016 (I’d recommend 2016 as 2013 is now in extended support). From there you can migrate to 2019. Alternatively, you can migrate to Office 365.

For more information about the Exchange 2010 life-cycle check out the Exchange Team blog.

So, what’s new in these Cumulative Updates?

In the last set of cumulative updates, Microsoft reduced the number of permissions Exchange had in Active Directory. In an ongoing effort to further tighten the security posture of Exchange, Microsoft has further reduced Exchange’s permissions in Active Directory.

This includes two notable changes. The first is that Exchange can no longer assign service principal names (SPN). Second, a deny attribute has been added to the DNS Admins group. The Exchange Team determined neither of these rights was necessary for the operation of Exchange.

In the previous Exchange 2019 cumulative update, you could disable legacy protocols on a per-user basis. In cumulative update 2, you can now globally disable legacy authentication at the organization level.

This series of updates also introduces support for .NET Framework 4.8. While optional now, 4.8 will be mandatory as part of the December 2019 updates.

[Read more…] about Exchange June 2019 Updates

Filed Under: Exchange News, Office 365 News

Exchange February 2019 Updates

February 23, 2019 By Gareth Gudger 5 Comments

Share
Tweet
Share
Exchange 2019 CU1

Last week was a big week for Exchange. Microsoft released its first cumulative update for Exchange 2019 as well as cumulative updates for Exchange 2016 and 2013.

As always, test these updates in a lab first! I recommend checking out this 7-part guide on configuring Exchange in your lab. It doesn’t take much to get one going.

The updates are as follows:

Exchange 2013 Cumulative Update 9

Exchange 2019 Cumulative Update 1 (VLSC)| KB4471391

Exchange 2016 Mini

Exchange 2016 Cumulative Update 12 | KB4471392 | UM Language Pack

Exchange 2013 Cumulative Update 9

Exchange 2013 Cumulative Update 22 | KB4345836 | UM Language Pack

Exchange 2010 Mini

Exchange 2010 SP3 Rollup 26 | KB4487052 (released February)

Exchange 2010 Mini

Exchange 2010 SP3 Rollup 25 | KB4468742 (released January)

Only 325 days left for Exchange 2010

Here is a quick reminder that extended support for Exchange 2010 is coming to an end. After January 14th, 2020, no further technical support or updates will be available. This includes security, bug, and time zone updates.

Unfortunately, there is no direct path to Exchange 2019 from 2010. If you do plan to stay on-prem you will need to migrate to either 2013 or 2016 (I’d recommend 2016 as 2013 is now in extended support). From there you can migrate to 2019. Alternatively, you can migrate to Office 365.

For more information about the Exchange 2010 life-cycle check out the Exchange Team blog.

So, what’s new in these Cumulative Updates?

Push notifications are one type of notification a developer can leverage in their application to add value. An example of a push notification might be the notification of new mail on a mobile device.

In this series of cumulative updates, the Exchange Team has changed the way it initiates push notifications through Exchange Web Services. This is in direct response to a security flaw where an attacker could intercept push notifications to gain access to credentials streamed via NTLM. These cumulative updates mitigate this attack by removing these credentials from the stream. Microsoft documents this resolution in KB4490060.

After applying this cumulative update, Microsoft recommends forcing the computer account to change its password by using either the Reset-ComputerMachinePassword cmdlet or, NETDOM. In addition, Microsoft recommends every organization review its user password expiration policies.

In further response to the security flaw, Microsoft is reducing the number of rights Exchange has in Active Directory when operating in a shared permission model.

In a shared permission model, Exchange administrators have the ability to create security principals in Active Directory and mail-enable those security principals. This includes the ability to create a new user as you are creating a mailbox, or, the ability to remove a user when you remove a mailbox. This also extends to tasks such as being able to create a distribution group, or, modify distribution group members.

In a split permission model, the Exchange administrator is restricted from these tasks and can only mail-enable, or, mail-disable existing objects (e.g. users, groups, or contacts) that were created by an administrator with Active Directory rights.

Going forward the shared permission model will have fewer Active Directory rights, but that does not mean reduced functionality for Exchange administrators.

[Read more…] about Exchange February 2019 Updates

Filed Under: Exchange News, Office 365 News

The following servers in Windows Failover Cluster are not in Active Directory

January 29, 2019 By Gareth Gudger Leave a Comment

Share
Tweet
Share
The Following Servers in the Windows Failover Cluster are not in Active Directory
The following servers in the Windows Failover Cluster are not in Active Directory: <server name>. This is usually the result of an incomplete membership change (add or remove) of the database availability group.

I ran into this error recently while trying to remove two Exchange 2010 members from a database availability group (DAG).

The error stated that a member of the DAG, a server named EXC3, did not exist in Active Directory. This was odd because queries to the Exchange 2010 management tools only returned two Exchange servers–EXC1 and EXC2.

We further confirmed that there was no computer account for EXC3 in Active Directory Users and Computers. We did, however, see remanents of EXC3 in ADSI Edit.

Talking with our customer we discovered that there had been a third Exchange server, named EXC3, that had crashed and was never recovered.

Fix–The following servers in the Windows Failover Cluster are not in Active Directory

To verify the status of all nodes in your database availability group, open PowerShell and import the Windows Failover Clustering cmdlets with Import-Module.

 C:\> Import-Module FailoverClusters

Next, run the Get-ClusterNode cmdlet. This will retrieve the status of all our nodes.

 C:\> Get-ClusterNode

Name State
---- -----
EXC1 Up
EXC2 Up
EXC3 Down

In the example above, we can see EXC1 and EXC2 are operational, whereas EXC3 is offline.

Because EXC3 no longer exists (and the fact we plan to collapse the entire DAG anyway) we can forcibly evict the failed node. To do this issue the following command.

 C:\> Get-ClusterNode -Name "EXC3" | Remove-ClusterNode

Remove-ClusterNode
Are you sure you want to evict node EXC3
[Y] Yes [N] No [S] Suspend [?] Help (default is "Y"): Y

You will be prompted to confirm. Press enter to accept the default action of “Yes”.

If we repeat the first Get-ClusterNode command we will only have the two operation cluster nodes remaining.

 C:\> Get-ClusterNode

Name State
---- -----
EXC1 Up
EXC2 Up

With no more failed nodes we can remove the two operational nodes using either the Exchange 2010 management console or PowerShell.

Twitter

Have you run into this error while add or remove members to a DAG? What did you do to fix it? Drop a comment below or join the conversation on Twitter

Filed Under: Exchange Solutions

RunAs Radio #618 – Exchange 2019 with Gareth Gudger

January 9, 2019 By Gareth Gudger Leave a Comment

Share
Tweet
Share

On November 30th I had the great pleasure of being a guest on the RunAs Radio podcast. I joined host Richard Campbell to discuss all the new features in Exchange 2019. We discuss the MetaCache Database [MCDB], the benefits of the new search architecture, and several client-side features.

[Read more…] about RunAs Radio #618 – Exchange 2019 with Gareth Gudger

Filed Under: Exchange News, Podcasts

The F12 easter-egg in Hybrid Configuration Wizard

December 2, 2018 By Gareth Gudger 1 Comment

Share
Tweet
Share

One of the best-kept secrets in the hybrid configuration wizard (“HCW”)
 is the F12 easter-egg. Jeff Kizner demonstrated this feature during his Ignite session back in September.

Tip: For a break down of Jeff’s session, with notes and timers, I highly recommend checking out 15 Ignite sessions every Exchange admin should see.

If you press F12 this enables a new section called Diagnostic Tools. This section provides shortcuts to the following tools or folders.

Hybrid Configuration Wizard F12 Diagnostic Tools HCW
  • Open Exchange Management Shell opens a remote PowerShell session to your on-premises Exchange servers.
  • Open Exchange Online PowerShell opens a PowerShell connection to Exchange Online. This supports MFA-enabled admin accounts.
  • Open Log File opens the active HCW log file in Notepad. The logs are stored in the profile of the user running the HCW. For example, C:\Users\<user>\AppData\Roaming\Microsoft\Exchange Hybrid Configuration
  • Create Support Package will combine your HCW log files into a single ZIP file which can easily be sent to Microsoft support. This link actually opens a second screen where you can specify to ZIP logs from the last 24 hours, or, between a certain date range. You then have the option to copy the file to the clipboard so it can be easily attached to an email.
  • Open Logging Folder opens the folder location of the HCW logs. 
    The HCW logs are stored in the profile of the user running the HCW. For example, C:\Users\<user>\AppData\Roaming\Microsoft\Exchange Hybrid Configuration
  • Open Process Folder opens a Command Prompt to the HCW process directory.

Pressing F12 a second time will hide these tools.

Twitter

What do you think about this easter-egg? Have you run into any cool easter-eggs in other Microsoft products? Drop a comment below or join the conversation on Twitter

Filed Under: Exchange Tutorials, Office 365 Tutorials

  • « Go to Previous Page
  • Page 1
  • Interim pages omitted …
  • Page 7
  • Page 8
  • Page 9
  • Page 10
  • Page 11
  • Interim pages omitted …
  • Page 31
  • Go to Next Page »

Primary Sidebar

Want to stay up to date?

Sidebar Form

Join thousands of IT professionals and get the latest Exchange & Office 365 tips and tutorials direct to your inbox

DigiCert Banner 300x348

(help support us using our affiliate link)

Footer

Site Navigation

  • Subscribe to blog
  • About SuperTekBoy
  • Disclaimer
  • Privacy & Cookies
  • Contact Us

Want to stay up to date?

Footer Form

Join thousands of IT professionals and get the latest Exchange & Office 365 tips and tutorials direct to your inbox

Join the conversation

  • Twitter
  • LinkedIn
  • Facebook
  • RSS

Copyright © 2026 · SuperTekBoy LLC