• Skip to primary navigation
  • Skip to main content
  • Skip to primary sidebar
  • Skip to footer

SuperTekBoy

Practical Help for Exchange & Office 365

  • Exchange
    • News
    • Tutorials
    • Solve a Problem
  • Office 365
    • News
    • Tutorials
    • Solve a Problem
  • Outlook
    • Tutorials
    • Solve a Problem
  • Books
  • Podcasts
  • Quick Links…
    • Generate or Renew SSL Certs for Exchange
    • Connect PowerShell to Exchange Online
    • Connect PowerShell to Office 365
    • Extend Schema for Exchange
    • Exchange Schema & Build Numbers
  • More…
    • Kemp Load Balancers
    • Other tech…
    • Videos
    • About SuperTekBoy
    • Contact Us

Office 365 Tutorials

Managing mailbox storage with Outlook on the Web (OWA)

March 18, 2022 By Gareth Gudger 1 Comment

Share
Tweet
Share

Outlook on the web (OWA) has some great features when it comes to managing your mailbox storage. These features not only include an analysis of how you are consuming your mailbox space, but also tools to clean up that space. In this article, we will take a look into managing a mailbox and a potential method for cleaning it up.

To access this feature open Outlook on the Web, select the Settings (” “) icon in the top-right and the View all Outlook Settings link, at the bottom of the Settings pop-out window.

From the Settings screen, select the General then Storage tabs.

Managing mailbox storage with Outlook on the Web (OWA)

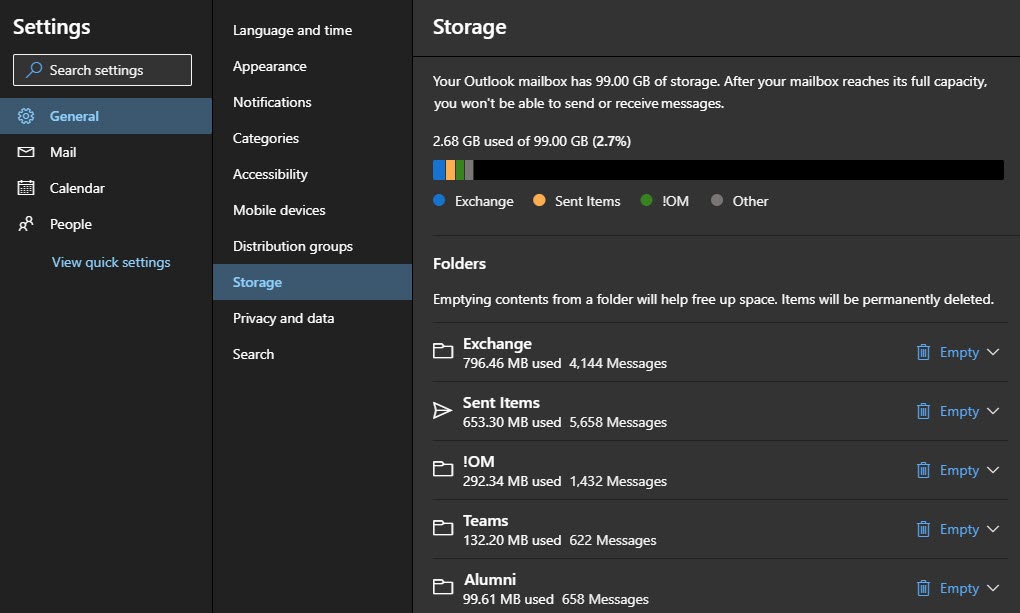
The top part of the Storage screen displays a chart that identifies our allowable mailbox size and our consumption of that allowable size. In our example, we are using 2.68 GB of an allowed 99 GB.

The chart also identifies how much space the top three folders are consuming in blue, yellow, and green. The grey color is the sum of all remaining folders in the mailbox. The legend below the chart identifies the names of the top three folders. From our example, you can see the top three folders in this mailbox are named “Exchange”, “Sent Items” and “!OM”.

The lower part of the Storage screen lists all folders in the mailbox, the size of each folder in megabytes, and the number of items in each folder. From our example, we can see the “Exchange” folder is 796 MBs in size and contains 4,144 items. Note that this list will not show any empty folders.

[Read more…] about Managing mailbox storage with Outlook on the Web (OWA)

Filed Under: Office 365 Tutorials, Outlook Tutorials

Configure global mail flow settings from the new Exchange Admin Center

March 7, 2022 By Gareth Gudger Leave a Comment

Share
Tweet
Share

One of the new Exchange Admin Center benefits is that many of the global mail flow settings that were previously only available via PowerShell are now available in this new GUI. For example, the Mail Flow settings page allows you to define several global transport configurations. This article will look at these settings and what they do. These settings are:

  • Plus addressing
  • Sending from aliases
  • Enabling SMTP AUTH protocol
  • Legacy SMTP AUTH endpoint for TLS 1.0 / TLS 1.1 clients
  • Reply-All storm protection

To find these settings, log into the new Exchange Admin Center and navigate to the Settings tab on the left navigation pane. Then select Mail Flow.

Exchange Online Mail Flow Settings B

This will pop out a dialog with the following options.

Exchange Online Mail Flow Settings

Plus Addressing

Plus addressing allows users to create their own unique email addresses by leveraging a plus sign in their email address—for example, apond+newsletter@exchangeservergeek.com. Anything after the plus sign is completely at the discretion of the user.

This becomes particularly useful when you want to target newsletters to a unique email address, especially when configuring inbox rules. It is also helpful to determine who might have sold or leaked your email address.

To enable this feature from the new Exchange Admin Center, navigate to Settings > Mail Flow. From the pop-up window, select Turn on plus addressing from your organization and click the Save button.

If you prefer to enable this from PowerShell, log onto Exchange Online PowerShell and run the following command.

 C:\> Set-OrganizationConfig -AllowPlusAddressInRecipients $true

To confirm the setting has taken effect, run Get-OrganizationConfig.

 C:\> Get-OrganizationConfig | FL AllowPlusAddressInRecipients

AllowPlusAddressInRecipients : True

Users can then start leveraging plus addresses. Emails addressed to a plus address will appear in the user’s inbox without any further user intervention. From there, the user can build inbox rules for the plus addresses if they desire.

Plus Addressing in Exchange Online

Reference: Plus Addressing Now Available in Exchange Online

[Read more…] about Configure global mail flow settings from the new Exchange Admin Center

Filed Under: Exchange Tutorials, Office 365 Tutorials

How to enroll in the Microsoft Teams public preview program

July 23, 2021 By Gareth Gudger Leave a Comment

Share
Tweet
Share

Microsoft Teams is a constant influx of new features and development. For example, in June alone, Microsoft released a few dozen new features, including chat bubbles, new spotlighting options, a meeting attendance dashboard, Dynamics integration, and more (not to mention all the new Teams devices).

One of the benefits of being in the Microsoft Teams Public Preview is seeing and testing new features before they are generally available. As a result, this is an excellent option for early adopters in a company who want to experience the new features and changes before the general population. Additionally, early access is beneficial for those in roles of corporate training and communication.

To opt into the Teams Public Preview is straightforward. First, click the three dots (…) next to your profile picture in the Teams client. Then, from the menu, select About > Public Preview.

Microsoft Teams Public Preview Program

You will then receive a disclaimer stating that your experience in the public preview is provided “as is,” “with all faults,” and excluded from any warranty or service level agreements (SLAs). Essentially, there is no guarantee you will be free from issues, and Microsoft cannot be held to any warranty or SLA to resolve those issues.

To accept these terms, click Switch to public preview. If you do not wish to accept, click Cancel. If you cancel, you will not be allowed to join the public preview.

Note: This action will restart the Microsoft Teams client. Switching to the public preview will end any calls or meetings.

Microsoft Teams Public Preview Program SLA and Warranty
[Read more…] about How to enroll in the Microsoft Teams public preview program

Filed Under: Office 365 Tutorials

How to start meetings late (or end early) in Outlook

January 8, 2021 By Gareth Gudger 2 Comments

Share
Tweet
Share

One of the great new features in Outlook is scheduling meetings or appointments to start late (or end early). The end early feature has been included in Outlook for some time. However, the start late feature was introduced into the Office beta channel in version 2012 (build 13530.20000).

Note: This feature is now available in the Current (Preview) channel as of version 2012 (Build 13530.20218)

The shorten meeting feature allows attendees time between meetings. This is useful for many aspects, such as allowing users time to travel between meeting rooms, grab a coffee, reconcile notes, or decompress.

How to shorten meetings to start late or end early

To access this feature, open Outlook, navigate to the File menu, then select Options. From the Outlook Options dialog, select the Calendar tab.

Under the Calendar Options section, select the Shorten appointments and meetings checkbox. From the drop-down, choose whether to have meetings End early or Start late.

Note: If you select None, the prior checkbox will become deselected.

Start Meetings Late in Microsoft Outlook

These options also allow you to specify how much time to shorten appointments and meetings. By default, any meeting under 1 hour will be shortened by 5 minutes. Any meeting for 1 hour or longer will be shortened by 10 minutes.

If you wish to change these defaults, pick another time from each drop-down. For example, for meetings one hour or greater, you have choices of 0, 5, 10, and 15 minutes. Once you have made your selection click Ok to save and close the Outlook Options dialog.

Shorten appointments and meetings in Microsoft Outlook
[Read more…] about How to start meetings late (or end early) in Outlook

Filed Under: Office 365 Tutorials, Outlook Tutorials

How to switch to the Office (M365 Apps) Beta Channel

January 5, 2021 By Gareth Gudger 15 Comments

Share
Tweet
Share

One of the benefits of being in the Office Beta Channel (formerly known as Insider Fast) is getting to see and test new Office features before they are generally available.

When you install Office, all new installations will default to the Current channel (formerly known as the Monthly channel). However, it is possible to change your update channel. The table below lists all the available update channels and their former names as these were recently changed.

ChannelOld Name
BetaInsider Fast
Current (Preview)Monthly (Targeted)
CurrentMonthly
Monthly EnterpriseMonthly Enterprise
Semi-Annual Enterprise (Preview)Semi-Annual (Targeted)
Semi-Annual EnterpriseSemi-Annual

The Beta Channel typically receives new features 1 month in advance of the Current Channel. For more information on the specifics of each channel, check out this article from Microsoft.

How to determine your Office update channel

To determine your Office update channel, open any Office app. In our example, we will open Microsoft Word.

Once launched, click Account. In the About Word section, you will see both the build number and the current update channel. In the screenshot below, you can see our build is Version 2012, and our update cycle is the Current Channel.

Determine Office update channel

Microsoft Outlook is a little different. To check your Office update channel using Outlook, navigate to the File menu and select Office Account. Like other Office apps, the build and update channel will be listed in the About Outlook section.

Determine Office update channel - Outlook

Tip: The build numbers are formulated from a two-digit year and a two-digit month. For example, the first two digits, “20”, designate the year 2020. The second two digits, “12”, designate December. Microsoft documents all build numbers and release notes here.

[Read more…] about How to switch to the Office (M365 Apps) Beta Channel

Filed Under: Office 365 Tutorials, Outlook Tutorials

Microsoft Word editor goes full dark mode

November 30, 2020 By Gareth Gudger 8 Comments

Share
Tweet
Share

If you are part of the Office Beta Channel (formerly known as the Office Insiders Program), then a new full dark mode has made its way to Microsoft Word.

Previously selecting Black under File > Account > Office Theme would change the ribbon, background, and status bars to black while leaving the editor itself a bright white.

Original Dark Mode in Microsoft Word

The new Black theme now switches the editor to a true dark mode. From the screenshot below, you can see the background and text have been inverted.

Dark Mode in Microsoft Word Build 2012
[Read more…] about Microsoft Word editor goes full dark mode

Filed Under: Office 365 Tutorials, Outlook Tutorials

  • Page 1
  • Page 2
  • Page 3
  • Interim pages omitted …
  • Page 5
  • Go to Next Page »

Primary Sidebar

Want to stay up to date?

Sidebar Form

Join thousands of IT professionals and get the latest Exchange & Office 365 tips and tutorials direct to your inbox

DigiCert Banner 300x348

(help support us using our affiliate link)

Footer

Site Navigation

  • Subscribe to blog
  • About SuperTekBoy
  • Disclaimer
  • Privacy & Cookies
  • Contact Us

Want to stay up to date?

Footer Form

Join thousands of IT professionals and get the latest Exchange & Office 365 tips and tutorials direct to your inbox

Join the conversation

  • Twitter
  • LinkedIn
  • Facebook
  • RSS

Copyright © 2026 · SuperTekBoy LLC