In a previous article, we examined the process of generating a certificate request for Exchange 2016. We then submitted that request to a certificate provider. Now that the certificate provider has validated our identity and issued our certificate, we are ready to move on to the next step.
In this article, we complete our certificate request. We explore how to accomplish this using the Exchange Admin Center and PowerShell.
Let’s get started!
Note: These steps are identical for Exchange 2013, Exchange 2016 CU22 and earlier, and Exchange 2019 CU11 and earlier. If you are using Exchange 2016 CU23 or greater or Exchange 2019 CU12 or greater, you must complete your pending certificate request with all new PowerShell commands covered in the following article.
Complete a Certificate Request with Exchange Admin Center
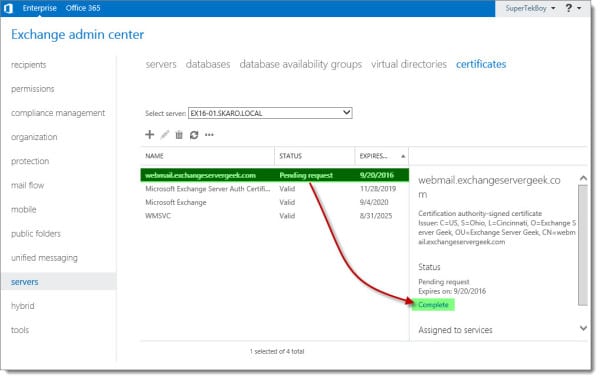
Log in to the Exchange Admin Center (EAC). Select the Servers tab and Certificates sub-tab.
Select your pending certificate request and click the Complete link from the action pane.

On the Complete Request window, type the UNC path to the location of the unpacked certificate.

Click OK.
Once the task completes, the certificate will be listed as Valid in both the Status column and in the Status section in the action pane. Keep in mind that you will still need to assign services to the certificate before it will be live.

Complete a Certificate Request with PowerShell
If you prefer to complete the certificate request from PowerShell, you would use the Import-ExchangeCertificate cmdlet. Using our example above, our command would look like this:
C:\> Import-ExchangeCertificate -FileName "\\ex16-01\c$\users\supertekboy\desktop\webmail_exchangeservergeek_com.cer" -PrivateKeyExportable:$true
In this command:
- -Path is the location of the certificate file you were issued.
To verify that our certificate is installed, you can run the Get-ExchangeCertificate command.
 C:> Get-ExchangeCertificate

Thumbprint                                Services   Subject
----------                                --------   -------
559642FCD3DD4769D79A457D11875AF9E6E49F3C  .......    CN=webmail.exchangeservergeek.com, OU=Exchange Server Geek, O=S...
Take note that the Services column lists all periods. This indicates no services are currently assigned to the certificate. As mentioned in the previous section, you need to assign services to the certificate before it will be live.
Further Reading
Here are some articles I thought you might like.
- Generate a Certificate Request for Exchange 2016 and Exchange 2019
- Complete a Certificate Request for 2016 and Exchange 2019
- Assign Services to a Certificate for Exchange 2016 and Exchange 2019
- Import & Export SSL Certificates in Exchange 2016 and Exchange 2019
- Renew a Certificate in Exchange 2016 & 2019
- Generate a Certificate Request for Exchange 2013
- Assign Services to a Certificate in Exchange 2013
- Import & Export a Certificate in Exchange 2013
- Renew a Certificate in Exchange 2013

Leave a Reply