• Skip to primary navigation
  • Skip to main content
  • Skip to primary sidebar
  • Skip to footer

SuperTekBoy

Practical Help for Exchange & Office 365

  • Exchange
    • News
    • Tutorials
    • Solve a Problem
  • Office 365
    • News
    • Tutorials
    • Solve a Problem
  • Outlook
    • Tutorials
    • Solve a Problem
  • Books
  • Podcasts
  • Quick Links…
    • Generate or Renew SSL Certs for Exchange
    • Connect PowerShell to Exchange Online
    • Connect PowerShell to Office 365
    • Extend Schema for Exchange
    • Exchange Schema & Build Numbers
  • More…
    • Kemp Load Balancers
    • Other tech…
    • Videos
    • About SuperTekBoy
    • Contact Us

Exchange Tutorials

How to create an Office 365 mailbox (in hybrid)

September 2, 2017 By Gareth Gudger 28 Comments

Share
Tweet
Share

When a company has implemented Exchange hybrid and has moved some or all their users to Office 365, the question “How do I create a mailbox in Office 365?” frequently comes up.

In this article, we explore how to create a mailbox in Exchange Online when directory synchronization is in place. For this article, we will explore this process using Exchange 2016. We will look at how to complete this task with the GUI and PowerShell. Note that these steps are identical for Exchange 2013.

Using the Exchange Admin Center

This is the simplest and quickest way to create a mailbox in Office 365. The drawback of this solution is that it only allows you to create an entirely new Active Directory user. A preexisting user without a mailbox cannot be enabled for an Office 365 mailbox using the GUI. To grant an existing user an Office 365 mailbox you will need to use PowerShell. Alternatively, that user could be given an on-prem mailbox and then move that mailbox to Office 365.

If your current process is to create a new account in Active Directory first and then enable the mailbox in Exchange second, I would recommend reversing these steps. Using the method below allows you to create a basic user in Active Directory with a mailbox in Office 365. Then you can go back into Active Directory to make any additional changes to the new account, such as group memberships.

For our example, we are going to create a new user called Wilfred Mott who will have a mailbox in Office 365. Wilfred does not currently have a user account in Active Directory so we can use this method. Wilfred’s email will be wilfred.mott@exchangeservergeek.com.

From your on-premises Exchange 2016 server, log into the Exchange Admin Center. Select the Recipients tab and Mailboxes sub-tab. Click the New (plus sign) and select Office 365 mailbox.

Note: If you do not see this option you may be missing the required RBAC permissions, or, there is an issue with your hybrid configuration.
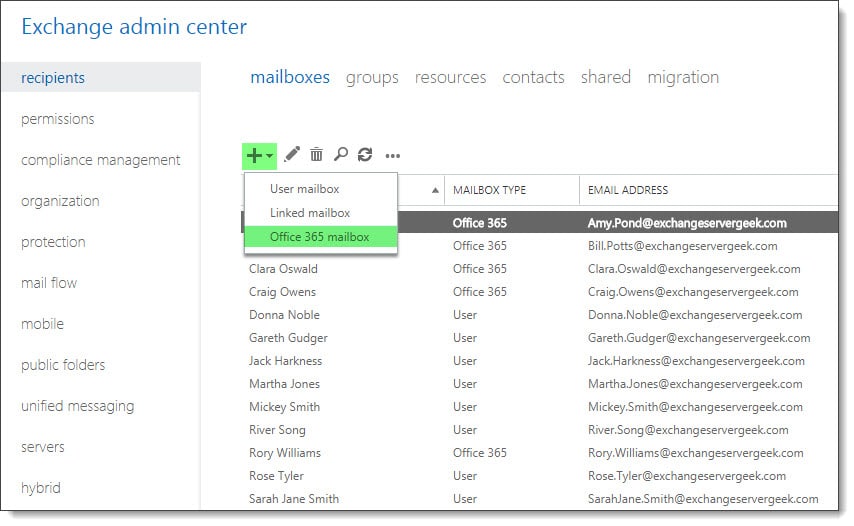
Create a new Office 365 mailbox

Selecting this option walks you through the process of creating a remote mailbox in Office 365. The benefit here is that you do not need to migrate the mailbox after it is created as it already exists as an object in the cloud. Keep in mind that you will not see this mailbox in the Office 365 tenant until directory synchronization has run.

[Read more…] about How to create an Office 365 mailbox (in hybrid)
Filed Under: Exchange Tutorials, Office 365 Tutorials

Recover Exchange Server after total loss

June 26, 2017 By Gareth Gudger 16 Comments

Share
Tweet
Share

Being able to recover an Exchange Server is key to business continuity. This is magnified in environments where there is only a single Exchange server. Rebuilding an Exchange environment from scratch would be an arduous and monumental task. Luckily Exchange saves much of its configuration settings in Active Directory. As long as Active Directory is healthy you can recover an Exchange Server to its former configuration. This process saves a massive amount of time.

That said there are some items that are not stored in Active Directory. This includes the databases where the user and public folder data is stored, third-party certificates and, customizations made outside of the Exchange management tools.

Certificates are easy. If you don’t have a backup you can have your certificate re-keyed by your provider. This may take some time so it is much better to export your Exchange server certificate and save it to a safe location. Then it can be quickly imported in the event of a failure. This will reduce downtime.

Databases are a little more difficult. Depending on the nature of the failure they may need to be restored from backup. The time required for restore largely depends on the size of the database. With the Exchange standard license you get five databases. So, rather than one large database, go with five smaller ones. These greatly aides your recovery time objective (RTO). Exchange enterprise allows up to a hundred databases giving you even greater capacity.

I always recommend that you architect a database availability group (DAG) where possible. Even if your budget can only cover two Exchange servers–creating a two-member DAG with two copies of each database–will put you miles ahead when it comes to disaster recovery. The instructions to recover a DAG member differ and we will cover that in a later article.

Configuration outside of the Exchange tools is going to be a little tougher. You will either need documentation so the changes can be repeated, or, a backup of the changes. Customizations outside of Exchange can include the registry, IIS, or, text-based configuration files.

[Read more…] about Recover Exchange Server after total loss

Filed Under: Exchange Tutorials

Quickly copy an Anonymous Receive Connector “Relay” between servers

June 18, 2017 By Gareth Gudger 1 Comment

Share
Tweet
Share

In this article, we are going to take a look at just how easy it can be to copy an anonymous receive connector from one server to another using PowerShell.

Anonymous Receive Connector Relay

This is especially important in scenarios where a receive connector may have dozens–if not hundreds–of IPs. Adding each IP using the graphical user interface would be insanely time-consuming. It would also be prone to human error. This challenge only multiplies if you have many servers to repeat this process on. With PowerShell, we can cut this task down to mere seconds.

The first part of this article is a primer on how to configure an anonymous receive connector. If you are just interested in how to copy all IPs from one connector to another jump to the section titled Copying an Anonymous “Relay” Connector between servers.

Note: While this article focuses on moving an anonymous receive connector it can be adapted for any custom receive connector you have created.

A quick primer on anonymous receive connectors

Before we explore how to move a receive connector let’s take a refresher on how we create a receive connector with PowerShell. For this task, we use the New-ReceiveConnector cmdlet. For example, to create an anonymous receive connector our command might look like this.

 C:\> New-ReceiveConnector -Name "Anonymous Relay" -Server EX16-01 -Usage Custom -TransportRole FrontEndTransport -PermissionGroups AnonymousUsers -Bindings 0.0.0.0:25 -RemoteIPRanges 10.0.0.25, 10.0.0.26, 10.0.0.50-10.0.0.59

In this command, we create a receive connector named “Anonymous Relay”. We use the -Server parameter to identify which server we want the connector to be created on. We identify that the -Usage of the connector will be Custom. Custom is one of five connector types and is used for anonymous relays.

[Read more…] about Quickly copy an Anonymous Receive Connector “Relay” between servers

Filed Under: Exchange Tutorials

Renew a Certificate in Exchange 2013 (and older versions of 2016 & 2019)

August 2, 2016 By Gareth Gudger 6 Comments

Share
Tweet
Share

How to renew a certificate in Exchange

In this article, we explore the process of renewing a certificate in Exchange. We demonstrate how to accomplish this using the Exchange Admin Center and PowerShell. The high-level steps include:

  • Create a new certificate signing request
  • Upload the certificate signing request to your certificate provider
  • Download the processed certificate from your certificate provider
  • Install the certificate on Exchange
  • Export the new certificate to a PFX file
  • Import the certificate to all other Exchange servers
  • Assign Exchange services to the new certificate on each server
  • Delete the old certificate

Let’s get started!

Note: These steps are identical for Exchange 2013, Exchange 2016 CU22 and earlier, and Exchange 2019 CU11 and earlier. If you are using Exchange 2016 CU23 or greater or Exchange 2019 CU12 or greater, you must renew your certificate with all new PowerShell commands covered in the following article.

Renew a Certificate with Exchange Admin Center

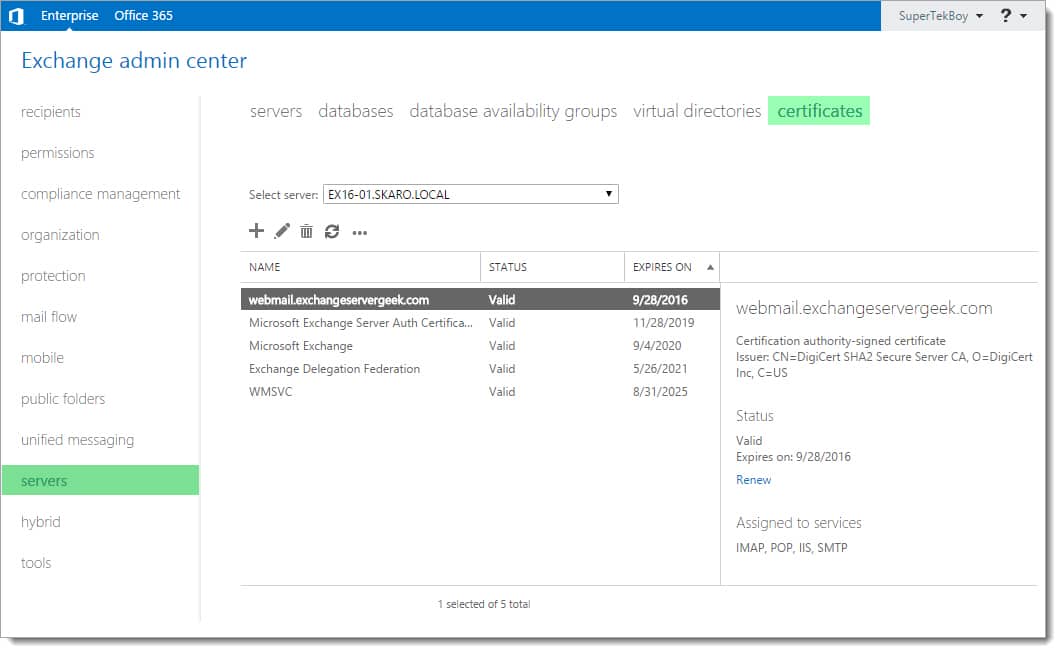
Log in to the Exchange Admin Center (EAC). Select the Servers tab and Certificates sub-tab.

This page displays all currently installed Exchange certificates. In our example, we see four self-signed certificates. We also see the certificate that we acquired from a trusted certificate authority (affiliate). This certificate is named webmail.exchangeservergeek.com. This is the certificate we will be renewing.

Renewing an Exchange certificate

Select the certificate to be renewed (in our case webmail.exchangeservergeek.com) and click the Renew link in the task pane to the right.

Renewing an Exchange certificate 2

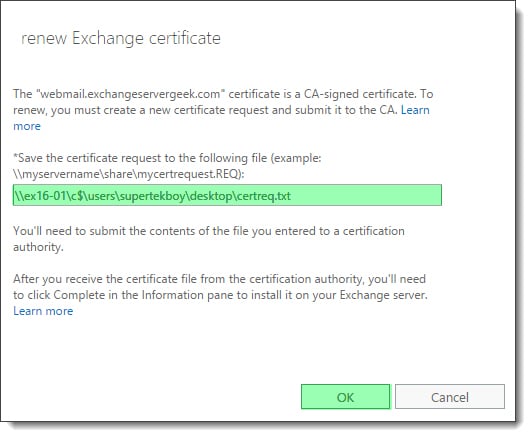
The renewal process will create a new certificate request to submit to our certificate authority. Specify a location to save this certificate request. This location must be in the form of a UNC path. In our example, we specify a file called certreq.txt at the path \\ex16-01\c$\users\supertekboy\desktop\. This will create a text file on our server’s desktop. Click Ok.

Renewing an Exchange certificate 3
[Read more…] about Renew a Certificate in Exchange 2013 (and older versions of 2016 & 2019)

Filed Under: Exchange Tutorials

How to apply an Exchange product key

July 26, 2016 By Gareth Gudger Leave a Comment

Share
Tweet
Share

In this article, we explore applying the Exchange product key. We will illustrate this process through both the Exchange Admin Center (EAC) and PowerShell. We will also look at how to license multiple servers at once and how to locate all unlicensed servers in your environment. This process is the same for both Exchange 2013 and 2016.

Apply the product key with Exchange Admin Center

To apply the product key through the Exchange Admin Center follow these steps.

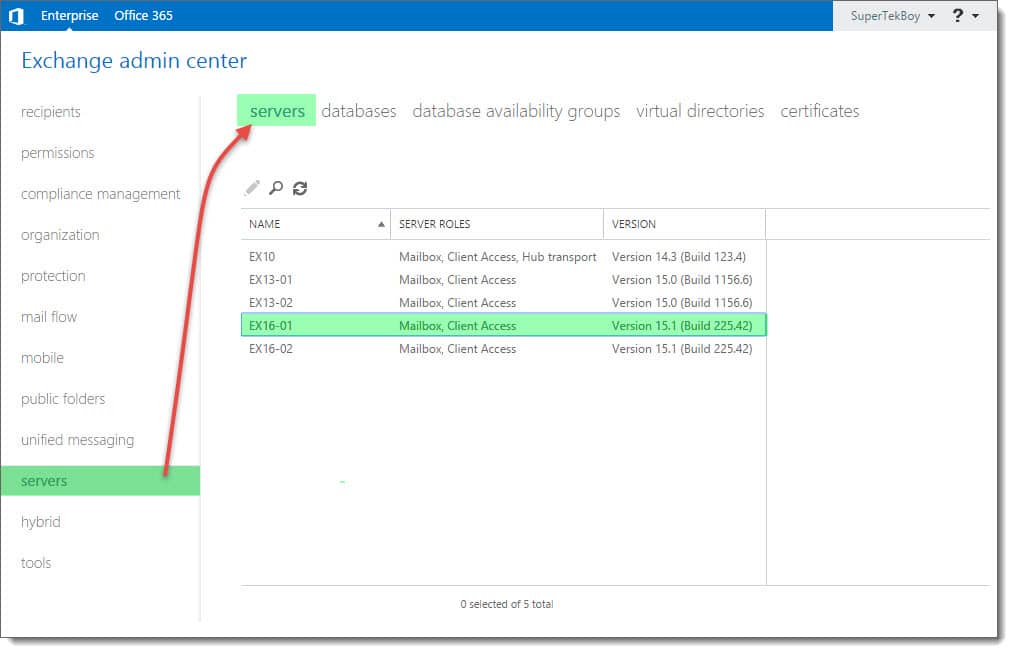
Log into the Exchange Admin Center (EAC). Navigate to the Servers tab and then the Servers sub-tab at the top.

Exchange Admin Center Servers Tab

Select the server you wish to apply the key and click the Edit (Edit button) button.

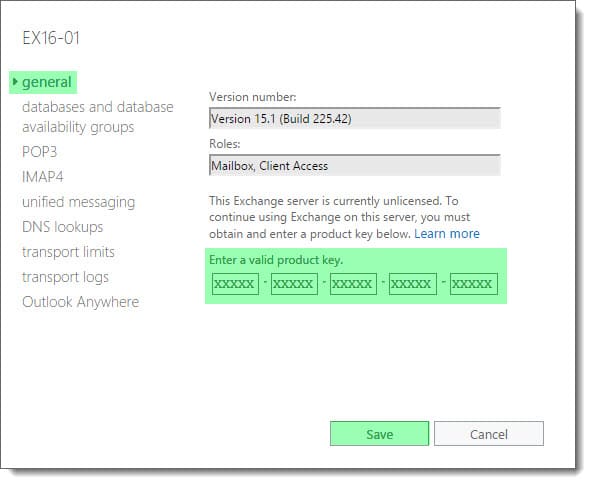
From the General tab enter your 25-character product key into the 5 boxes under Enter a valid product key section.

Exchange Admin Center Entering Product Key
[Read more…] about How to apply an Exchange product key

Filed Under: Exchange Tutorials

Make inbound SMTP highly available with Kemp LoadMaster

June 17, 2016 By Gareth Gudger 5 Comments

Share
Tweet
Share
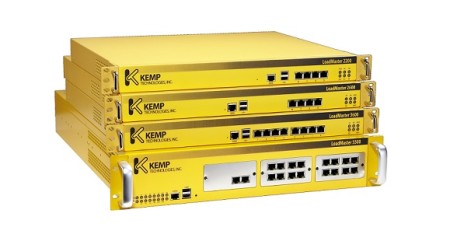
Load Balancer Produkte Familie Kemp Technologies

In a previous article, Configure Kemp Load Balancer for Exchange 2016, we explored how to make client access services highly available for Exchange 2016. In this article, we continue that trend by making the Simple Mail Transfer Protocol (otherwise known as SMTP) highly available.

If you don’t have a load balancer, you can download one for free from Kemp. Kemp’s free appliance is what we will use in this guide.

Don’t worry. Despite the focus being on Kemp, you can translate these principles to any vendor.

Let’s get started!

Disclaimer: I need to point out that I am not sponsored by Kemp in any way. However, this document does contain some affiliate links.

The environment

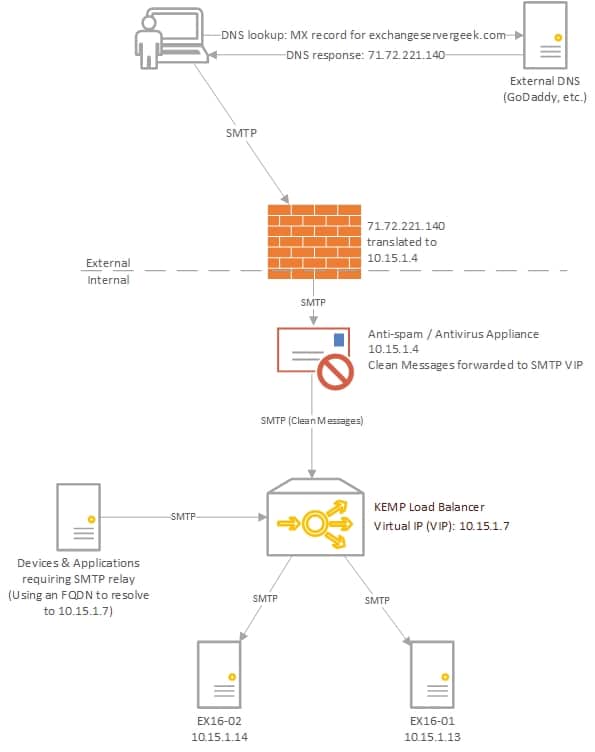
In our example below, we plan to have two Exchange 2016 servers behind a load balancer in a single site; EX16-01 and EX16-02.

Make inbound SMTP highly available with Kemp LoadMasters
[Read more…] about Make inbound SMTP highly available with Kemp LoadMaster

Filed Under: Exchange Tutorials, Kemp Load Balancers, Other Tech

  • « Go to Previous Page
  • Page 1
  • Page 2
  • Page 3
  • Page 4
  • Page 5
  • Interim pages omitted …
  • Page 10
  • Go to Next Page »

Primary Sidebar

Want to stay up to date?

Sidebar Form

Join thousands of IT professionals and get the latest Exchange & Office 365 tips and tutorials direct to your inbox

DigiCert Banner 300x348

(help support us using our affiliate link)

Footer

Site Navigation

  • Subscribe to blog
  • About SuperTekBoy
  • Disclaimer
  • Privacy & Cookies
  • Contact Us

Want to stay up to date?

Footer Form

Join thousands of IT professionals and get the latest Exchange & Office 365 tips and tutorials direct to your inbox

Join the conversation

  • Twitter
  • LinkedIn
  • Facebook
  • RSS

Copyright © 2026 · SuperTekBoy LLC