• Skip to primary navigation
  • Skip to main content
  • Skip to primary sidebar
  • Skip to footer

SuperTekBoy

Practical Help for Exchange & Office 365

  • Exchange
    • News
    • Tutorials
    • Solve a Problem
  • Office 365
    • News
    • Tutorials
    • Solve a Problem
  • Outlook
    • Tutorials
    • Solve a Problem
  • Books
  • Podcasts
  • Quick Links…
    • Generate or Renew SSL Certs for Exchange
    • Connect PowerShell to Exchange Online
    • Connect PowerShell to Office 365
    • Extend Schema for Exchange
    • Exchange Schema & Build Numbers
  • More…
    • Kemp Load Balancers
    • Other tech…
    • Videos
    • About SuperTekBoy
    • Contact Us

Exchange Tutorials

Extend, Prepare and Verify Active Directory for Exchange Server

June 15, 2016 By Gareth Gudger 3 Comments

Share
Tweet
Share

UPDATED: 1/19/2023

Before you install a new version of Exchange, you will need to perform a number of tasks in Active Directory. This is true for both migrating an older version of Exchange, or, installing into a greenfield that has had no prior iteration of Exchange. This will involve the following tasks.

  1. Extend the schema
  2. Prepare the organization
  3. Prepare the domains

Setup will perform these steps during its main installation if it determines they have not been run. So, you may wonder why you would ever perform these steps manually.

One possibility is that a company operates in a split-permissions model. In large organizations, two separate teams may manage Active Directory and Exchange. If least privilege is in place, it is likely that the Exchange team cannot perform elevated Active Directory tasks such as schema extensions. Similarly, the Active Directory team may not have permission to manage Exchange. In this case, the Active Directory team will need to run the commands manually before the main setup.

Another possibility is that a company may have a large geographically dispersed network with multiple Active Directory sites. It could have its schema master in one site and its Exchange servers in a totally different site. The links between these sites could have any number of restrictions upon them, such as a long interval between replication cycles. In that case, the company will need to run the command manually in the site hosting the schema master and allow time for replication.

This article illustrates how to perform these tasks from a command line.

Tip: These same instructions work for Exchange 2010, 2013, 2016, and 2019 installations. In addition, these tasks often have to be repeated when performing cumulative updates. For more information on whether your cumulative update requires these commands, be sure to check official Microsoft documentation.

Extending the Schema

To do this, we must first open an elevated command prompt. We need to do this from a machine running a 64-bit version of Windows. The minimum version of Windows required is dictated by the Exchange Supportability Matrix. This machine must also be in the same site and domain as the schema master. The computer we execute this from does not have to be a domain controller. For smaller companies with a single-domain/single-site environment, we can simply run these commands from the intended Exchange server.

Tip: To perform this update, you must be a member of both the Enterprise and Schema admin groups.
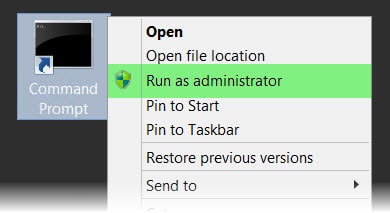
Command Prompt Run As Administrator

Change to the directory containing your Exchange setup files and issue the following command. Be sure to include the license agreement switch.

Tip: Starting with Exchange 2016 CU22 and Exchange 2019 CU11, Microsoft replaced the /IAcceptExchangeServerLicenseTerms parameter with the option to send diagnostic data to Microsoft. To send the optional data, use the /IAcceptExchangeServerLicenseTerms_DiagnosticDataON parameter. If you do not wish to send any data, use /IAcceptExchangeServerLicenseTerms_DiagnosticDataOFF. Note that this can be changed post-installation using the Set-ExchangeServer cmdlet.

C:\Ex2016Setup> Setup.exe /PrepareSchema /IAcceptExchangeServerLicenseTerms_DiagnosticDataON

After several minutes the command will complete. You should see an output similar to the following.

[Read more…] about Extend, Prepare and Verify Active Directory for Exchange Server
Filed Under: Exchange Tutorials

Using SRV records for multiple Autodiscover domains

May 17, 2016 By Gareth Gudger 1 Comment

Share
Tweet
Share

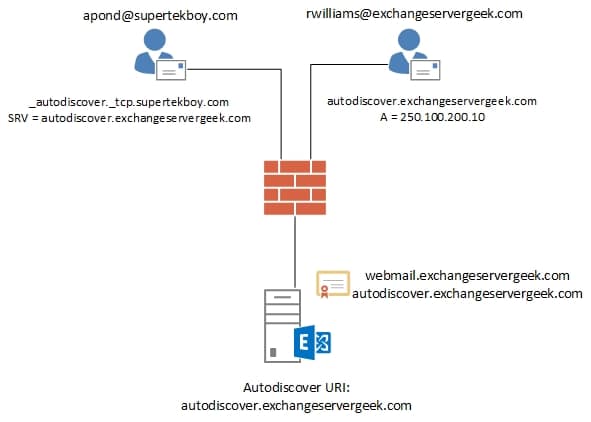
In most situations adding a second email domain, is simply just a matter of configuring the necessary mail flow. However, in situations such as an acquisition or merger, you may need users to configure Outlook with an email domain that is different from the one configured in your autodiscover URI. This is especially true for companies that offer hosted Exchange in a multi-tenancy business model. 

In this article, we take a look at a couple of case studies where an SRV record might be preferred over adding additional names to a certificate. We then explore how to configure an SRV record in a popular DNS management system. Finally, we look at two different ways to test that SRV record.

Tip: Not all ActiveSync devices support SRV records (some don’t support Autodiscover at all). In these cases you may need to manually configure each device with the server name, or, look into a different autodiscover method.

Case Study 1: Acquisitions and Divestiture

One solution is to simply add each domain to your UC / SAN certificate (also called a multi-domain certificate). This may seem like a quick and easy solution but it all depends on volume. Re-keying your certificate for a one-time acquisition or merger may seem like a minute task. But consider a company that frequently acquires or divests other companies. You may find yourself re-keying that certificate every couple of months. This may still seem trivial but consider the size of your environment. If you have a large Exchange deployment with dozens of servers and multiple load balancers then each will need the new certificate every time it is re-keyed. This pales in comparison to the single SRV record that can be easily added to the new domain. It not only saves you time but also money. Adding each domain may incur additional charges. Some certificate providers even charge a fee for re-keying a certificate.

Case Study 2: Multi-tenant hosted Exchange providers

With a hosted Exchange provider the acquisition and departure of clients are likely to be even more volatile. That said, you don’t want to be re-keying your certificate every time you onboard or off-board a client. Adding each domain to your certificate will eventually become cost-prohibitive affecting your bottom line. Like any business your bottom line is important. So choosing the SRV redirect method over a cost-prohibitive multi-domain certificate is more attractive (and also simpler to configure).

Scenario

For the purposes of this article ExchangeServerGeek has recently acquired SuperTekBoy. STB users have an email address of SuperTekBoy.com. Whereas ESG users have an email address of ExchangeServerGeek.com. Mail data from STB has already been migrated to the ESG. The company requires STB users to keep using their SuperTekBoy.com email addresses to configure their Outlook profiles. The company does not want to make any changes to its current SSL certificate as this will incur additional fees. The Exchange administrator determines the best solution is to configure an SRV record.

Exchange Autodiscover SRV Records
[Read more…] about Using SRV records for multiple Autodiscover domains

Filed Under: Exchange Tutorials

Exchange 2016: Public Folder migration (Part 2)

March 11, 2016 By Gareth Gudger 61 Comments

Share
Tweet
Share

PREVIOUS: Exchange 2016: Public Folder migration Part 1

In part one of public folder migration, we prepared our environment. Then we ran all the necessary scripts to size and create the new public folder mailbox hierarchy.

In this second and final part of our series, we will copy the data from the legacy public folder databases into our newly created modern public folders. We will also finalize the migration process.

Step 3: Data Migration

Let’s start moving our data. First, let’s create the migration batch. From the Exchange 2016 server issue the following command.

 C:\> New-MigrationBatch -Name PFMigration -SourcePublicFolderDatabase (Get-PublicFolderDatabase -Server EX10) -CSVData (Get-Content C:\PFScripts\FolderToMailbox.csv -Encoding Byte) -NotificationEmails headgeek@exchangeservergeek.com

In our example:

-Name specifies a display name to help identify the batch.
-SourcePublicFolderDatabase (-Server) specifies the 2010 server hosting the public folder database. In my lab, this is called EX10.
-CSVData specifies the path to our map file we created in part one of our series. We had called this FolderToMailbox.csv and saved it to C:\PFScripts.
-NotificationEmails specifies where to email the batch migration report. This is optional.

 C:\> New-MigrationBatch -Name PFMigration -SourcePublicFolderDatabase (Get-PublicFolderDatabase -Server EX10) -CSVData (Get-Content 
C:\PFScripts\FolderToMailbox.csv -Encoding Byte) -NotificationEmails headgeek@exchangeservergeek.com

Identity         Status       Type              TotalCount
--------         ------       ----              ----------
PFMigration      Created      PublicFolder      1

[PS] C:\>

This only creates the job. To start the actual data copy run the following command. If you named your job anything other than PFMigration you will need to change that here.

 C:\> Start-MigrationBatch PFMigration

We can check the progress of the batch by logging into the Exchange Admin Center. Once logged in, navigate to Recipients >> Migration tab.

[Read more…] about Exchange 2016: Public Folder migration (Part 2)
Share
Tweet
Share

Filed Under: Exchange, Exchange Tutorials

Exchange 2016: Public Folder migration made easy

March 9, 2016 By Gareth Gudger 28 Comments

Share
Tweet
Share

If you are in the planning stages for migration from Exchange 2010 to Exchange 2016, then you have probably seen this TechNet article.

At first, it may seem daunting.

So many scripts. So many PowerShell commands.

If you are not comfortable with PowerShell it may seem a bit overwhelming.

Plus, it is vastly different than any previous migration process.

Why the change?

Architecture

Beginning with Exchange 2013–and continued with 2016–public folders underwent a major architectural change.

This new architecture is referred to as Modern Public Folders. The old architecture is now known as Legacy Public Folders. But its much more than a name change. Gone is the Public Folder database. And hello are the new Public Folder Mailboxes.

The benefit?

No more Public Folder Replication. Boy, did that used to be a pain!

With Public Folders stored as a mailbox, that mailbox can now be part of a Database Availability Group (DAG). And with that, all the benefits of Windows Failover Clustering.

This makes the migration process vastly different.

On a high level, it is the process of moving all data out of a database and into a special mailbox. That is where the scripts come in. I’ll explain along the way.

Let’s get started!

Works with 2013: This process also works with migrations to Exchange 2013 (from 2007 SP3 RU15 or 2010 SP3 RU8). It requires Exchange 2013 be on Cumulative Update 7 or later. If not, you will need to perform the older serial migration method documented here.

[Read more…] about Exchange 2016: Public Folder migration made easy
Share
Tweet
Share

Filed Under: Exchange, Exchange Tutorials

Add a legal disclaimer to all outbound email (Exchange/O365)

January 7, 2016 By Gareth Gudger 7 Comments

Share
Tweet
Share

Adding a legal disclaimer to all outbound email is an important task. Thankfully, this is a simple process in Exchange on-premises and Office 365. In fact, the instructions are identical for Exchange 2013, Exchange 2016 and Office 365.

For this article, our example company, Time Travel Research, wishes that all email leaving the organization have a legal disclaimer. Time Travel Research is not concerned about applying a disclaimer if the message remains inside the organization. For example, a disclaimer between two employees is not necessary. However, they would like all external messages, whether it be to a customer or a vendor, to have this disclaimer.

Let’s get started!

Add a legal disclaimer to all outbound email

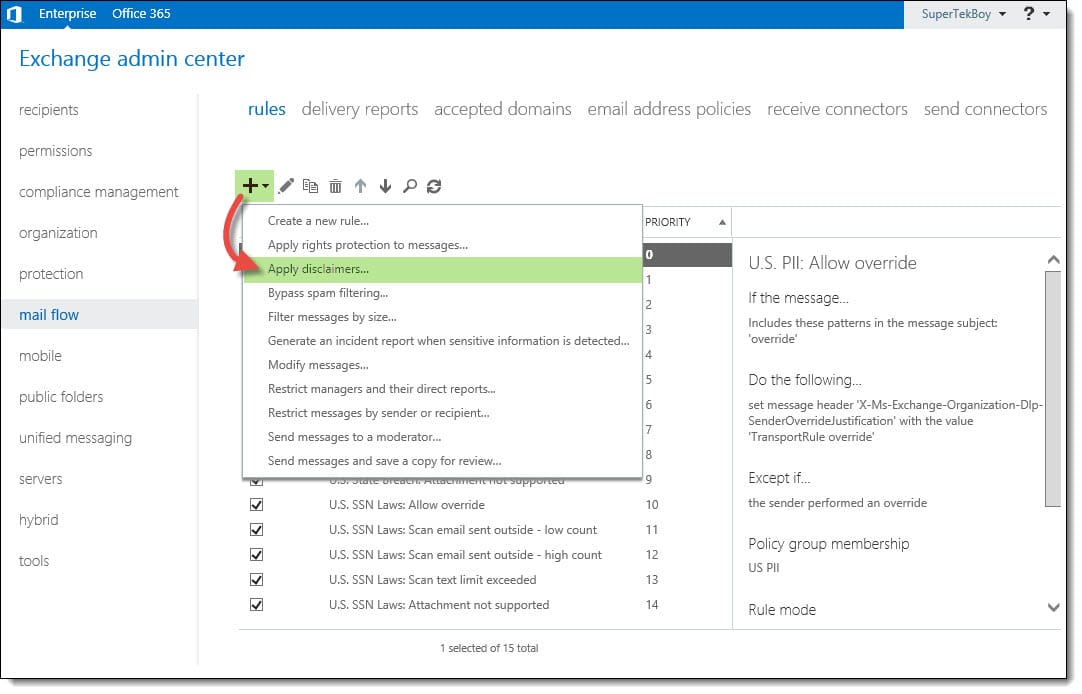
Log in to the Exchange Admin Center. Once logged in, navigate to Mail Flow >> Rules. Click the New (Excchange 2016 New) button.

From the drop-down menu, you will notice several choices. These choices are rule templates. We could just select Create a new rule. That would start us with a blank rule with no conditions. However, to give us a head start lets pick the Apply disclaimers template. This will configure a couple of items for us.

Add a legal disclaimer to all outbound email Exchange Office 365
[Read more…] about Add a legal disclaimer to all outbound email (Exchange/O365)
Share
Tweet
Share

Filed Under: Exchange Tutorials, Office 365 RSS, Office 365 Tutorials

Configure Kemp Load Balancer for Exchange 2013, 2016, and 2019

November 17, 2015 By Gareth Gudger 39 Comments

Share
Tweet
Share

With each release of Exchange, we have seen a substantial shift in the way it required load balancers to be configured. For example, between Exchange 2010 and 2013, the requirement for session affinity was dropped. This allowed multiple requests from a single client to take different paths to its mailbox. It no longer mattered which client access servers in a site were involved in the session. This was a contrast to 2010, when a client session had to maintain a single path at all times. Ross Smith covers this in greater detail here.

Exchange 2013 also dropped support for traditional RPC connections. All client connections to Exchange 2013 were flipped to RPC over HTTP. Service Pack 1 saw another shift in client connectivity as it introduced the option of MAPI over HTTP (although disabled by default). This faster, leaner protocol allowed the Exchange Team to develop shorter failover times between servers. It introduced another virtual directory into the mix–the MAPI virtual directory–which would need to be load balanced as well.

Unlike its predecessor, Exchange 2016 did not see a shift in client connectivity. With Exchange 2016, an organization can choose between MAPI over HTTP, or, RPC over HTTP (although the former is now preferred).

Knowing the nuances between each version of Exchange can be daunting. Equally daunting is the configuration of the load balancer itself. But it doesn’t have to be.

A good vendor will give you instructions on load balancing Exchange.
A great vendor will give you a template to automate the setup.

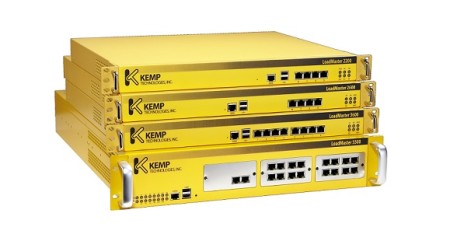
Load Balancer Produkte Familie Kemp Technologies

This is lucky because this article is about a great vendor.

In this article, we configure the Kemp load balancer to provide high availability for Exchange 2016. If you don’t have a load balancer, you can download one for free from Kemp. Kemp’s free appliance is what we will use in this guide.

Don’t worry. Despite the focus being on Kemp, you can translate these principles to any vendor.

Let’s get started!

Disclaimer: I need to point out that I am not sponsored by Kemp in any way. However, this document does contain some affiliate links.

The environment

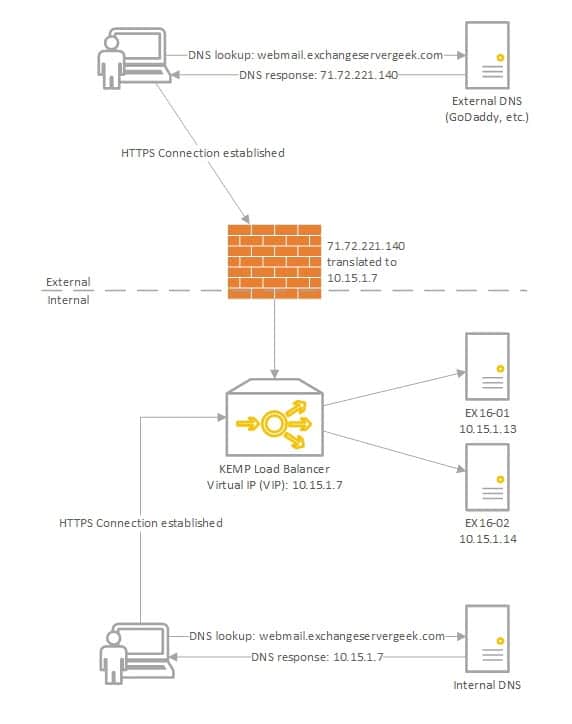
In our example below, we plan to have two Exchange 2016 servers behind a load balancer in a single site; EX16-01 and EX16-02.

Load Balancing Exchange 2016 Kemp VLB
[Read more…] about Configure Kemp Load Balancer for Exchange 2013, 2016, and 2019
Share
Tweet
Share

Filed Under: Exchange Tutorials, Kemp Load Balancers, Other Tech

  • « Go to Previous Page
  • Page 1
  • Page 2
  • Page 3
  • Page 4
  • Page 5
  • Page 6
  • Interim pages omitted …
  • Page 10
  • Go to Next Page »

Primary Sidebar

Want to stay up to date?

Sidebar Form

Join thousands of IT professionals and get the latest Exchange & Office 365 tips and tutorials direct to your inbox

DigiCert Banner 300x348

(help support us using our affiliate link)

Footer

Site Navigation

  • Subscribe to blog
  • About SuperTekBoy
  • Disclaimer
  • Privacy & Cookies
  • Contact Us

Want to stay up to date?

Footer Form

Join thousands of IT professionals and get the latest Exchange & Office 365 tips and tutorials direct to your inbox

Join the conversation

  • Twitter
  • LinkedIn
  • Facebook
  • RSS

Copyright © 2026 · SuperTekBoy LLC