• Skip to primary navigation
  • Skip to main content
  • Skip to primary sidebar
  • Skip to footer

SuperTekBoy

Practical Help for Exchange & Office 365

  • Exchange
    • News
    • Tutorials
    • Solve a Problem
    • Videos & Podcasts
  • Office 365
    • News
    • Tutorials
    • Solve a Problem
    • Videos & Podcasts
  • Outlook
    • Tutorials
    • Solve a Problem
    • Videos & Podcasts
  • Windows
    • News
    • Tutorials
    • Solve a Problem
    • Videos & Podcasts
  • Quick Links…
    • Generate or Renew SSL Certs for Exchange
    • Connect PowerShell to Exchange Online
    • Connect PowerShell to Office 365
    • Extend Schema for Exchange
    • Exchange Schema & Build Numbers
  • More…
    • Kemp Load Balancers
    • Other tech…
    • About SuperTekBoy
    • Contact Us

Exchange

Install Exchange 2016 in your lab (Part 7)

September 30, 2015 By Gareth Gudger 25 Comments

20 Shares
Share
Tweet
Share
Reddit
Print
Exchange 2013 & 2016 Big Logo

In the sixth part of our Exchange lab series we:

  • Moved our databases
  • Changed the Database Name
  • Enabled Circular Logging

In the final part of our Exchange lab series we:

  • Move test users via the Exchange Admin Center
  • Move test users via PowerShell
  • Outlook on the Web (formerly Outlook Web App)

Let’s get started!

Move test users via the Exchange Admin Center

Now that we have our database situated let’s move some users.

Log in to the Exchange Admin Center and select Migration from the Recipients tab.

Select the New (Excchange 2016 New) button then Move to a different database.

Exchange 2016 Move User A

On the New Local Move Request dialog we can either select the user we want to move from a directory lookup or, we can import those users from a CSV file. For this example, we will just pick a couple of users from the directory. In this case, pick Select the users that you want to move and click the Add (Add button) button.

Exchange 2016 Move User B

On the Select a Mailbox dialog, pick the mailboxes you wish to move. Then click Add. To remove a mailbox click the [remove] link to the right of its name. Once you have all the desired mailboxes click OK.

[Read more…] about Install Exchange 2016 in your lab (Part 7)

Filed Under: Exchange, Exchange Tutorials

Install Exchange 2016 in your lab (Part 6)

September 29, 2015 By Gareth Gudger Leave a Comment

27 Shares
Share
Tweet
Share
Reddit
Print
Exchange 2013 & 2016 Big Logo

In the fifth part of our Exchange lab series we:

  • Generated a certificate request
  • Processed a certificate request
  • Completed a certificate request
  • Assigned services to a certificate
  • Checked our work

In the sixth part of our Exchange lab series we:

  • Move our databases
  • Change the Database Name
  • Enable Circular Logging

Let’s get started.

Move our databases

In part one of our series, we discussed our drive layout. We stated that the E drive would contain the Exchange install directory, L would contain the log folder and, M would contain the mailbox database. We decided to use regular drive letters to keep things simple as we only planned to use a couple of databases in our lab. In summary, this is what we proposed.

DriveSizePurpose
C:50 GBOperating System
E:50 GBExchange Install Directory
M:10 GBDatabases
L:5 GBLogs

But there is a gotcha. If you log into EAC, browse to the database tab and, edit your database you may notice there is no way to move the database path.

This changed back in Exchange 2013. Moving the database and log files is only possible through the Exchange Management Shell (EMS). This differs from earlier versions of Exchange where you could do this from the GUI.

Move Database Path EAC 2016

That said let’s open the Exchange Management Shell (EMS).

First, let’s get the name of the database. We do this with the following command.

 C:\> Get-MailboxDatabase

You will get an output like the one below.

 C:\> Get-MailboxDatabase

Name                           Server     Recovery   ReplicationType
----                           ------     --------   ---------------
Daleks Database                EX13-01    False      Remote
Time Travel Research           EX13-01    False      Remote
Mailbox Database 1988836857    EX16-01    False      None

From this output, you can see we have three databases in our environment. ‘Daleks Database’ and ‘Time Travel Research’ are currently mounted on an Exchange 2013 server named EX13-01. The database that was created when we installed Exchange 2016 is ‘Mailbox Database 1988836857′. Let’s change both the path and the name of this database.

To move the database and log folder path we want to use the Move-DatabasePath cmdlet. Not only will this cmdlet change the path of our database but we can also opt to change the name of our EDB (database) file as well. Currently, the name of the EDB file matches the name of the database. This is ‘Mailbox Database 1899118761.edb’. During the move, we will change this to ‘Doctors Companions.edb’. Changing the name of the file does not change the name of the database in Exchange. We will tackle that later.

[Read more…] about Install Exchange 2016 in your lab (Part 6)

Filed Under: Exchange, Exchange Tutorials

Install Exchange 2016 in your lab (Part 5)

September 22, 2015 By Gareth Gudger 11 Comments

60 Shares
Share
Tweet
Share
Reddit
Print
Exchange 2013 & 2016 Big Logo

In the fourth part of our Exchange lab series we:

  • Discussed the importance of a correctly configured namespace
  • Configured URLs via Exchange Admin Center (EAC)
  • Configured URLs via PowerShell
  • Configured split DNS

In the fifth part of our Exchange lab series we:

  • Generate a certificate request
  • Process a certificate request
  • Complete a certificate request
  • Assign services to a certificate
  • Check our work

Let’s get started.

Generate a Certificate Request

In the last part of our series, we got our namespace configured. Now we need to make sure we have a certificate for that namespace.

Note: Adding a certificate to your lab is optional. Whether you choose to go with a certificate really depends on how close to a production experience you want to be. You can always purchase a certificate for your lab and import it into production later on. If a certificate is not critical for your lab experience you may still wish to review this section in preparation for production.

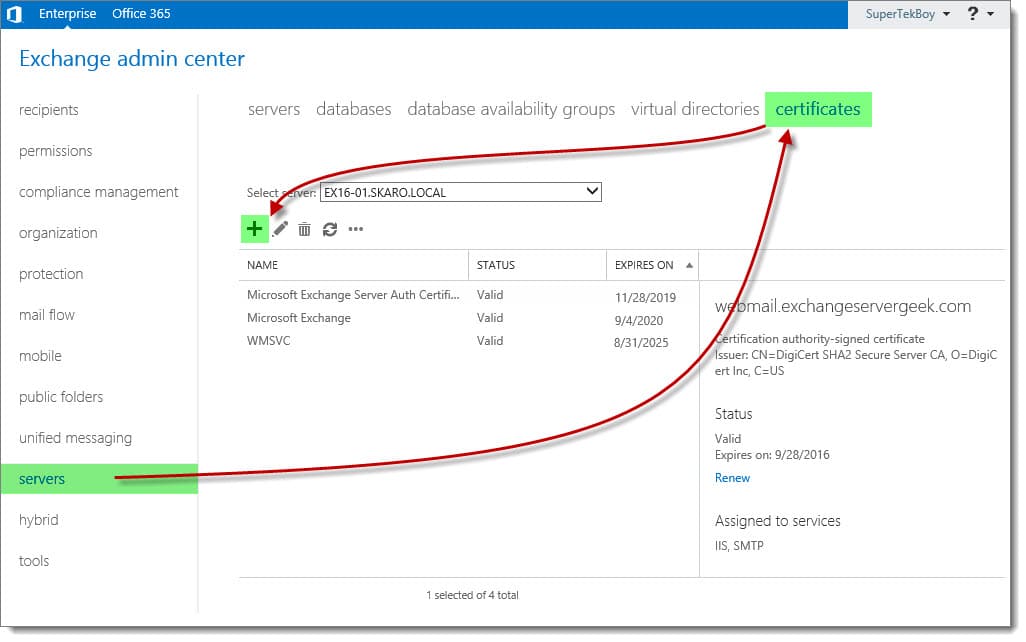
Log in to the Exchange Admin Center (EAC). Select the Servers tab and Certificates sub-tab.

This page displays all currently installed Exchange certificates. These three self-signed certificates are installed with Exchange out of the box. The self-signed certificate titled “Microsoft Exchange” is the one that Exchange is currently using for all of its web services. That’s the one that we will replace with a trusted 3rd party certificate.

Like its predecessor, Exchange 2016 maintains the Certificate Request Wizard. This wizard takes all the guesswork out of generating a certificate request.

To launch the wizard click the New (Add button) button.

Generate a Certificate Request in Exchange 2016 A2

In the New Exchange Certificate wizard select Create a request for a certificate from a certification authority. Click Next.

[Read more…] about Install Exchange 2016 in your lab (Part 5)

Filed Under: Exchange, Exchange Tutorials

Install Exchange 2016 in your lab (Part 4)

September 17, 2015 By Gareth Gudger 15 Comments

66 Shares
Share
Tweet
Share
Reddit
Print
Exchange 2013 & 2016 Big Logo

In the third part of our Exchange lab series we:

  • Installed Exchange 2016 with the graphical setup
  • Installed Exchange 2016 with the command line

In the fourth part of our Exchange lab series we:

  • Discuss the importance of a correctly configured namespace
  • Configure URLs via Exchange Admin Center (EAC)
  • Configure URLs via PowerShell
  • Configure Split-DNS

Let’s get started!

Note: For instructions on previous versions of Exchange check the following articles:
Designing a simple namespace for Exchange 2013
Designing a simple namespace for Exchange 2010

What’s in a namespace?

A namespace is critically important.

Not only does namespace govern the availability of services like Outlook Web App, or, ActiveSync, but it also governs items such as the distribution of the Offline Address Book, or, Autodiscover. In addition–beginning with Exchange 2013 and continued with 2016–all client requests are made over HTTPS versus straight TCP/IP. This means Outlook Anywhere now manages Outlook connectivity internally as well as externally.

It is imperative we correctly configure our URLs and apply a certificate containing those URLs. Otherwise, our clients won’t be able to establish the necessary SSL connections. Which will lead to all sorts of problems.

Out of the box, Exchange configures its internal URLs to match its internal hostname. It leaves its external URLs blank. Due to recent restrictions, third-party certificate providers no longer allow internal hostnames on certificates. An example of an internal hostname would be anything that ends .LOCAL or .PRIV. In short, it is any top-level domain that is not routable on the internet.

The challenge? If our internal hostnames cannot be found on our certificate it will give our test users a variety of security warnings. This makes it difficult to use internal hostnames with Exchange.

The simplest solution? Don’t use internal hostnames. Instead, use only external hostnames. We will use the same external hostname for both our internal and external URLs. Our URLs for each service will be as follows:

ServiceInternal and External URL
AutoDiscoverhttps://autodiscover.exchangeservergeek.com/Autodiscover/Autodiscover.xml
Exchange Control Panelhttps://webmail.exchangeservergeek.com/ecp
Exchange Web Serviceshttps://webmail.exchangeservergeek.com/EWS/Exchange.asmx
Exchange ActiveSynchttps://webmail.exchangeservergeek.com/Microsoft-Server-ActiveSync
Offline Address Bookhttps://webmail.exchangeservergeek.com/OAB
Outlook Web Apphttps://webmail.exchangeservergeek.com/owa
MAPI over HTTPhttps://webmail.exchangeservergeek.com/mapi
Outlook Anywherewebmail.exchangeservergeek.com

That solves our certificate problem. But how does that work with DNS?

We do this by way of split-DNS. Split-DNS allows us to use the same URLs internally as we do externally. Split-DNS is a non-authoritative copy of our external DNS hosted internally. This non-authoritative copy uses the internal IPs of our servers (versus the public IPs the authoritative copy is using).

For example, our external DNS provider will resolve webmail.exchangeservergeek.com to 7172.

Exchange Split DNS

The need for split-DNS is to keep our local traffic on the local LAN. Without split-DNS, all local traffic would go out the firewall for name resolution only to try and come back in later with the public IP of Exchange. Not only is this an unnecessary detour for your internal clients–plus the unnecessary consumption of internet bandwidth–but most firewalls will block this kind of behavior deeming it suspicious.

[Read more…] about Install Exchange 2016 in your lab (Part 4)
66 Shares
Share
Tweet
Share
Reddit
Print

Filed Under: Exchange, Exchange Tutorials

Install Exchange 2016 in your lab (Part 2)

September 9, 2015 By Gareth Gudger 1 Comment

24 Shares
Share
Tweet
Share
Reddit
Print
Exchange 2013 & 2016 Big Logo

In part one of our Exchange 2016 lab series we:

  • Explored the options for building an Exchange lab
  • Reviewed the requirements for Exchange 2016
  • Built the Exchange 2016 virtual machine
  • Installed the base operating system with all updates

In the second part of our Exchange lab series we will:

  • Install Exchange 2016 mailbox server prerequisites
  • Extend the Active Directory schema for Exchange 2016

Let’s get started!

Exchange 2016 Mailbox Server Prerequisites

First, let’s get the operating system core components installed. To do this open a PowerShell console as the administrator.

PowerShell Run As Administrator

Then issue the following command.

Update: If using Windows Server 2016, drop the AS-HTTP-Activation component from the command.

 C:\> Install-WindowsFeature AS-HTTP-Activation, Server-Media-Foundation, NET-Framework-45-Features, RPC-over-HTTP-proxy, RSAT-Clustering, RSAT-Clustering-CmdInterface, RSAT-Clustering-Mgmt, RSAT-Clustering-PowerShell, Web-Mgmt-Console, WAS-Process-Model, Web-Asp-Net45, Web-Basic-Auth, Web-Client-Auth, Web-Digest-Auth, Web-Dir-Browsing, Web-Dyn-Compression, Web-Http-Errors, Web-Http-Logging, Web-Http-Redirect, Web-Http-Tracing, Web-ISAPI-Ext, Web-ISAPI-Filter, Web-Lgcy-Mgmt-Console, Web-Metabase, Web-Mgmt-Console, Web-Mgmt-Service, Web-Net-Ext45, Web-Request-Monitor, Web-Server, Web-Stat-Compression, Web-Static-Content, Web-Windows-Auth, Web-WMI, Windows-Identity-Foundation

This command may seem like a lot but in essence, it can be grouped into 4 sets of components being installed.

  • .NET 4.5 support
  • Internet Information Service (IIS)
  • Windows Failover Clustering
[Read more…] about Install Exchange 2016 in your lab (Part 2)

Filed Under: Exchange, Exchange Tutorials

Fatal error MrsHttpUnauthorizedException

August 6, 2015 By Gareth Gudger 2 Comments

27 Shares
Share
Tweet
Share
Reddit
Print

Recently I encountered the following error when completing a mailbox move from Exchange to Office 365.

  8/1/2015 12:00:00 AM [CY1PR11MB0001] Fatal error MrsHttpUnauthorizedException has occurred.

The initial sync had worked fine. The mailbox was AutoSuspended at 95%. It was ready to be completed. Yet, it did not want to go. I repeated a Resume-MoveRequest on a similar mailbox–same exact error.

Sadly, the interwebs seemed devoid of any real information. Luckily a good friend and colleague alerted me to the root cause. This error will occur if the password has changed on the account used to create the move request.

In my case, this had indeed happened.

The remedy for MrsHttpUnauthorizedException

To fix the issue we need to update the credentials on the move request. To do this we need to enlist the help of the Set-MoveRequest cmdlet. Let’s get started.

[Read more…] about Fatal error MrsHttpUnauthorizedException

Filed Under: Exchange, Exchange Solutions, Office 365, Office 365 RSS, Office 365 Solutions

RBAC hides the Office 365 Mailbox creation link

July 21, 2015 By Gareth Gudger 15 Comments

33 Shares
Share
Tweet
Share
Reddit
Print

If you have configured Exchange 2013 in hybrid mode then you have probably noticed the appearance of this link. It’s the Office 365 Mailbox creation link.

New Office 365 Mailbox link

However, if you have implemented RBAC this link may not show when you’d expect it to.

I ran into this recently when upgrading an Exchange 2010 hybrid environment to 2013. Previously the client had implemented RBAC where members of the helpdesk team were added to the Recipient Management group. In 2010 this allowed the helpdesk team to create and manage mail recipients; both on-premise and in the cloud. However, when this group attempted to use the 2013 management tools the Office 365 Mailbox link was absent.

After some digging–plus some trial and error–we quickly found an oddity. The short answer–it’s all based around one missing role entry. To see that link you need access to the Get-RemoteDomain command. Members of Recipient Management do not have this.

[Read more…] about RBAC hides the Office 365 Mailbox creation link

Filed Under: Exchange, Exchange Solutions, Office 365, Office 365 RSS, Office 365 Solutions

Unleashing the power of the AdminAuditLog

February 18, 2015 By Gareth Gudger 1 Comment

27 Shares
Share
Tweet
Share
Reddit
Print

Ever wonder, Who made that modification to my Exchange environment?

I have.

So how do we answer that question?

Behold! The great and powerful Admin Audit Log!

The Admin Audit Log was introduced in Exchange 2010. But, it still seems a best-kept secret. There are a couple of ways to get to it.

First, you can go through the EAC >> Compliance >> Auditing tabs. Then select Export Administrator Audit Log.

EAC Admin Audit Log

The second is via the Exchange Management Shell (EMS) through the Search-AdminAuditLog cmdlet. Let’s explore this method a little more.

[Read more…] about Unleashing the power of the AdminAuditLog

Filed Under: Exchange, Exchange Tutorials, Office 365

  • « Go to Previous Page
  • Go to page 1
  • Go to page 2
  • Go to page 3
  • Go to page 4
  • Go to Next Page »

Primary Sidebar

Want to stay up to date?

Join thousands of IT professionals and get the latest Exchange & Office 365 tips and tutorials direct to your inbox

My favorite book on all things Office 365! Continually updated with fresh content by MVPs Tony Redmond, Paul Robichaux, Brian Desmond, Ståle Hansen & more! Get the eBook
Office 365 for IT Pros 7th Edition
(affiliate banner)

Free Kemp Loadbalancer 300x300
(affiliate banner)

Passware

(affiliate banner)

DigiCert SSL certificate for Microsoft Exchange

(affiliate banner)

Footer

Site Navigation

  • Subscribe to blog
  • About SuperTekBoy
  • Disclaimer
  • Privacy & Cookies
  • Contact Us

Want to stay up to date?

Join thousands of IT professionals and get the latest Exchange & Office 365 tips and tutorials direct to your inbox

Join the conversation

  • Twitter
  • LinkedIn
  • Facebook
  • YouTube
  • RSS

Copyright © 2021 · SuperTekBoy LLC